Whirlpool WFE366LVT Owners Manual
Whirlpool WFE366LVT - 30 IN SC CLEANTOP CERAN5 Manual
 |
UPC - 883049138756
View all Whirlpool WFE366LVT manuals
Add to My Manuals
Save this manual to your list of manuals |
Whirlpool WFE366LVT manual content summary:
- Whirlpool WFE366LVT | Owners Manual - Page 1
Racks and Bakeware 7 Oven Vent 7 Baking and Roasting 7 Broiling 7 Convection Baking and Roasting 8 Timed Cooking (on some models 8 RANGE CARE 8 Self-Cleaning Cycle (on some models 8 SteamClean (on some models 9 General Cleaning 9 Oven Light 10 TROUBLESHOOTING 10 ACCESSORIES 11 WARRANTY - Whirlpool WFE366LVT | Owners Manual - Page 2
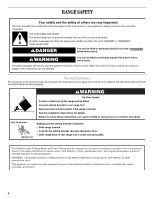
range and be killed. Connect anti-tip bracket to rear range foot. Reconnect the anti-tip bracket, if the range is moved. See the installation instructions for details. Failure to follow these instructions reproductive harm. This appliance can cause low-level exposure to some of the substances listed, - Whirlpool WFE366LVT | Owners Manual - Page 3
or oven bottoms, except as suggested in the manual. Improper installation of these liners may result in a risk of electric shock, or fire. ■ Glazed Cooking Utensils - Only certain types of glass, glass/ceramic, ceramic, earthenware, or other glazed utensils are suitable for range-top service without - Whirlpool WFE366LVT | Owners Manual - Page 4
a manual switch located on the top left corner of the range. While the oven door is closed, press the oven light switch to turn the light on and off. The oven light will come on when the oven door is opened. The oven light will not come on during the Self-Clean cycle. SELF-CLEAN Self-clean cycle - Whirlpool WFE366LVT | Owners Manual - Page 5
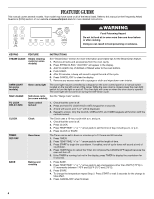
be set to anywhere between HI and LO. Push in and turn to setting. REMEMBER: When range is in use or (on some models) during the Self-Cleaning cycle, the entire cooktop area may become hot. Ceramic Glass The surface cooking area will glow red when an element is on. It may cycle on and - Whirlpool WFE366LVT | Owners Manual - Page 6
in use. Tones Tones are audible signals, indicating the following: Basic Functions One tone ■ Valid pad press ■ Oven is preheated (long tone) ■ Function has been entered ■ Reminder (on some models), repeating each minute after the end-of-cycle tones Three tones ■ Invalid pad press Four tones ■ End - Whirlpool WFE366LVT | Owners Manual - Page 7
cooking and cleaning results. Do not set plastics, paper or other items that could melt or burn near the oven vent. A. Oven vent (ceramic glass model) Baking and Roasting ACCUBAKE® Temperature Management System (on some models) The ACCUBAKE® system electronically regulates the oven heat levels - Whirlpool WFE366LVT | Owners Manual - Page 8
oven will shut off automatically and "End" will appear on the display. 8. Press OFF/CANCEL to clear the display. RANGE CARE Self-Cleaning Cycle (on some models) WARNING Prepare Range Keep children away from oven during Self-Cleaning cycle. Failure to follow these instructions can result in burns - Whirlpool WFE366LVT | Owners Manual - Page 9
: ■ Glass cleaner, mild liquid cleaner or nonabrasive scrubbing pad: Gently clean around the model and serial number plate because scrubbing may remove numbers. ■ All-Purpose Appliance Cleaner Part Number 31682 (not included): See cover for contact information. STAINLESS STEEL (on some models) NOTE - Whirlpool WFE366LVT | Owners Manual - Page 10
the problem continues, call an electrician. Cooktop will not operate ■ Is the control knob set correctly? Push in knob before turning to a setting. ■ On ceramic glass models, is the oven control lockout set? See the control lock keypad feature in the "Feature Guide" section. ■ Has a self-clean cycle - Whirlpool WFE366LVT | Owners Manual - Page 11
the way. ■ Has the function been entered? See "Self-Cleaning Cycle" section. ■ Has a delay start been set? See "Timed Cooking" section. Oven cooking results not what expected ■ Is the range level? Level the range. See the Installation Instructions. ■ Is the proper temperature set? Double-check the - Whirlpool WFE366LVT | Owners Manual - Page 12
to instructions attached to or furnished with the product, Whirlpool Corporation or Whirlpool Canada LP (hereafter "Whirlpool") will pay for Factory Specified Parts and repair labor to correct defects in materials or workmanship. Service must be provided by a Whirlpool designated service company
-
 1
1 -
 2
2 -
 3
3 -
 4
4 -
 5
5 -
 6
6 -
 7
7 -
8
-
9
-
10
-
11
-
12
 |
 |

THANK YOU for purchasing this high-quality product. If you should experience a problem not covered in TROUBLESHOOTING,
please visit our website at
www.whirlpool.com
for additional information. If you still need assistance, call us at 1-800-253-1301.
You will need your model and serial number located on the oven frame behind the storage drawer panel.
Para obtener acceso a “Instrucciones para el usuario de la estufa eléctrica” en español, o para obtener información adicional acerca
de su producto, visite:
www.whirlpool.com
Tenga listo su número de modelo completo. Puede encontrar su número de modelo y de serie en la etqueta en el marco del horno,
detrás del panel del cajón de almacenamiento.
®
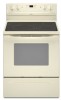
ELECTRIC RANGE
USER INSTRUCTIONS
Table of Contents
RANGE SAFETY
.......................................................................................
2
The Anti-Tip Bracket
.............................................................................
2
FEATURE GUIDE
.....................................................................................
4
COOKTOP USE
........................................................................................
5
OVEN USE
................................................................................................
6
Electronic Oven Controls
......................................................................
6
Aluminum Foil
........................................................................................
6
Positioning Racks and Bakeware
.........................................................
7
Oven Vent
..............................................................................................
7
Baking and Roasting
.............................................................................
7
Broiling
..................................................................................................
7
Convection Baking and Roasting
.........................................................
8
Timed Cooking (on some models)
........................................................
8
RANGE CARE
...........................................................................................
8
Self-Cleaning Cycle (on some models)
................................................
8
SteamClean (on some models)
.............................................................
9
General Cleaning
...................................................................................
9
Oven Light
...........................................................................................
10
TROUBLESHOOTING
............................................................................
10
ACCESSORIES
......................................................................................
11
WARRANTY
............................................................................................
12
W10200357B