Whirlpool WFE374LVS Owners Manual - Page 9
SteamClean, General Cleaning - range parts
 |
View all Whirlpool WFE374LVS manuals
Add to My Manuals
Save this manual to your list of manuals |
Page 9 highlights
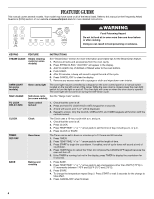
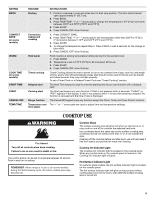
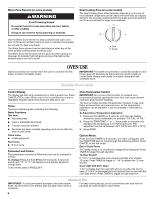
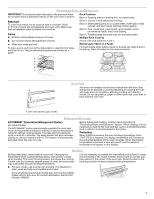
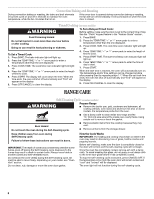
Electronic Oven Control with Adjustable Clean Time (on some models) The SELF CLEAN self-cleaning cycle is time adjustable between 2 hours 30 minutes and 4 hours 30 minutes in 15-minute increments. Suggested clean times are 2 hours 30 minutes for light soil, and 4 hours 30 minutes for heavy soil. The last 30 minutes of the cycle is for cool down. To Self-Clean: 1. Press SELF CLEAN. 2. Press the TEMP/TIME "+" or "-" arrow pads to enter the desired self-clean cycle time. 3. Press START. The oven door will automatically lock. The DOOR LOCKED and CLEAN indicator lights will be displayed. The time remaining will also be displayed. 4. When the self-clean cycle is complete and the oven cools, the DOOR LOCKED and CLEAN indicator lights will turn off. 5. When the oven is completely cooled, remove ash with a damp cloth. SteamClean (on some models) The SteamClean feature is designed for light oven cavity bottom cleaning. Allow the range to cool to room temperature before using the SteamClean feature. If your oven cavity is above 100°F (38°C), "OVEN COOLING" will appear in the display and the SteamClean feature will not activate until it cools down. ■ Remove all racks and accessories from the oven cavity. ■ For best results, use 10 oz (295 mL) of distilled or filtered water. ■ The SteamClean feature will take a total of 20 minutes. A beep will sound at the end of the cycle. IMPORTANT: Since the water in the oven bottom is hot, do not open the oven door during the SteamClean cycle. Press CANCEL/OFF at any time to end the cycle. The display will return to the time of day. Helpful Hints ■ Once the SteamClean cycle is complete, remove all remaining water in the bottom of the oven with a sponge or cloth. ■ Wipe any remaining moisture from the oven door interior, oven cavity interior sides, and cooktop. ■ Use a soft brush or nylon scrubber to wipe the oven interior. This may help with more stubborn stains. ■ It is recommended to use distilled or filtered water, as tap water may leave mineral deposits on the oven bottom. Use a cloth soaked with vinegar or lemon juice to remove any mineral deposits that may be left after the SteamClean cycle. ■ If the oven is heavily soiled, use the Self-Clean cycle. The SteamClean cycle may be used first to eliminate most of the debris, resulting in a more effective self-clean. General Cleaning IMPORTANT: Before cleaning, make sure all controls are off and the oven and cooktop are cool. Always follow label instructions on cleaning products. For additional information, you can visit the Frequently Asked Questions (FAQs) section of our website at www.whirlpool.com. Soap, water and a soft cloth or sponge are suggested first unless otherwise noted. METALLIC PAINT (on some models) Do not use abrasive cleaners, cleaners with bleach, rust removers, ammonia or sodium hydroxide (lye) because paint surface may stain. CERAMIC GLASS (on some models) EXTERIOR PORCELAIN ENAMEL SURFACES (on some models) Food spills containing acids, such as vinegar and tomato, should be cleaned as soon as the entire range is cool. These spills may affect the finish. Cleaning Method: ■ Glass cleaner, mild liquid cleaner or nonabrasive scrubbing pad: Gently clean around the model and serial number plate because scrubbing may remove numbers. ■ All-Purpose Appliance Cleaner Part Number 31682 (not included): See cover for contact information. STAINLESS STEEL (on some models) NOTE: To avoid damage to stainless steel surfaces, do not use soap-filled scouring pads, abrasive cleaners, Cooktop Cleaner, steel-wool pads, gritty washcloths or abrasive paper towels. Damage may occur to stainless steel surfaces, even with one-time or limited use. Cleaning Method: Rub in direction of grain to avoid damaging. ■ Stainless Steel Cleaner and Polish Part Number 31462: See cover for contact information. Liquid detergent or all-purpose cleaner: Rinse with clean water and dry with soft, lint-free cloth. Cleaning Method: Cooktop Cleaner Part Number 31464 is recommended regularly to help avoid scratches, pitting and abrasions and to condition the cooktop. Cooktop Scraper Part Number WA906B is also recommended for stubborn soils. These can be ordered as accessories. See cover for contact information. The Cooktop Scraper uses razor blades. Store razor blades out of the reach of children. Do not use steel wool, abrasive powder cleansers, chlorine bleach, rust remover or ammonia because damage may occur. Light to moderate soil ■ Clean with paper towels or clean damp sponge Sugary spills (jellies, candy, syrup) ■ Clean with cooktop scraper and cooktop cleaner. Scrape off sugary spills while the cooktop is still warm. You may want to wear oven mitts while cleaning the cooktop. Heavy soil, dark streaks, specks and discoloration ■ Clean with Cooktop Cleaner or nonabrasive cleanser: Burned-on soil ■ Clean with Cooktop Cleaner and Cooktop Scraper. Metal marks from aluminum and copper ■ Clean with Cooktop Cleaner as soon as cooktop has cooled down. The marks will not totally disappear, but after many cleanings they will become less noticeable. 9
-
 1
1 -
2
-
3
-
 4
4 -
 5
5 -
 6
6 -
 7
7 -
 8
8 -
 9
9 -
 10
10 -
 11
11 -
 12
12
 |
 |