Whirlpool WFE505W0J Installation Instructions
Whirlpool WFE505W0J Manual
 |
View all Whirlpool WFE505W0J manuals
Add to My Manuals
Save this manual to your list of manuals |
Whirlpool WFE505W0J manual content summary:
- Whirlpool WFE505W0J | Installation Instructions - Page 1
3 Tools and Parts 3 Location Requirements 3 Electrical Requirements- U.S.A. Only......5 Electrical Requirements - Canada Only...6 INSTALLATION INSTRUCTIONS 6 Unpack Range 6 Install Anti-Tip Bracket 7 Electrical Connection - U.S.A. Only.........8 Verify Anti-Tip Bracket Is Installed and Engaged - Whirlpool WFE505W0J | Installation Instructions - Page 2
foot is engaged in the slot of the anti-tip bracket. Re-engage anti-tip bracket if range is moved. Do not operate range without anti-tip bracket installed and engaged. Failure to follow these instructions can result in death or serious burns to children and adults. Anti-Tip Bracket To verify the - Whirlpool WFE505W0J | Installation Instructions - Page 3
responsibility to comply with installation clearances specified on the model/serial/rating plate. The model/serial/rating plate is located on the frame behind require: ■■ When this range is installed in a mobile home, it must be secured according to the instructions in this document. ■■ - Whirlpool WFE505W0J | Installation Instructions - Page 4
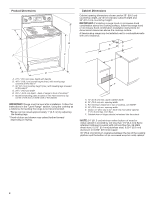
255/16" (64.3 cm) depth - back of range to front of cooktop** F. Model/serial/rating plate (located on the frame behind a top corner of the door or either side of the drawer) IMPORTANT: Range must be level after installation. Follow the instructions in the "Level Range" section. Using the cooktop as - Whirlpool WFE505W0J | Installation Instructions - Page 5
instructions provided for it here. ■■ Range must be connected to the proper electrical voltage and frequency as specified on the model/serial rating plate. The model . ■■ Allow 2 to 3 ft (61.0 cm to 91.4 cm) of slack in the line so that the range can be moved if servicing is ever necessary. ■■ A - Whirlpool WFE505W0J | Installation Instructions - Page 6
-50R wall receptacle. Be sure the wall receptacle is within reach of range's final location. ■■ Do not use an extension cord. INSTALLATION INSTRUCTIONS Unpack Range WARNING Excessive Weight Hazard Use two or more people to move and install range. Failure to do so can result in back or other injury - Whirlpool WFE505W0J | Installation Instructions - Page 7
Rear position Front position Diagonal (2 options) Tip Over Hazard A child or adult can tip the range and be killed. Install anti-tip bracket to floor or wall per installation instructions. Slide range back so rear range foot is engaged in the slot of the anti-tip bracket. Re-engage anti-tip - Whirlpool WFE505W0J | Installation Instructions - Page 8
power before servicing. Use 8 gauge copper or 6 gauge aluminum wire. Electrically ground range. Failure to follow these instructions can result each side B. Terminal block cover C. Hex-head screws 3. Depending on your model, remove the plastic tag holding three 10-32 hex nuts from the middle post - Whirlpool WFE505W0J | Installation Instructions - Page 9
screw against the flexible conduit. 5. Complete installation following instructions for your type of electrical connection: 4-wire ( Use a Phillips screwdriver to remove the ground-link screw from the back of the range. Save the ground-link screw and the end of the ground link under the screw - Whirlpool WFE505W0J | Installation Instructions - Page 10
neutral wire of power supply cord. 1. Feed the power supply cord through the strain relief on the cord/conduit plate on bottom of range. Allow enough slack to easily attach the wiring to the terminal block. A B C D D B C A. 10-32 hex nut B. Line 2 (red) C. Ground-link screw D. Neutral (white - Whirlpool WFE505W0J | Installation Instructions - Page 11
out and removed. A B C A. Metal ground strap B. Discard C. Ground-link screw 2. Use a Phillips screwdriver to remove the ground-link screw from the back of the range. Save the ground-link screw and the end of the ground link under the screw. 3. Pull the wires through the strain relief on bottom of - Whirlpool WFE505W0J | Installation Instructions - Page 12
the mounting wall. If you need assistance or service, refer to the "Assistance or Service" section of the Use and Care Guide, or the cover or "Warranty" section of the User Instructions, for contact information. 6. Repeat steps 1 and 2 to ensure that the range foot is engaged in the anti-tip bracket - Whirlpool WFE505W0J | Installation Instructions - Page 13
or Steam Clean by referring to the "Range Care" section of the User Instructions. For Ranges with AquaLift® Technology or Steam Clean: 1. and check levelness of the range, first side-to-side; then front to back. Warming Drawer or Premium Storage Drawer (on some models) Remove all items from inside - Whirlpool WFE505W0J | Installation Instructions - Page 14
Storage Drawer (on some models) The storage drawer can be removed. Before removing, make sure For more information, read the "Range Care" section of the Use and Care Guide or User Instructions. 6. Read the "Range Use" section of the Use and Care Guide or User Instructions. 7. Plug power cord into - Whirlpool WFE505W0J | Installation Instructions - Page 15
to verify the electrical supply. ■■ See "Troubleshooting" in the Use and Care Guide or User Instructions. When the range has been on for 5 minutes, check for heat. If range is cold, turn off the range and contact a qualified technician. Moving the Range WARNING Tip Over Hazard A child or adult - Whirlpool WFE505W0J | Installation Instructions - Page 16
Fixer la bride antibasculement au plancher ou au mur, conformément aux instructions d'installation. Faire glisser de nouveau la cuisinière de façon à antibasculement n'est pas installée et engagée. Le non-respect de ces instructions peut causer un décès ou des brûlures graves aux enfants et aux - Whirlpool WFE505W0J | Installation Instructions - Page 17
alimentation (homologation UL) conçu pour l'utilisation avec une cuisinière. Pour service 250 V minimum, 40 A ou 50 A, compatible avec une ouverture de ée dans une résidence mobile, elle doit être fixée selon les instructions de ce document. ■■ Pour une installation dans une résidence mobile, un - Whirlpool WFE505W0J | Installation Instructions - Page 18
ère un coin supérieur de la porte ou de chaque côté du tiroir) IMPORTANT : La cuisinière doit être d'aplomb après l'installation. Suivre les instructions de la section "Réglage de l'aplomb de la cuisinière". Il n'est pas recommandé d'utiliser la table de cuisson comme référence pour établir l'aplomb - Whirlpool WFE505W0J | Installation Instructions - Page 19
électrique Pour installer la cuisinière de façon appropriée, il faut établir le type de raccords électriques que l'on utilisera et suivre les instructions de ce document. ■■ La cuisinière doit être alimentée par une source d'électricité et une tension appropriées, comme spécifiée sur la plaque - Whirlpool WFE505W0J | Installation Instructions - Page 20
électrique. AVERTISSEMENT Risque du poids excessif Utiliser deux ou plus de personnes pour déplacer et installer la cuisinière. Le non-respect de cette instruction peut causer une blessure au dos ou d'autre blessure. Si l'on utilise un conducteur distinct de liaison à la terre lorsque les codes le - Whirlpool WFE505W0J | Installation Instructions - Page 21
Fixer la bride antibasculement au plancher ou au mur, conformément aux instructions d'installation. Faire glisser de nouveau la cuisinière de façon bride antibasculement n'est pas installée et engagée. Le non-respect de ces instructions peut causer un décès ou des brûlures graves aux enfants et aux - Whirlpool WFE505W0J | Installation Instructions - Page 22
entretien. Utiliser des conducteurs en cuivre de calibre 8 ou en aluminium de calibre 6. Relier la cuisinière à la terre. Le non-respect de ces instructions peut causer un décès, un incendie ou un choc électrique. OU Retirer l'écrou hexagonal 10-32 de chacun des trois boîtiers de raccordement, puis - Whirlpool WFE505W0J | Installation Instructions - Page 23
B C A. Barrette de liaison à la terre métallique B. Partie à éliminer C. Vis de liaison à la terre 5. Terminer l'installation selon les instructions adaptées au type de raccordement électrique : 4 conducteurs (recommandé) 3 conducteurs (si un circuit à 4 conducteurs n'est pas disponible) Options de - Whirlpool WFE505W0J | Installation Instructions - Page 24
4. À l'aide d'un tournevis cruciforme, connecter le conducteur de mise à la terre vert du cordon d'alimentation à la cuisinière en serrant la vis de liaison à la terre et à la section de liaison à la terre. Le conducteur de mise à la terre doit être raccordé en premier. 5. À l'aide d'un tourne-écrou - Whirlpool WFE505W0J | Installation Instructions - Page 25
1. Une partie de la barrette métallique de terre doit être coupée et retirée. A B C A. Barrette de liaison à la terre métallique B. Partie à éliminer C. Vis de liaison à la terre 2. À l'aide d'un tournevis cruciforme, retirer la vis de liaison à la terre à l'arrière de la cuisinière. Conserver la - Whirlpool WFE505W0J | Installation Instructions - Page 26
et la paroi de montage. Pour assistance ou un entretien, consulter la section "Assistance ou service" du guide d'utilisation et d'entretien, la couverture ou la section "Garantie" des instructions d'utilisation pour obtenir les coordonnées des personnes à contacter. 6. Répéter les étapes 1 et 2 pour - Whirlpool WFE505W0J | Installation Instructions - Page 27
nivellement arrière se dégage de la bride antibasculement. 3. Suivre les instructions fournies pour le type 1 ou 2, en fonction du type de tiroir nivellement arrière se dégage de la bride antibasculement. 4. Suivre les instructions fournies pour le type 1 ou 2, en fonction du type de tiroir fourni - Whirlpool WFE505W0J | Installation Instructions - Page 28
prise de courant appropriée. Mettre l'appareil sous tension. 8. Mettre en marche les brûleurs de surface et le four. Consulter le Guide d'utilisation et d'entretien ou les instructions d'utilisation pour des instructions spécifiques sur le fonctionnement de la cuisinière. A. Loquet de charnière 28 - Whirlpool WFE505W0J | Installation Instructions - Page 29
défectueux. Demander à un électricien qualifié d'inspecter le circuit d'alimentation électrique. ■■ Voir la section "Dépannage" dans le guide d'utilisation et d'entretien ou les instructions d'utilisation. Après 5 minutes de fonctionnement de la cuisinière, vérifier la chaleur. Si la cuisinière est - Whirlpool WFE505W0J | Installation Instructions - Page 30
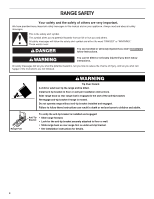
SEGURIDAD DE LA COCINA Su seguridad y la seguridad de los demás es muy importante. Hemos incluido muchos mensajes importantes de seguridad en este manual y en su electrodoméstico. Lea y obedezca siempre todos los mensajes de seguridad. Este es el símbolo de alerta de seguridad. Este símbolo le - Whirlpool WFE505W0J | Installation Instructions - Page 31
Destornillador Phillips ■■ Trinquete de 1/4" (6,4 mm) ■■ Nivelada ■■ Sacatuercas de 1/4" (6,4 mm) ■■ Martillo ■■ Sacatuercas de 3/8" (1 cm) y 5/16" (7,9 mm) ■■ Taladro manual o eléctrico ■■ Broca de 1/8" (3,2 mm) ■■ Llave o pinza (para pisos de madera) Piezas suministradas Verifique que est - Whirlpool WFE505W0J | Installation Instructions - Page 32
Dimensiones del producto A F B C Dimensiones del gabinete Las dimensiones de la abertura del gabinete que se muestran son para una profundidad del mostrador de 25" (64,0 cm), una profundidad del gabinete de la base de 24" (61,0 cm) y una altura del mostrador de 36" (91,4 cm). IMPORTANTE: Si va a - Whirlpool WFE505W0J | Installation Instructions - Page 33
Requisitos eléctricos Requisitos eléctricos, en EE. UU. únicamente Si los códigos lo permiten y se emplea un cable de conexión a tierra separado, es recomendable que un instalador eléctrico calificado determine si la ruta de conexión a tierra y el calibre del cable están de acuerdo con los códigos - Whirlpool WFE505W0J | Installation Instructions - Page 34
Requisitos eléctricos - Solo en Canadá ADVERTENCIA Peligro de Choque Eléctrico Conecte la estufa a tierra. No seguir estas instrucciones puede ocasionar la muerte, incendio o choque eléctrico. Si los códigos lo permiten y utiliza un cable de conexión a tierra separado, es recomendable que un - Whirlpool WFE505W0J | Installation Instructions - Page 35
Instalación del soporte antivuelco ADVERTENCIA Montaje a través del piso Peligro de Vuelco Un niño o un adulto puede volcar accidentalmente la estufa y resultar muerto. Instale el soporte anti-vuelco al piso o a la pared según las instrucciones de instalación. Deslice la estufa hacia atrás de modo - Whirlpool WFE505W0J | Installation Instructions - Page 36
un protector de cables homologado por UL. C A. Dos lengüetas de montaje a cada lado B. Tapa del bloque de terminal C. Tornillos de cabeza hexagonal 3. Según cuál sea su modelo, retire la etiqueta plástica que sostiene tres tuercas hexagonales de 10-32 del poste medio del bloque de terminales - Whirlpool WFE505W0J | Installation Instructions - Page 37
Estilo 2: Protector de cables para cable directo ■■ Quite el disco removible según sea necesario para la conexión del conducto flexible. ■■ Ensamble en la abertura un conector de conducto homologado por UL. A Conexión de 4 hilos: Cable de suministro eléctrico Use este método para: ■■ Nuevas - Whirlpool WFE505W0J | Installation Instructions - Page 38
4. Use un destornillador Phillips para conectar el hilo verde a tierra del cable de suministro eléctrico a la cocina con el tornillo de enlace a tierra y la sección del enlace a tierra. Debe sujetarse primero el hilo de puesta a tierra. 5. Use un sacatuercas de 3/8" (1 cm) para conectar el cable - Whirlpool WFE505W0J | Installation Instructions - Page 39
1. Parte del fleje de metal a tierra debe cortarse y quitarse. A B C A. Fleje metálico de conexión a tierra B. Deseche C. Tornillo de puesta a tierra 2. Use un destornillador Phillips para retirar el tornillo de enlace a tierra de la parte posterior de la cocina. Reserve el tornillo de enlace a - Whirlpool WFE505W0J | Installation Instructions - Page 40
para determinar si hay una obstrucción entre la cocina y la pared de montaje. Si necesita asistencia o servicio técnico, consulte la sección "Asistencia o servicio técnico" del Manual de uso y cuidado o la sección "Garantía" de las Instrucciones del usuario para ver la información de contacto. 40 - Whirlpool WFE505W0J | Installation Instructions - Page 41
la cocina sin tener el soporte antivuelco instalado y asegurado. Para contactar al servicio técnico, consulte la sección "Ayuda o servicio técnico" en el Manual de uso y cuidado, la portada o la sección "Garantía" de las Instrucciones para el usuario. Nivelación de la cocina Para determinar si tiene - Whirlpool WFE505W0J | Installation Instructions - Page 42
. Si sobra alguna pieza, vuelva a revisar todos los pasos para ver cuál se omitió. 2. Verifique que tenga todas las herramientas. 3. Deseche o . 8. Encienda los quemadores de superficie y el horno. Consulte el Manual de uso y cuidado o las Instrucciones del usuario para obtener instrucciones espec - Whirlpool WFE505W0J | Installation Instructions - Page 43
é mal cableado. Póngase en contacto con un electricista calificado para verificar el suministro eléctrico. ■■ Vea la sección "Solución de problemas" del Manual de uso y cuidado o las Instrucciones del usuario. Cuando la cocina haya estado encendida durante 5 minutos, verifique que haya calor. Si la - Whirlpool WFE505W0J | Installation Instructions - Page 44
W11333088A ©2019 All rights reserved. Used under license in Canada. Tous droits réservés. Utilisé sous licence au Canada. Todos los derechos reservados. Usado en Canadá bajo licencia. 03/19
-
 1
1 -
 2
2 -
 3
3 -
 4
4 -
 5
5 -
 6
6 -
 7
7 -
8
-
9
-
10
-
11
-
12
-
13
-
14
-
15
-
16
-
17
-
18
-
19
-
20
-
21
-
22
-
23
-
24
-
25
-
26
-
27
-
28
-
29
-
30
-
31
-
32
-
33
-
34
-
35
-
36
-
37
-
38
-
39
-
40
-
41
-
42
-
43
-
44
 |
 |

INSTALLATION INSTRUCTIONS 30" (76.0 CM)
FREESTANDING ELECTRIC RANGES
INSTRUCTIONS D’INSTALLATION
DES CUISINIÈRES ÉLECTRIQUES
AUTOPORTANTES
DE 30" (76,0 CM)
INSTRUCCIONES DE INSTALACIÓN
COCINAS ELÉCTRICAS INDEPENDIENTES
DE 30" (76,0 CM)
Table of Contents/Table des matières/Tabla de contenidos
IMPORTANT:
Save for local electrical inspector’s use.
IMPORTANT :
À conserver pour consultation par l’inspecteur local des installations électriques.
IMPORTANTE:
Guarde para tener a disposición del inspector de electricidad local.
W11333088A
RANGE SAFETY
........................................
2
INSTALLATION REQUIREMENTS
............
3
Tools and Parts
........................................
3
Location Requirements
...........................
3
Electrical Requirements- U.S.A. Only
.....
5
Electrical Requirements - Canada Only..6
INSTALLATION INSTRUCTIONS
..............
6
Unpack Range
.........................................
6
Install Anti-Tip Bracket
............................
7
Electrical Connection - U.S.A. Only
........
8
Verify Anti-Tip Bracket Is Installed
and Engaged
.........................................
12
Level Range
...........................................
13
Warming Drawer or Premium Storage
Drawer
...................................................
13
Storage Drawer
.....................................
14
Oven Door
.............................................
14
Complete Installation
............................
14
Moving the Range
.................................
15
SÉCURITÉ DE LA CUISINIÈRE
..............
16
EXIGENCES D’INSTALLATION
..............
17
Outillage et pièces
.................................
17
Exigences d’emplacement
....................
17
Spécifications électriques –
É.-U. seulement
.....................................
19
Spécifications électriques –
Canada seulement
................................
20
INSTRUCTIONS D’INSTALLATION
........
20
Déballage de la cuisinière
.....................
20
Installation de la bride
antibasculement
....................................
21
Raccordement électrique –
É.-U. seulemnt
.......................................
22
Vérifier que la bride antibasculement
est bien installée et engagée
................
26
Réglage de l’aplomb de la cuisinière
....
27
Tiroir-réchaud ou tiroir de remisage
de qualité supérieure
.............................
27
Tiroir de remisage
..................................
28
Porte du four
.........................................
28
Achever l’installation
.............................
28
Déplacement de la cuisinière
................
29
SEGURIDAD DE LA COCINA
.................
30
REQUISITOS DE INSTALACIÓN
............
31
Herramientas y piezas
...........................
31
Requisitos de ubicación
........................
31
Requisitos eléctricos,
en EE. UU. únicamente
.........................
33
Requisitos eléctricos –
Solo en Canadá
.....................................
34
INSTRUCCIONES DE INSTALACIÓN
....
34
Desembale la cocina
.............................
34
Instalación del soporte antivuelco
........
35
Conexión eléctrica,
en EE. UU. únicamente
.........................
36
Verifique que el soporte anti-vuelco
esté instalado y enganchado
................
40
Nivelación de la cocina
.........................
41
Cajón de calentamiento o cajón
de almacenamiento Premium
..............
41
Cajón de almacenamiento
....................
42
Puerta del horno
....................................
42
Completar la instalación
.......................
42
Cómo mover la cocina
..........................
43