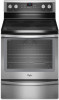
Whirlpool WFE720H0AS Use & Care Guide
Whirlpool WFE720H0AS Manual
 |
View all Whirlpool WFE720H0AS manuals
Add to My Manuals
Save this manual to your list of manuals |
Whirlpool WFE720H0AS manual content summary:
- Whirlpool WFE720H0AS | Use & Care Guide - Page 1
ELECTRIC RANGE USER INSTRUCTIONS THANK YOU for purchasing this high-quality product. If you should experience a problem not covered in TROUBLESHOOTING, please visit our website at www.whirlpool.com for additional information. If you still need assistance, call us at 1-800-253-1301. You will need - Whirlpool WFE720H0AS | Use & Care Guide - Page 2
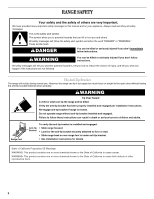
RANGE SAFETY Your safety and the safety of others are very important. We have provided many important safety messages in this manual and on floor or wall. • Slide range back so rear range foot is under anti-tip bracket. • See installation instructions for details. State of California Proposition - Whirlpool WFE720H0AS | Use & Care Guide - Page 3
except as suggested in the manual. Improper installation of these liners may result in a risk of electric shock, or fire. ■ Glazed Cooking Utensils - Only certain types of glass, glass/ceramic, ceramic, earthenware, or other glazed utensils are suitable for range-top service without breaking due to - Whirlpool WFE720H0AS | Use & Care Guide - Page 4
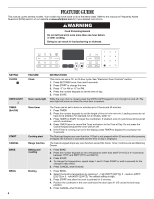
GUIDE This manual covers several models. Your model may have some or all of the items listed. Refer to this manual or Frequently Asked Questions (FAQs) section of our website at www.whirlpool.com for more detailed instructions start Range and Warming Drawer. 1. °C]) or 3 - low (400°F [204°C]). - Whirlpool WFE720H0AS | Use & Care Guide - Page 5
the cooktop, then press START. Press WARM ZONE OFF to turn off the warming element. Warming drawer (on some models) 1. Press WARMING DRAWER to select the Warming Drawer function at the Low setting. 2. To select a higher temperature setting, press WARMING DRAWER a second time for the Medium setting - Whirlpool WFE720H0AS | Use & Care Guide - Page 6
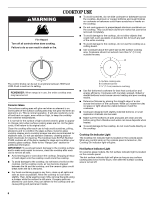
plastic or aluminum foil, to touch any part of the entire cooktop. ■ To avoid between HIGH and LOW. Push in and turn to setting. REMEMBER: When range is in use, scraper while the surface is still warm. If sugary spills are allowed to Indicator Light On ceramic glass models, the hot surface indicator - Whirlpool WFE720H0AS | Use & Care Guide - Page 7
offers flexibility due to a wide range of settings between High and Melt Triple Rapid Boil Element (on some models) The Rapid Boil Element offers additional low temperature. Use cookware appropriate in size for the Rapid Boil Element. A B Use the Cooktop Warm Zone element to keep cooked foods warm - Whirlpool WFE720H0AS | Use & Care Guide - Page 8
as a guide for cookware ■ Heats very quickly and evenly. Earthenware ■ Follow manufacturer's instructions. ■ Use on low heat settings. Porcelain ■ See stainless steel or cast iron cooking area or element. On electric cooktops, canners should not ■ On ceramic glass models, use only flat-bottomed - Whirlpool WFE720H0AS | Use & Care Guide - Page 9
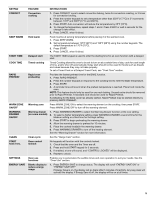
is not in use, the time of day (TOD) is displayed, unless the range is in Energy Save mode. During Energy Save mode, the display will be is preheated (long tone) ■ Function has been entered ■ Reminder (on some models), repeating each minute after the end-of-cycle tones Three tones ■ Invalid pad - Whirlpool WFE720H0AS | Use & Care Guide - Page 10
either high or low. 1. Press SETTINGS is running): 1. Press the number keypad as instructed by the scrolling text to select the new temperature baking or press CANCEL to turn off the range. Aluminum Foil IMPORTANT: To avoid permanent damage to guide. 7 6 5 4 3 2 1 ■ Make sure racks are level. 10 - Whirlpool WFE720H0AS | Use & Care Guide - Page 11
, use racks 1 and 4. Place the cakes on the racks as shown. A B A. Ends of rack in position 3 B. Food in position 2 Split Oven Rack (on some models) Split-Rack with Removable Insert To Use Racks: The split-rack with removable insert is a space maximizer. When the two are attached, they make - Whirlpool WFE720H0AS | Use & Care Guide - Page 12
or burners cycle on and off in intervals. On convection range models, the fan will run while preheating and may be cycled on to the "Positioning Racks and Bakeware" section for more information. When broiling on the low or medium settings, the broil element will cycle on and off to maintain the - Whirlpool WFE720H0AS | Use & Care Guide - Page 13
shut off automatically. 6. Press CANCEL to clear the display. Warming Drawer (on some models) WARNING Remove food from plastic bags and place in oven- Press WARMING DRAWER to select the Warming Drawer function at the Low setting. 2. To select a higher temperature setting, press WARMING DRAWER a - Whirlpool WFE720H0AS | Use & Care Guide - Page 14
hour. This new cleaning technology is a low-heat, odorfree alternative to traditional self-cleaning options surface of the oven interior. NOTES: ■ The range should be level to ensure that the entire surface Cleaning Kits may be obtained by ordering Part Number W10423113RP. See the "Accessories" - Whirlpool WFE720H0AS | Use & Care Guide - Page 15
instructions on cleaning products. For additional information, you can visit the Frequently Asked Questions (FAQs) section of our website at www.whirlpool Cleaner Part Number guides will help them slide. STORAGE DRAWER OR WARMING DRAWER (on some models) Check that storage drawer or warming drawer - Whirlpool WFE720H0AS | Use & Care Guide - Page 16
by turning clockwise. 5. Plug in range or reconnect power. TROUBLESHOOTING First try the solutions suggested here or visit our website and reference FAQs (Frequently Asked Questions) to possibly avoid the cost of a service call. www.whirlpool.com Operation PROBLEM Nothing will operate Cooktop will - Whirlpool WFE720H0AS | Use & Care Guide - Page 17
on dry areas of the oven bottom during the Clean cycle. Level the range. See the Installation Instructions. To remove deposits, use a cloth soaked with vinegar. Then use a Foods are overdone or burnt even at low temperatures. See "Fahrenheit and Celsius" in the "Electronic Oven Controls" section. 17 - Whirlpool WFE720H0AS | Use & Care Guide - Page 18
you can visit our website at www.whirlpool.com/cookingaccessories. Cooktop Care Kit (ceramic glass models) (includes cleaner, protectant, scraper, and applicator pads) Order Part Number 31605 Cooktop Protectant (ceramic glass models) Order Part Number 31463A affresh™ Stainless Steel Cleaning Wipes - Whirlpool WFE720H0AS | Use & Care Guide - Page 19
where service by an authorized Whirlpool servicer is not available. 10. The removal and reinstallation of your major appliance if it is installed in an inaccessible location or is not installed in accordance with published installation instructions. 11. Major appliances with original model/serial - Whirlpool WFE720H0AS | Use & Care Guide - Page 20
W10392932A SP PN W10395083A © 2011 Whirlpool Corporation. All rights reserved. ® Registered Trademark/TM Trademark of Whirlpool, U.S.A. 10/11 Printed in U.S.A.
-
 1
1 -
 2
2 -
 3
3 -
 4
4 -
 5
5 -
 6
6 -
 7
7 -
8
-
9
-
10
-
11
-
12
-
13
-
14
-
15
-
16
-
17
-
18
-
19
-
20
 |
 |
THANK YOU for purchasing this high-quality product. If you should experience a problem not covered in TROUBLESHOOTING,
please visit our website at
www.whirlpool.com
for additional information. If you still need assistance, call us at 1-800-253-1301.
You will need your model and serial number, located on the oven frame behind the top right side of the oven door.
Para obtener acceso a “Instrucciones para el usuario de la estufa eléctrica” en español, o para obtener información adicional acerca
de su producto, visite:
www.whirlpool.com
Deberá tener a mano el número de modelo y de serie, que están ubicados en el marco del horno, detrás del lado derecho superior
de la puerta del horno.
ELECTRIC RANGE
USER INSTRUCTIONS
Table of Contents
RANGE SAFETY
.......................................................................................
2
The Anti-Tip Bracket
.............................................................................
2
FEATURE GUIDE
.....................................................................................
4
COOKTOP USE
........................................................................................
6
Cookware
..............................................................................................
8
Home Canning
......................................................................................
8
OVEN USE
................................................................................................
9
Electronic Oven Controls
......................................................................
9
Sabbath Mode
....................................................................................
10
Aluminum Foil
......................................................................................
10
Positioning Racks and Bakeware
.......................................................
10
Split Oven Rack (on some models)
....................................................
11
Oven Vent
............................................................................................
11
Baking and Roasting
...........................................................................
12
Broiling
................................................................................................
12
Convection Cooking
...........................................................................
12
Cook Time
...........................................................................................
13
Warming Drawer (on some models)
...................................................
13
RANGE CARE
.........................................................................................
14
Clean Cycle
.........................................................................................
14
General Cleaning
.................................................................................
15
Oven Light
...........................................................................................
16
TROUBLESHOOTING
............................................................................
16
ACCESSORIES
......................................................................................
18
WARRANTY
............................................................................................
19
W10392932A