Whirlpool WFE775H0HZ Installation Instructions
Whirlpool WFE775H0HZ Manual
 |
View all Whirlpool WFE775H0HZ manuals
Add to My Manuals
Save this manual to your list of manuals |
Whirlpool WFE775H0HZ manual content summary:
- Whirlpool WFE775H0HZ | Installation Instructions - Page 1
REQUIREMENTS 3 Tools and Parts 3 Location Requirements 3 Electrical Requirements - U.S.A. Only 5 Electrical Requirements - Canada Only 7 INSTALLATION INSTRUCTIONS 7 Unpack Range 7 Install Anti-Tip Bracket 8 Electrical Connection - U.S.A. Only 9 Verify Anti-Tip Bracket Is Installed and - Whirlpool WFE775H0HZ | Installation Instructions - Page 2
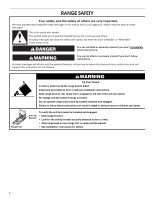
foot is engaged in the slot of the anti-tip bracket. Re-engage anti-tip bracket if range is moved. Do not operate range without anti-tip bracket installed and engaged. Failure to follow these instructions can result in death or serious burns to children and adults. Anti-Tip Bracket To verify the - Whirlpool WFE775H0HZ | Installation Instructions - Page 3
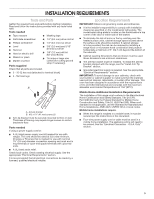
responsibility to comply with installation clearances specified on the model/serial rating plate. The model/serial rating plate is located on the frame behind installations require: ■■ When this range is installed in a mobile home, it must be secured per the instructions in this document. ■■ Four- - Whirlpool WFE775H0HZ | Installation Instructions - Page 4
255⁄16" (64.3 cm) depth - back of range to front of cooktop** F. Model/serial rating plate (located on the frame behind a top corner of the door or either side of the drawer) IMPORTANT: Range must be level after installation. Follow the instructions in the "Level Range" section. Using the cooktop as - Whirlpool WFE775H0HZ | Installation Instructions - Page 5
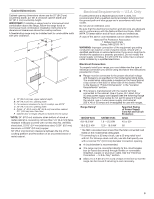
in a risk of electric shock. Check with a qualified electrician or service technician if you are in doubt as to whether the appliance is instructions provided for it here. Range must be connected to the proper electrical voltage and frequency as specified on the model/serial rating plate. The model - Whirlpool WFE775H0HZ | Installation Instructions - Page 6
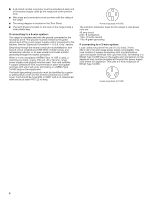
the neutral conductor. When a 4-wire receptacle of NEMA Type 14-50R is used, a matching UL listed, 4-wire, 250 volt, 40 or 50 amp, range power supply cord (pigtail) must be used. This cord contains 4 copper conductors with ring terminals or open-end spade terminals with upturned ends, terminating in - Whirlpool WFE775H0HZ | Installation Instructions - Page 7
- Canada Only WARNING Electrical Shock Hazard Electrically ground range. Failure to do so can result in death, fire, or electrical shock. INSTALLATION INSTRUCTIONS Unpack Range WARNING Excessive Weight Hazard Use two or more people to move and install range. Failure to do so can result in back or - Whirlpool WFE775H0HZ | Installation Instructions - Page 8
Install Anti-Tip Bracket WARNING Floor Mounting Tip Over Hazard A child or adult can tip the range and be killed. Install anti-tip bracket to floor or wall per installation instructions. Slide range back so rear range foot is engaged in the slot of the anti-tip bracket. Re-engage anti-tip bracket - Whirlpool WFE775H0HZ | Installation Instructions - Page 9
range. Electrical Shock Hazard Disconnect power before servicing. Use 8 gauge copper or 6 gauge aluminum wire. Electrically ground range. Failure to follow these instructions Terminal block cover C. Hex-head screws 3. Depending on your model, remove the plastic tag holding three 10-32 hex nuts from - Whirlpool WFE775H0HZ | Installation Instructions - Page 10
must be cut out and removed. 5. Complete installation following instructions for your type of electrical connection: 4-wire (recommended) Use a Phillips screwdriver to remove the ground-link screw from the back of the range. Save the ground-link screw and the end of the ground link under the screw - Whirlpool WFE775H0HZ | Installation Instructions - Page 11
neutral wire of power supply cord. 1. Feed the power supply cord through the strain relief on the cord/conduit plate on bottom of range. Allow enough slack to easily attach the wiring to the terminal block. A B C D D B C A. 10-32 hex nut B. Line 2 (red) C. Ground-link screw D. Neutral (white - Whirlpool WFE775H0HZ | Installation Instructions - Page 12
. Save the ground-link screw and the end of the ground link under the screw. 3. Pull the wires through the strain relief on bottom of range. Allow enough slack to easily attach wiring to the terminal block. Bare Wire Torque Specifications Attaching terminal lugs to the terminal block - 20 lbs-in - Whirlpool WFE775H0HZ | Installation Instructions - Page 13
bracket. Slide the range forward and determine if there is an obstruction between the range and the mounting wall. If you need assistance or service, refer to the "Assistance or Service" section of the Use and Care Guide, or the "Warranty" section of the User Instructions, for contact information - Whirlpool WFE775H0HZ | Installation Instructions - Page 14
" section of the Use and Care Guide, or the "Warranty" section of the User Instructions, to contact service. Level Range Determine if you have AquaLift® Technology or Steam Clean by referring to the "Range Care" section of the User Instructions. For Ranges with AquaLift® Technology or Steam Clean - Whirlpool WFE775H0HZ | Installation Instructions - Page 15
Storage Drawer (on some models) The storage drawer can be removed. Before removing, make sure drawer ■■ See the "Troubleshooting" section in the Use and Care Guide or User Instructions. When the range has been on for 5 minutes, check for heat. If range is cold, turn off the range and contact a - Whirlpool WFE775H0HZ | Installation Instructions - Page 16
instructions. Slide range back so rear range foot is engaged in the slot of the anti-tip bracket. Re-engage anti-tip bracket if range is moved. Do not operate range Engaged" section. 6. Check that range is level. Electrical Shock Hazard Disconnect power before servicing. Replace all parts and panels - Whirlpool WFE775H0HZ | Installation Instructions - Page 17
est le danger potentiel et vous disent comment réduire le risque de blessure et ce qui peut se produire en cas de non-respect des instructions. Pied de la cuisinière AVERTISSEMENT Risque de basculement Un enfant ou une personne adulte peut faire basculer la cuisinière, ce qui peut causer - Whirlpool WFE775H0HZ | Installation Instructions - Page 18
ces nécessaires avant d'entreprendre l'installation. Lire et observer les instructions fournies avec chacun des outils de la liste ci-dessous. Outils alimentation (homologation UL) conçu pour l'utilisation avec une cuisinière. Pour service 250 V minimum, 40 A ou 50 A, compatible avec une ouverture de - Whirlpool WFE775H0HZ | Installation Instructions - Page 19
ère un coin supérieur de la porte ou de chaque côté du tiroir) IMPORTANT : La cuisinière doit être d'aplomb après l'installation. Suivre les instructions de la section "Réglage de l'aplomb de la cuisinière". Il n'est pas recommandé d'utiliser la table de cuisson comme référence pour établir l'aplomb - Whirlpool WFE775H0HZ | Installation Instructions - Page 20
électrique Pour installer la cuisinière de façon appropriée, il faut établir le type de raccords électriques que l'on utilisera et suivre les instructions de ce document. ■■ La cuisinière doit être alimentée par une source d'électricité et une tension appropriées, comme spécifiée sur la plaque - Whirlpool WFE775H0HZ | Installation Instructions - Page 21
de choc électrique Relier la cuisinière à la terre. Le non-respect de cette instruction peut causer un décès, un incendie ou un choc électrique. Si les codes en vigueur le murale soit placée à portée de la position de service finale de la cuisinière. ■■ Ne pas utiliser de câble de rallonge. 21 - Whirlpool WFE775H0HZ | Installation Instructions - Page 22
ère AVERTISSEMENT Risque du poids excessif Utiliser deux ou plus de personnes pour déplacer et installer la cuisinière. Le non-respect de cette instruction peut causer une blessure au dos ou d'autre blessure. 1. Ôter les matériaux d'emballage, le ruban adhésif et la pellicule protectrice de la - Whirlpool WFE775H0HZ | Installation Instructions - Page 23
Fixer la bride antibasculement au plancher ou au mur, conformément aux instructions d'installation. Faire glisser de nouveau la cuisinière de façon bride antibasculement n'est pas installée et engagée. Le non-respect de ces instructions peut causer un décès ou des brûlures graves aux enfants et aux - Whirlpool WFE775H0HZ | Installation Instructions - Page 24
entretien. Utiliser des conducteurs en cuivre de calibre 8 ou en aluminium de calibre 6. Relier la cuisinière à la terre. Le non-respect de ces instructions peut causer un décès, un incendie ou un choc électrique. OU Retirer l'écrou hexagonal 10-32 de chacun des trois boîtiers de raccordement, puis - Whirlpool WFE775H0HZ | Installation Instructions - Page 25
neutre 1. Une partie de la barrette métallique de liaison à la terre doit être coupée et retirée. 5. Terminer l'installation selon les instructions adaptées au type de raccordement électrique : 4 conducteurs (recommandé) 3 conducteurs (si un circuit à 4 conducteurs n'est pas disponible) Options de - Whirlpool WFE775H0HZ | Installation Instructions - Page 26
4. À l'aide d'un tournevis cruciforme, connecter le fil de mise à la terre vert du cordon d'alimentation à la cuisinière en serrant la vis de liaison à la terre et à la section de liaison à la terre. Le fil de mise à la terre doit être raccordé en premier. 5. À l'aide d'un tourne-écrou de 3/8" (9,5 - Whirlpool WFE775H0HZ | Installation Instructions - Page 27
1. Une partie de la barrette métallique de liaison à la terre doit être coupée et retirée. A B C A. Barrette de liaison à la terre métallique B. Partie à éliminer C. Vis de liaison à la terre 2. À l'aide d'un tournevis cruciforme, retirer la vis de liaison à la terre à l'arrière de la cuisinière. - Whirlpool WFE775H0HZ | Installation Instructions - Page 28
obstruction entre la cuisinière et la paroi de montage. Pour assistance ou dépannage, consulter la section "Assistance ou service" du guide d'utilisation et d'entretien, la couverture ou la section "Garantie" des instructions d'utilisation pour obtenir les coordonnées des personnes à contacter. 28 - Whirlpool WFE775H0HZ | Installation Instructions - Page 29
bride antibasculement n'est pas installée et engagée. Consulter la section "Assistance ou service" du guide d'utilisation et d'entretien, la couverture ou la section "Garantie" des instructions d'utilisation pour contacter le service à la clientèle. Réglage de l'aplomb de la cuisinière Déterminer si - Whirlpool WFE775H0HZ | Installation Instructions - Page 30
ée. Mettre l'appareil sous tension. 8. Mettre en marche les brûleurs de surface et le four. Consulter le Guide d'utilisation et d'entretien ou les instructions d'utilisation pour des instructions spécifiques sur le fonctionnement de la cuisinière. Si la cuisinière ne fonctionne pas, contrôler ce - Whirlpool WFE775H0HZ | Installation Instructions - Page 31
Fixer la bride antibasculement au plancher ou au mur, conformément aux instructions d'installation. Faire glisser de nouveau la cuisinière de façon bride antibasculement n'est pas installée et engagée. Le non-respect de ces instructions peut causer un décès ou des brûlures graves aux enfants et aux - Whirlpool WFE775H0HZ | Installation Instructions - Page 32
SEGURIDAD DE LA ESTUFA Su seguridad y la seguridad de los demás es muy importante. Hemos incluido muchos mensajes importantes de seguridad en este manual y en su electrodoméstico. Lea y obedezca siempre todos los mensajes de seguridad. Este es el símbolo de alerta de seguridad. Este símbolo le - Whirlpool WFE775H0HZ | Installation Instructions - Page 33
Cinta métrica ■■ Cinta adhesiva protectora ■■ Destornillador de hoja plana ■■ Trinquete de 1/4" (6.4 mm) ■■ Destornillador Phillips ■■ Nivel ■■ Martillo ■■ Taladro manual o eléctrico ■■ Llave o pinza ■■ Sacatuercas de 1/4" (6.4 mm) ■■ Sacatuercas de 3/8" (9,5 mm) y de 5/16" (7,9 mm) ■■ Broca de - Whirlpool WFE775H0HZ | Installation Instructions - Page 34
Dimensiones del producto NOTA: La apariencia de su modelo puede diferir del que se ilustra. A F B C E D A. Profundidad máxima con manija: 27 3/8" (69,5 cm) B. 46 1/2" (118,1 cm) de altura general (máx.) con las patas niveladoras completamente atorrnilladas* C. 36" (91,4 cm) de altura (máx.) de la - Whirlpool WFE775H0HZ | Installation Instructions - Page 35
Dimensiones del armario Las dimensiones de la abertura del armario que se muestran son para una profundidad del mostrador de 25" (64,0 cm), una profundidad del armario de la base de 24" (61,0 cm) y una altura del mostrador de 36" (91,4 cm). IMPORTANTE: Si va a instalar una campana para estufa o una - Whirlpool WFE775H0HZ | Installation Instructions - Page 36
M9W 1R3 CANADA ■■ Si no está seguro de que la conexión a tierra de la estufa sea adecuada, verifíquela con un instalador eléctrico competente. Range Ratings* 120/240 Volts 8.8 - 16.5 KW 16.6 - 22.5 KW 120/208 Volts 7.8 12.5 KW 12.6 18.5 KW Specified Rating of Power Supply Cord Kit and - Whirlpool WFE775H0HZ | Installation Instructions - Page 37
INSTRUCCIONES DE INSTALACIÓN Desempaque la estufa ADVERTENCIA Peligro de peso excesivo Use dos o más personas para mover e instalar la estufa. No seguir esta instrucción puede ocasionar una lesión en la espalda u otro tipo de lesiones. 1. Retire los materiales de envío, la cinta adhesiva y la pelí - Whirlpool WFE775H0HZ | Installation Instructions - Page 38
Instalación del soporte antivuelco ADVERTENCIA Montaje a través del piso Peligro de Vuelco Un niño o un adulto puede volcar accidentalmente la estufa y resultar muerto. Instale el soporte anti-vuelco al piso o a la pared según las instrucciones de instalación. Deslice la estufa hacia atrás de modo - Whirlpool WFE775H0HZ | Installation Instructions - Page 39
Conexión eléctrica - EE. UU. únicamente Cable de suministro eléctrico Cable directo ADVERTENCIA 1. Desconecte el suministro eléctrico. 2. Quite los tornillos de la tapa del bloque de terminal ubicados en la parte posterior de la estufa. Jale la tapa hacia abajo y hacia usted para sacarla de la - Whirlpool WFE775H0HZ | Installation Instructions - Page 40
Estilo 2: Protector de cables para cable directo ■■ Quite el disco removible según sea necesario para la conexión del conducto flexible. ■■ Ensamble en la abertura un conector de conducto que esté en la lista de UL. A B A. Tuerca de retención desmontable B. Conducto ■■ Apriete el tornillo del - Whirlpool WFE775H0HZ | Installation Instructions - Page 41
4. Use un destornillador Phillips para conectar el hilo verde a tierra del cable de suministro eléctrico a la estufa con el tornillo de enlace a tierra y la sección del enlace a tierra. Debe sujetarse primero el hilo de puesta a tierra. 5. Use un sacatuercas de 3/8" (9,5 mm) para conectar el cable - Whirlpool WFE775H0HZ | Installation Instructions - Page 42
1. Parte de la banda metálica de conexión a tierra se debe recortar y retirar. A B C A. Banda metálica de conexión a tierra B. Deseche C. Tornillo de enlace a tierra 2. Use un destornillador Phillips para retirar el tornillo de enlace a tierra de la parte posterior de la estufa. Reserve el tornillo - Whirlpool WFE775H0HZ | Installation Instructions - Page 43
para determinar si hay una obstrucción entre la estufa y la pared de montaje. Si necesita asistencia o servicio técnico, consulte la sección "Asistencia o servicio técnico" del Manual de uso y cuidado o la sección "Garantía" de las Instrucciones del usuario para ver la información de contacto. 43 - Whirlpool WFE775H0HZ | Installation Instructions - Page 44
correctamente. No ponga a funcionar la estufa sin tener el soporte anti-vuelco instalado y asegurado. Consulte la sección "Asistencia o servicio técnico" del Manual de uso y cuidado o la sección "Garantía" de las Instrucciones del usuario para ver la información de contacto. Nivelación de la estufa - Whirlpool WFE775H0HZ | Installation Instructions - Page 45
Cajón de almacenamiento (en algunos modelos) El cajón de almacenamiento puede retirarse. Antes de retirarlo, cerciórese de que esté frío y vacío. Para retirarlo: 1. Retire el cajón de almacenamiento en sentido recto hasta el tope. A A. Muesca de tope del cajón 2. Levante el frente del cajón y retire - Whirlpool WFE775H0HZ | Installation Instructions - Page 46
el cable de suministro de energía en el contacto apropiado. Encienda el aparato. 8. Encienda los quemadores de superficie y el horno. Vea el Manual de uso y cuidado o las Instrucciones del usuario para obtener instrucciones específicas sobre el funcionamiento de la estufa. Si la estufa no funciona - Whirlpool WFE775H0HZ | Installation Instructions - Page 47
Cómo mover la estufa ADVERTENCIA Para estufas de cableado directo: Peligro de Vuelco Un niño o un adulto puede volcar accidentalmente la estufa y resultar muerto. Instale el soporte anti-vuelco al piso o a la pared según las instrucciones de instalación. Deslice la estufa hacia atrás de modo que - Whirlpool WFE775H0HZ | Installation Instructions - Page 48
W11085337C ®/™ ©2018 Whirlpool. All rights reserved. Tous droits réservés. Todos los derechos reservados. 01/18
-
 1
1 -
 2
2 -
 3
3 -
 4
4 -
 5
5 -
 6
6 -
 7
7 -
8
-
9
-
10
-
11
-
12
-
13
-
14
-
15
-
16
-
17
-
18
-
19
-
20
-
21
-
22
-
23
-
24
-
25
-
26
-
27
-
28
-
29
-
30
-
31
-
32
-
33
-
34
-
35
-
36
-
37
-
38
-
39
-
40
-
41
-
42
-
43
-
44
-
45
-
46
-
47
-
48
 |
 |

INSTALLATION INSTRUCTIONS
30" (76.2 CM) FREESTANDING ELECTRIC RANGES
INSTRUCTIONS D’INSTALLATION POUR CUISINIÈRES
ÉLECTRIQUES AUTOPORTANTES DE 30" (76,2 cm)
INSTRUCCIONES DE INSTALACIÓN ESTUFAS ELÉCTRICAS
INDEPENDIENTES DE 30" (76,2 cm)
Table of Contents
IMPORTANT:
Save for local electrical inspector's use.
IMPORTANT :
Conserver ces instructions à l’usage de l’inspecteur des installations électriques local.
IMPORTANTE:
Guarde para tener a disposición del inspector de electricidad local.
W11085337C
Table des matières
Índice
SEGURIDAD DE LA ESTUFA
.......................................................
32
REQUISITOS DE INSTALACIÓN
.................................................
33
Herramientas y piezas
................................................................
33
Requisitos de ubicación
.............................................................
33
Requisitos eléctricos — EE. UU. únicamente
...........................
35
Requisitos eléctricos – Solo en Canadá
....................................
36
INSTRUCCIONES DE INSTALACIÓN
.........................................
37
Desempaque la estufa
...............................................................
37
Instalación del soporte antivuelco
.............................................
38
Verify Anti-Tip Bracket Is Installed and Engaged
......................
13
Level Range
................................................................................
14
Warming Drawer or Premium StorageDrawer
...........................
14
Storage Drawer
..........................................................................
15
Oven Door
..................................................................................
15
Complete Installation
.................................................................
15
Moving the Range
......................................................................
16
Raccordement électrique – É.-U. seulement
.............................
24
Vérifier que la bride antibasculement est bien installée et
engagée
......................................................................................
28
Réglage de l’aplomb de la cuisinière
.........................................
29
Tiroir-réchaud ou tiroir de remisage de qualité supérieure
........
29
Tiroir de remisage
.......................................................................
30
Porte du four
..............................................................................
30
Terminer l’installation
..................................................................
30
Déplacement de la cuisinière
.....................................................
31
SÉCURITÉ DE LA CUISINIÈRE
...................................................
17
EXIGENCES D’INSTALLATION
...................................................
18
Outils et pièces
...........................................................................
18
Exigences d’emplacement
.........................................................
18
Spécifications électriques – É.-U. seulement
............................
20
Spécifications électriques
..........................................................
21
INSTRUCTIONS D’INSTALLATION
.............................................
22
Déballage de la cuisinière
..........................................................
22
Installation de la bride antibasculement
....................................
23
Conexión eléctrica — EE. UU. únicamente
...............................
39
Verifique que el soporte antivuelco esté instalado y
enganchado
...............................................................................
43
Nivelación de la estufa
...............................................................
44
Cajón de calentamiento o cajón de
almacenamiento premium
.........................................................
44
Cajón de almacenamiento
.........................................................
45
Puerta del horno
.........................................................................
45
Completar la instalación
............................................................
45
Cómo mover la estufa
................................................................
46
RANGE SAFETY
.............................................................................
2
INSTALLATION REQUIREMENTS
.................................................
3
Tools and Parts
.............................................................................
3
Location Requirements
................................................................
3
Electrical Requirements — U.S.A. Only
.......................................
5
Electrical Requirements - Canada Only
.......................................
7
INSTALLATION INSTRUCTIONS
...................................................
7
Unpack Range
..............................................................................
7
Install Anti-Tip Bracket
.................................................................
8
Electrical Connection — U.S.A. Only
...........................................
9