Whirlpool WGD5500XW Installation Instructions
Whirlpool WGD5500XW Manual
 |
UPC - 883049200125
View all Whirlpool WGD5500XW manuals
Add to My Manuals
Save this manual to your list of manuals |
Whirlpool WGD5500XW manual content summary:
- Whirlpool WGD5500XW | Installation Instructions - Page 1
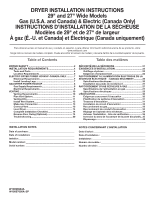
Dryer Installation Instructions 29" and 27" Wide Models Gas (U.S.A. and Canada) & Electric (Canada Only) Instructions D'installation de la sÉcheuse Modèles de 29" et de 27" de largeur À gaz (É.-U. et Canada) et Électrique (Canada uniquement) Para obtener acceso al manual de uso y cuidado en español - Whirlpool WGD5500XW | Installation Instructions - Page 2
DRYER SAFETY Your safety and the safety of others are very important. We have provided many important safety messages in this manual and on and tell you what can happen if the instructions are not followed. IMPORTANT: The gas installation must conform with local codes, or in the absence of - Whirlpool WGD5500XW | Installation Instructions - Page 3
your safety, the information in this manual must be followed to minimize the risk gas supplier's instructions. • If you cannot reach your gas supplier, call the fire department. - Installation and service must be performed by a qualified installer, service agency, or the gas supplier. WARNING: Gas - Whirlpool WGD5500XW | Installation Instructions - Page 4
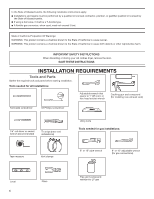
gas connector, when used, must not exceed 3 feet. IMPORTANT SAFETY INSTRUCTIONS When discarding or storing your old clothes dryer, remove the door. SAVE THESE INSTRUCTIONS snips (new vent installations) Utility knife Tools needed for gas installations: Tape measure Vent clamps 8" or 10" pipe - Whirlpool WGD5500XW | Installation Instructions - Page 5
and Care Guide for information about accessories available for your dryer. ■■ If you are using power supply cord, a grounded electrical outlet located within 2 ft. (610 mm) of either side of dryer. See "Electrical Requirements." ■■ A sturdy floor to support dryer and a total weight (dryer and load - Whirlpool WGD5500XW | Installation Instructions - Page 6
Manufactured Home Standard CAN/CSA-Z240 MH. ■■ Metal exhaust system hardware, available for purchase. For further information, please reference the "Assistance or Service" section of the "Dryer User Instructions." ■■ Special provisions must be made in mobile homes to introduce outside air into the - Whirlpool WGD5500XW | Installation Instructions - Page 7
8579325. For further information, please reference the "Assistance or Service" section of the "Dryer User Instructions." To avoid damaging floor, use a large flat piece of cardboard from dryer carton; place under entire back edge of dryer. Firmly grasp dryer body (not console panel) and gently lay - Whirlpool WGD5500XW | Installation Instructions - Page 8
on the rating plate in the door well of your dryer. If this information does not agree with the type of gas available, please reference the "Assistance or Service" section of the "Dryer User Instructions." LP gas conversion: Conversion must be made by a qualified technician. No attempt shall be - Whirlpool WGD5500XW | Installation Instructions - Page 9
pipe and 3/8" approved tubing. ■■ Lengths over 20 ft. (6.1 m) should use larger tubing and a different size adapter fitting. ■■ If your dryer has been converted to use LP gas, 3/8" LP compatible copper tubing can be used. If the total length of the supply line is more than 20 ft. (6.1 m), use larger - Whirlpool WGD5500XW | Installation Instructions - Page 10
or metal foil vent. Rigid metal vent: ■■ Recommended for best drying performance and to avoid crushing and kinking. Flexible metal vent: (Acceptable only if accessible to clean) ■■ Must be fully extended and supported in final dryer location. ■■ Remove excess to avoid sagging and kinking that may - Whirlpool WGD5500XW | Installation Instructions - Page 11
for your installation. Two close-clearance installations are shown. Refer to the manufacturer's instructions. C D E A F G B Over-The-Top installation (also available with one offset elbow) I H A. Dryer B. Elbow C. Wall D. Exhaust hood E. Clamps F. Rigid metal or flexible metal vent G. Vent - Whirlpool WGD5500XW | Installation Instructions - Page 12
vent runs longer than those specified in Vent system chart. Exhaust systems longer than those specified will: ■■ Shorten life of dryer. ■■ Reduce performance, resulting in longer drying times and increased energy usage. NOTE: Side and bottom exhaust installations for 27" wide models have a 90º turn - Whirlpool WGD5500XW | Installation Instructions - Page 13
, be sure there are no kinks. NOTE: For LP gas connections, you must use pipe-joint compound resistant to action of LP gas. Do not use TEFLON®† tape. 2. Plan pipe fitting connection D Using a 4" (102 mm) clamp, connect vent to exhaust outlet in dryer. If connecting to existing vent, make sure vent - Whirlpool WGD5500XW | Installation Instructions - Page 14
on dryer. q Wipe dryer drum interior thoroughly with a damp cloth to remove any dust. q Read "Dryer Use" in your Use and Care Guide. q Set the dryer on not feel heat, turn the dryer off and check to see whether gas supply line shutoff valve is open. ■■ If the gas supply line shutoff valve is closed - Whirlpool WGD5500XW | Installation Instructions - Page 15
side of hinges. 3. Lift door off top screws NOTE: Two people maybe needed to reinstall door. Insert screws into bottom holes on left side of dryer cabinet. Tighten screws halfway. Position door so large end of door hinge slot is over screws. Slide door up so screws are in bottom of - Whirlpool WGD5500XW | Installation Instructions - Page 16
screws separate from hinge screws as they are diferent sizes. Holding door over towel on dryer, grasp sides of outer door and lift to separate it from inner door. NOTE: Insert 4 door screws. Lift door until top screws in dryer cabinet are in large part of hinge slot. Pull door forward off screws. Set - Whirlpool WGD5500XW | Installation Instructions - Page 17
9. Remove door strike Flip door over so handle side is down. 8. Attach door hinges Remove door strike from dryer cabinet and set aside. 10. Remove and transfer hinge hole plugs Reattach door hinges to dryer door so that the larger hole is at the bottom of the hinge. Use a small, flat-blade - Whirlpool WGD5500XW | Installation Instructions - Page 18
it is needed, slide door catch left or right within slot to adjust alignment. 27" Wide Model Side-Swing Door 1. Place towel on dryer Lift door until top screws in dryer cabinet are in large part of hinge slot. Pull door forward off screws. Set door (handle side up) on top of - Whirlpool WGD5500XW | Installation Instructions - Page 19
separate from hinge screws as they are different sizes. Holding door over towel on dryer, grasp sides of outer door and lift to separate it from inner door. removed. Insert 5 door screws. 7. Flip door over Reattach door hinges to dryer door so that the larger hole is at the bottom of the hinge. 9. - Whirlpool WGD5500XW | Installation Instructions - Page 20
to reinstall door. Insert screws into the bottom holes on left side of dryer cabinet. Tighten screws halfway. Position door so large end of door hinge slot right within slot to adjust alignment. Troubleshooting See the Use and Care Guide or visit our website and reference Frequently Asked Questions to possibly - Whirlpool WGD5500XW | Installation Instructions - Page 21
le danger potentiel et vous disent comment réduire le risque de blessure et ce qui peut se produire en cas de non-respect des instructions. IMPORTANT : L'installation du gaz doit se conformer aux codes locaux, ou en l'absence de codes locaux, au code canadien d'installation B149.1 du gaz naturel - Whirlpool WGD5500XW | Installation Instructions - Page 22
Appeler immédiatement le fournisseur de gaz d'un téléphone voisin. Suivre ses instructions. • À défaut de joindre votre fournisseur de gaz, appeler les pompiers. doivent être effectués par un installateur qualifié, une agence de service ou le fournisseur de gaz. AVERTISSEMENT : L'odorat ne permet pas - Whirlpool WGD5500XW | Installation Instructions - Page 23
Dans l'État du Massachusetts, les instructions d'installation suivantes sont applicables : ■ Les travaux d'installation et réparation doivent être exécutés par un plombier ou tuyauteur qualifié ou licencié, ou par le personnel - Whirlpool WGD5500XW | Installation Instructions - Page 24
(Non fourni avec la sécheuse) Se référer au Guide d'utilisation et d'entretien pour des renseignements sur les accessoires des côtés de la sécheuse. Voir "Spécifications électriques". ■■ Un plancher robuste capable de supporter le poids de la sécheuse (sécheuse et charge) de 200 lb. (90,7 kg). Il - Whirlpool WGD5500XW | Installation Instructions - Page 25
Espacements d'installation : L'emplacement doit être assez grand pour permettre d'ouvrir complètement la porte de la sécheuse. La plupart des installations requièrent un espace minimum de 5½" (140 mm) derrière la sécheuse pour le conduit d'évacuation avec coude. Voir "Exigences concernant l'é - Whirlpool WGD5500XW | Installation Instructions - Page 26
conseillé d'utiliser le cordon d'alimentation de rechange - pièce numéro 8579325. Pour plus d'information, consulter la section "Assistance ou service" dans "Instructions d'utilisation de la sécheuse". Risque de choc électrique Brancher sur une prise à 4 alvéoles reliée à la terre. Le non-respect - Whirlpool WGD5500XW | Installation Instructions - Page 27
de gaz, et le personnel d'entretien autorisé. Le non-respect de ces instructions peut causer un décès, un explosion ou un incendie. Examiner les pieds l'alimentation au gaz de pétrole liquéfié (propane ou butane), avec conversion appropriée. ■■ Cette sécheuse doit être équipée du brûleur convenable - Whirlpool WGD5500XW | Installation Instructions - Page 28
au propane : Un technicien qualifié doit effectuer la conversion. Ne pas entreprendre de convertir la sécheuse pour utiliser un raccord neuf en acier inoxydable souple (conception homologuée par l'American Gas Association ou par CSA International) pour raccorder la sécheuse à la canalisation rigide - Whirlpool WGD5500XW | Installation Instructions - Page 29
pas enlever la broche de liaison à la terre. Ne pas utiliser un adaptateur. Ne pas utiliser un câble de rallonge. Le non-respect de ces instructions peut causer un décès, un incendie ou un choc électrique. ■■ L'appareil doit être alimenté par un circuit de 120 V, CA seulement, 60 Hz, 15 ou 20 - Whirlpool WGD5500XW | Installation Instructions - Page 30
INSTRUCTIONS POUR L'Installation Exigences concernant l'evacuation Clapets de décharge : ■■ Doit se situer à : (Acceptable uniquement si accessible pour le nettoyage) ■■ Doit être complètement déployé et supporté dans l'emplacement final de la sécheuse. ■■ Enlever tout excès de conduit pour éviter - Whirlpool WGD5500XW | Installation Instructions - Page 31
un conduit d'évacuation en plastique. Ne pas utiliser un conduit d'évacuation en feuille de métal. Le non-respect de ces instructions peut causer un décès ou un incendie. A B C A. Installation avec acheminement standard du conduit d'évacuation par l'arrière B. Installation avec évacuation par - Whirlpool WGD5500XW | Installation Instructions - Page 32
Numéro de pièces 4396727RP 4396004 4396005 4396006RW 4396007RW 4396008RP 8212662 Descriptions Conduit d'évacuation souple pour sécheuse de 8' avec brides Coude décalé pour sécheuse Coude décalé pour mur Coude serré DuraSafe™ Clapet de conduit d'évacuation à travers le mur Brides d'évacuation en - Whirlpool WGD5500XW | Installation Instructions - Page 33
Installation du circuit d'évacuation 1. Installer le clapet d'évacuation 12" min. (305 mm) 12" min. (305 mm) Installer un clapet d'évacuation et calfeutrer l'ouverture murale à l'extérieur autour du clapet d'évacuation. 2. Raccorder le conduit d'évacuation au clapet Le conduit doit se trouver par - Whirlpool WGD5500XW | Installation Instructions - Page 34
Raccordement du conduit d'évacuation 1. Raccorder le conduit d'évacuation à la bouche d'évacuation Réglage de l'aplomb de la sécheuse 1. Régler l'aplomb de la sécheuse À l'aide d'une bride de serrage de 4" (102 mm), relier le conduit d'évacuation à la bouche d'évacuation de la sécheuse. Si on - Whirlpool WGD5500XW | Installation Instructions - Page 35
tambour de la sécheuse avec un chiffon humide pour éliminer toute trace de poussière. q Lire la section "Utilisation de la sécheuse" dans le Guide d'utilisation et d'entretien. q Régler la sécheuse pour un programme de séchage complet (pas le programme de séchage à l'air) de 20 minutes et mettre la - Whirlpool WGD5500XW | Installation Instructions - Page 36
2. Ôter les vis inférieures 4. Retirer les bouchons d'obturation de charnière et les transférer Ouvrir la porte de la sécheuse. Ôter les vis inférieures du côté charnière de la caisse de la sécheuse. Desserrer (ne pas retirer) les vis supérieures du côté charnière de la caisse de la sécheuse. 3. - Whirlpool WGD5500XW | Installation Instructions - Page 37
6. Contrôler l'alignement de la gâche de la porte 2. Ôter les vis inférieures Fermer la porte et vérifier que la gâche de la porte est alignée avec le piton de retenue de la porte. Au besoin, faire glisser le piton de retenue de la porte vers la gauche ou vers la droite à l'intérieur de l'encoche - Whirlpool WGD5500XW | Installation Instructions - Page 38
4. Ôter les vis des charnières 6. Faire pivoter la porte externe Retirer les vis fixant les charnières à la porte. 5. Ôter les vis du panneau de porte Saisir la porte externe et la faire pivoter de 180° puis la replacer sur la porte interne. Veiller à maintenir la cale d'espacement en carton - Whirlpool WGD5500XW | Installation Instructions - Page 39
8. Fixer les charnières de porte 10. Retirer les bouchons d'obturation de charnière et les transférer Utiliser un petit tournevis à lame plate pour retirer avec précaution les 4 bouchons d'obturation du côté gauche de la caisse de la sécheuse. Transférer les bouchons d'obturation dans les trous de - Whirlpool WGD5500XW | Installation Instructions - Page 40
12. Retirer le bouchon d'obturation de la gâche de porte Modèle large avec porte à ouverture latérale de 27" 1. Placer une serviette sur la sécheuse Retirer le bouchon d'obturation de la gâche de porte. Insérer la gâche de la porte retirée à l'étape 9 dans le trou et la fixer avec une vis. Insérer - Whirlpool WGD5500XW | Installation Instructions - Page 41
4. Ôter les vis des charnières 7. Retourner la porte Retirer les vis fixant les charnières à la porte. 5. Ôter les vis du panneau de porte Retourner la porte de façon à ce que la poignée soit orientée vers le bas. 8. Fixer les charnières de porte Retirer les vis du sommet, du bas et du côté de - Whirlpool WGD5500XW | Installation Instructions - Page 42
piton de retenue de la porte vers la gauche ou vers la droite à l'intérieur de l'encoche pour régler l'alignement. Dépannage Voir le guide d'utilisation et d'entretien ou consulter notre site Web et la Foire aux questions pour tenter d'éviter le coût d'une intervention de réparation. REMARQUE : Il - Whirlpool WGD5500XW | Installation Instructions - Page 43
NOTES 43 - Whirlpool WGD5500XW | Installation Instructions - Page 44
. All rights reserved Tous droits réservés ® Registered Trademark/TM Trademark of Whirlpool, U.S.A., Whirlpool Canada LP Licensee in Canada ® Marque déposée/TM Marque de commerce de Whirlpool, U.S.A., emploi sous licence par Whirlpool Canada LP au Canada 2/10 Printed in U.S.A. Imprimé aux É.-U.
-
 1
1 -
 2
2 -
 3
3 -
 4
4 -
 5
5 -
 6
6 -
 7
7 -
8
-
9
-
10
-
11
-
12
-
13
-
14
-
15
-
16
-
17
-
18
-
19
-
20
-
21
-
22
-
23
-
24
-
25
-
26
-
27
-
28
-
29
-
30
-
31
-
32
-
33
-
34
-
35
-
36
-
37
-
38
-
39
-
40
-
41
-
42
-
43
-
44
 |
 |

W10096984A
W10097000A-SP
Table of Contents
DRYER SAFETY
................................................................
2
INSTALLATION REQUIREMENTS
....................................
4
Tools and Parts
....................................................................
4
Location Requirements
......................................................
5
ELECTRIC DRYER POWER HOOKUP-CANADA ONLY
...........
7
Electrical Requirements
.....................................................
7
Install Leveling Legs
...........................................................
7
GAS DRYER POWER HOOKUP
.................................................
8
Gas Supply Requirements
..................................................
8
Electrical Requirements
.....................................................
9
VENTING
....................................................................................
10
Venting Requirements
.......................................................
10
Plan Vent System
...............................................................
11
Venting Kits
........................................................................
11
Install Vent System
............................................................
12
Make Gas Connection
......................................................
13
Connect Vent
.....................................................................
13
Level Dryer
.........................................................................
14
Complete Installation Checklist
.......................................
14
Reverse Door Swing (Optional)
........................................
14
Troubleshooting
.................................................................
20
INSTALLATION NOTES
Date of purchase:
_________________________________
Date of installation:
_______________________________
Installer:
________________________________________
Model number:
___________________________________
Serial number:
___________________________________
Date d’achat :
_____________________________________
Date d’installation :
________________________________
Installateur :
______________________________________
Numéro de modèle :
________________________________
Numéro de série :
__________________________________
NOTES CONCERNANT L’INSTALLATION
Table des matières
SÉCURITÉ DE LA SÉCHEUSE
.......................................
21
EXIGENCES D’INSTALLATION
......................................
23
Outillage et pièces
............................................................
23
Exigences d’emplacement
...............................................
24
RACCORDEMENT à L’ALIMENTATION ÉLECTRIQUE DE LA
SÉCHEUSE ÉLECTRIQUE
- CANADA SEULEMENT
.............
26
Spécifications électriques
................................................
26
Installation des pieds de nivellement
..............................
27
RACCORDEMENT D’UNE SÉCHEUSE à GAZ
.......................
27
Spécifications de l’alimentation en gaz
..........................
27
Spécifications électriques
................................................
29
L’ÉVACUATION
..........................................................................
30
Exigences concernant l’évacuation
................................
30
Planification du système d’évacuation
...........................
31
Trousses d’évacuation
......................................................
31
Installation du circuit d’évacuation
.................................
33
Raccordement au gaz
.......................................................
33
Raccordement du conduit d’évacuation
.........................
34
Réglage de l’aplomb de la sécheuse
...............................
34
Achever l’installation - liste de vérification
.....................
35
Inversion du sens de l’ouverture de la porte (facultatif)
.. 35
Dépannage
.........................................................................
42
DRYER INSTALLATION INSTRUCTIONS
29" and 27" Wide Models
Gas (U.S.A. and Canada) & Electric (Canada Only)
INSTRUCTIONS D’INSTALLATION DE LA SÉCHEUSE
Modèles de 29" et de 27" de largeur
à gaz (É.-U. et Canada) et Électrique (Canada uniquement)
Para obtener acceso al manual de uso y cuidado en español, o para obtener información adicional acerca de su producto, visite:
www.whirlpool.com
Tenga listo su número de modelo completo. Puede encontrar el número de modelo y de serie dentro de la cavidad superior de la puerta.