Whirlpool WGD9600TA Installation Instructions
Whirlpool WGD9600TA Manual
 |
View all Whirlpool WGD9600TA manuals
Add to My Manuals
Save this manual to your list of manuals |
Whirlpool WGD9600TA manual content summary:
- Whirlpool WGD9600TA | Installation Instructions - Page 1
DRYER INSTALLATION INSTRUCTIONS GAS (U.S.A. AND CANADA) ELECTRIC (CANADA ONLY) INSTRUCTIONS D'INSTALLATION DE LA SÉCHEUSE À GAZ (É.-U. ET CANADA) ÉLECTRIQUE (CANADA UNIQUEMENT) TABLE OF CONTENTS DRYER SAFETY 2 INSTALLATION REQUIREMENTS 4 Tools and Parts 4 Optional Equipment 4 Location - Whirlpool WGD9600TA | Installation Instructions - Page 2
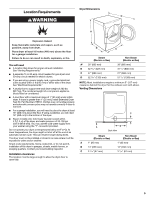
DRYER SAFETY Your safety and the safety of others are very important. We have provided many important safety messages in this manual and if you don't immediately follow instructions. WARNING You can be killed or seriously injured if you don't follow instructions. All safety messages will tell - Whirlpool WGD9600TA | Installation Instructions - Page 3
from a neighbor's phone. Follow the gas supplier's instructions. • If you cannot reach your gas supplier, call the fire department. - Installation and service must be performed by a qualified installer, service agency, or the gas supplier. WARNING: Gas leaks cannot always be detected by smell - Whirlpool WGD9600TA | Installation Instructions - Page 4
" before purchasing parts. Mobile home installations require metal exhaust system hardware available for purchase from the dealer from whom you purchased your dryer. For further information, please refer to the "Assistance or Service" section in your Use and Care Guide. Optional Equipment - Whirlpool WGD9600TA | Installation Instructions - Page 5
amp circuit needed for gas dryers and 30-amp circuit needed for electric dryers. ■ If you are using a power supply cord, a grounded electrical outlet located within 2 ft (610 mm) of either side of the dryer. See "Electrical Requirements." ■ A sturdy floor to support the total dryer weight of 200 lbs - Whirlpool WGD9600TA | Installation Instructions - Page 6
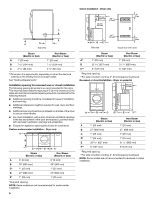
servicing. ■ Additional clearances might be required for wall, door, and floor moldings. ■ Additional spacing should be considered on all sides of the dryer considered. Custom undercounter installation - Dryer only A B C* D E* Steam (Electric or Gas) Non-Steam (Electric or Gas) A 0" (0 mm) - Whirlpool WGD9600TA | Installation Instructions - Page 7
must be made in mobile homes to introduce outside air into the dryer. The opening (such as a nearby window) should be at least twice as large as the dryer exhaust opening. For gas dryers ■ Mobile Home Installation Kit Part Number 346764. See "Tools and Parts" section for information on ordering. 7 - Whirlpool WGD9600TA | Installation Instructions - Page 8
electrician or service representative or personnel if you are in doubt as to whether the dryer is properly grounded. Do not modify the plug provided with the dryer: if it will not fit the outlet, have a proper outlet installed by a qualified electrician. SAVE THESE INSTRUCTIONS 4-wire receptacle - Whirlpool WGD9600TA | Installation Instructions - Page 9
An individual manual shutoff valve must be installed within six (6) feet (1.8 m) of the dryer in accordance with the National Fuel Gas Code, ANSI Service" section. LP gas conversion: Conversion must be made by a qualified technician. No attempt shall be made to convert the appliance from the gas - Whirlpool WGD9600TA | Installation Instructions - Page 10
electrician or service representative or personnel if you are in doubt as to whether the dryer is properly grounded. Do not modify the plug provided with the dryer: if it will not fit the outlet, have a proper outlet installed by a qualified electrician. SAVE THESE INSTRUCTIONS †®TEFLON is - Whirlpool WGD9600TA | Installation Instructions - Page 11
instructions can result in death or fire. WARNING: To reduce the risk of fire, this dryer MUST BE EXHAUSTED OUTDOORS. IMPORTANT: Observe all governing codes and ordinances. The dryer exhaust must not be connected into any gas Whirlpool Service. For more information, see the "Assistance or Service" - Whirlpool WGD9600TA | Installation Instructions - Page 12
problems and health problems manufacturer's instructions. D A E F G A. Dryer B. Elbow Service" section to order. ■ Over-the-Top Installation: Part Number 4396028 ■ Periscope Installation (For use with dryer vent to wall vent mismatch): Part Number 4396037 - 0" (0 mm) to 18" (460 mm) mismatch Part - Whirlpool WGD9600TA | Installation Instructions - Page 13
. Check that the vent is secured to exhaust hood with a 4" (102 mm) clamp. 2. Move dryer into its final location. Do not crush or kink vent. 3. (On gas models) Check that there are no kinks in the flexible gas line. 4. Once the exhaust vent connection is made, remove the corner posts and cardboard - Whirlpool WGD9600TA | Installation Instructions - Page 14
8. Read "Dryer Use." Electric Models Only 9. For power supply cord installation, plug into a grounded outlet. Gas Models Only: 10. Check that gas supply is on. scale through the water system in the dryer. Over time, the buildup of lime scale may clog different parts of the water system, which will - Whirlpool WGD9600TA | Installation Instructions - Page 15
go away. TROUBLESHOOTING First try the solutions suggested here and possibly avoid the cost of a service call... Dryer Operation Dryer will not run turn, but there may be a problem with your home power supply keeping the dryer's heater from turning on. The dryer will continue to run when this - Whirlpool WGD9600TA | Installation Instructions - Page 16
replace exhaust vent with heavy metal or flexible metal vent. See the Installation Instructions. ■ Are fabric softener sheets blocking the grille? Use only one fabric softener sheet, and use it only once. ■ Is the dryer located in a closet? Closet doors must have ventilation openings at the top and - Whirlpool WGD9600TA | Installation Instructions - Page 17
: DANGER Risque possible de décès ou de blessure grave si vous ne suivez pas immédiatement les instructions. AVERTISSEMENT Risque possible de décès ou de blessure grave si vous ne suivez pas les instructions. Tous les messages de sécurité vous diront quel est le danger potentiel et vous disent - Whirlpool WGD9600TA | Installation Instructions - Page 18
gaz (homologation UL ou CSA). Pour d'autre information, contacter le fournisseur de gaz local. En cas de détection d'une fuite de gaz, exécuter les instructions "Que faire dans le cas d'une odeur de gaz". IMPORTANT : L'installation du gaz doit se conformer aux codes locaux, ou en l'absence de codes - Whirlpool WGD9600TA | Installation Instructions - Page 19
. Lire et suivre les instructions fournies avec les outils indiqu service" de votre Guide d'utilisation et d'entretien. Équipement facultatif Consulter votre Guide . Voir "Spécifications électriques". ■ Un plancher robuste capable de supporter un poids total (sécheuse et charge) de 200 lb (90,7 kg - Whirlpool WGD9600TA | Installation Instructions - Page 20
ère la sécheuse pour le conduit d'évacuation avec coude. 20 C A B Vue latérale Steam (Electric or Gas) A* 1" (25 mm) B 7 5/8" (194 mm) C 3 3/8" (86 mm) Non-Steam (Electric or Gas) 1" (25 mm) 7 5/8" (194 mm) 3 3/8" (86 mm) * La dimension A est approximative et dépend de la visibilité du - Whirlpool WGD9600TA | Installation Instructions - Page 21
■ Pour installation dans un placard avec porte, on doit prévoir des ouvertures minimales d'entrée d'air en haut et en bas de la porte. Les portes à claire-voie offrant des ouvertures équivalentes de passage de l'air sont acceptables. ■ Il faut aussi prendre en compte l'espace requis entre les - Whirlpool WGD9600TA | Installation Instructions - Page 22
Espacement recommandé pour l'installation dans un placard REMARQUE : Certains modèles ne sont pas recommandés pour une installation dans un placard. ■ Pour installation dans un placard avec porte, on doit prévoir des ouvertures minimum d'entrée d'air au sommet du placard. A* B* Espacement - Whirlpool WGD9600TA | Installation Instructions - Page 23
en savoir plus, veuillez vous reporter aux numéros de service qui se trouvent à la section "Assistance ou service". AVERTISSEMENT Risque de choc électrique Brancher sur une prise à 4 alvéoles reliée à la terre. Le non-respect de cette instruction peut causer un décès ou un choc électrique. C'est - Whirlpool WGD9600TA | Installation Instructions - Page 24
gaz, et le personnel d'entretien autorisé. Le non-respect de ces instructions peut causer un décès, un explosion ou un incendie. Canalisation d'arrivée marchand ou composer les numéros indiqués dans la section "Assistance ou service". Conversion au gaz de pétrole liquéfié : Un technicien qualifié - Whirlpool WGD9600TA | Installation Instructions - Page 25
pas enlever la broche de liaison à la terre. Ne pas utiliser un adaptateur. Ne pas utiliser un câble de rallonge. Le non-respect de ces instructions peut causer un décès, un incendie ou un choc électrique. †®TEFLON est une marque déposée de E.I Du Pont De Nemours et Compagnie. 25 - Whirlpool WGD9600TA | Installation Instructions - Page 26
un conduit d'évacuation en feuille de métal. Le non-respect de ces instructions peut causer un décès ou un incendie. AVERTISSEMENT : Pour réduire le risque ou en appelant l'assistance Whirlpool. Pour plus de renseignements, consulter la section "Assistance ou service". Conduit métallique rigide ■ - Whirlpool WGD9600TA | Installation Instructions - Page 27
métal lourd. Ne pas utiliser un conduit d'évacuation en plastique. Ne pas utiliser un conduit d'évacuation en feuille de métal. Le non-respect de ces instructions peut causer un décès ou un incendie. 27 - Whirlpool WGD9600TA | Installation Instructions - Page 28
Deux installations à dégagement réduit sont illustrées. Voir les instructions du fabricant. A. Installation au-dessus de la sécheuse (également disponible installations où le dégagement est réduit. Voir la section "Assistance ou service" pour commander. ■ Installation au-dessus de la sécheuse : Piè - Whirlpool WGD9600TA | Installation Instructions - Page 29
PIEDS DE NIVELLEMENT AVERTISSEMENT Risque du poids excessif Utiliser deux ou plus de personnes pour déplacer et installer la sécheuse. Le non-respect de cette instruction peut causer une blessure au dos ou d'autre blessure. 1. Pour protéger le plancher, utiliser une grande pièce de carton de la bo - Whirlpool WGD9600TA | Installation Instructions - Page 30
7. Fixer le tuyau d'alimentation en eau froide de la laveuse à l'autre extrémité du connecteur en Y. Visser le raccord à la main jusqu'à ce qu'il soit fixé au connecteur en Y. A RÉGLAGE DE L'APLOMB DE LA SÉCHEUSE Contrôler l'aplomb de la sécheuse. Contrôler l'aplomb tout d'abord transversalement, - Whirlpool WGD9600TA | Installation Instructions - Page 31
ère fois. L'odeur disparaîtra. DÉPANNAGE Essayer d'abord les solutions suggérées ici, ce qui vous évitera peut-être le coût d'une visite de service... Fonctionnement de la sécheuse Le sécheuse ne fonctionne pas ■ Un fusible est-il grillé ou un disjoncteur s'est-il déclenché? Remplacer le fusible - Whirlpool WGD9600TA | Installation Instructions - Page 32
, et pour la plupart des installations, un espacement minimum de 5" (127 mm) est nécessaire à l'arrière de la sécheuse. Voir "Instructions d'installation". W10255469A W10259188A - SP © 2009 Whirlpool Corporation. All rights reserved. Tous droits réservés. 3/09 Printed in U.S.A. Imprimé aux É.-U.
-
 1
1 -
 2
2 -
 3
3 -
 4
4 -
 5
5 -
 6
6 -
 7
7 -
8
-
9
-
10
-
11
-
12
-
13
-
14
-
15
-
16
-
17
-
18
-
19
-
20
-
21
-
22
-
23
-
24
-
25
-
26
-
27
-
28
-
29
-
30
-
31
-
32
 |
 |

DRYER INSTALLATION INSTRUCTIONS
GAS (U.S.A. AND CANADA)
ELECTRIC (CANADA ONLY)
INSTRUCTIONS D'INSTALLATION DE LA SÉCHEUSE
À GAZ (É.-U. ET CANADA)
ÉLECTRIQUE (CANADA UNIQUEMENT)
TABLE OF CONTENTS
DRYER SAFETY
..............................................................................
2
INSTALLATION REQUIREMENTS
................................................
4
Tools and Parts
............................................................................
4
Optional Equipment
.....................................................................
4
Location Requirements
................................................................
5
ELECTRIC DRYER POWER HOOKUP – CANADA ONLY
..........
8
Electrical Requirements
...............................................................
8
GAS DRYER POWER HOOKUP
....................................................
9
Gas Supply Requirements
...........................................................
9
Make Gas Connection
...............................................................
10
Electrical Requirements
.............................................................
10
VENTING
.......................................................................................
11
Venting Requirements
................................................................
11
Plan Vent System
.......................................................................
12
Install Vent System
.....................................................................
13
INSTALL LEVELING LEGS
...........................................................
13
CONNECT VENT
...........................................................................
13
CONNECT INLET HOSE
(STEAM MODELS)
........................................................................
13
LEVEL DRYER
..............................................................................
14
COMPLETE INSTALLATION
.......................................................
14
TROUBLESHOOTING
..................................................................
15
TABLE DES MATIÈRES
SÉCURITÉ DE LA SÉCHEUSE
....................................................
17
EXIGENCES D'INSTALLATION
...................................................
19
Outillage et pièces
......................................................................
19
Équipement facultatif
.................................................................
19
Exigences d'emplacement
.........................................................
19
RACCORDEMENT DE L'ALIMENTATION À LA
SÉCHEUSE ÉLECTRIQUE
...........................................................
23
Spécifications électriques
..........................................................
23
RACCORDEMENT DE L'ALIMENTATION
À LA SÉCHEUSE À GAZ
..............................................................
24
Alimentation en gaz
....................................................................
24
Raccordement au gaz
................................................................
25
Spécifications électriques
..........................................................
25
ÉVACUATION
................................................................................
26
Exigences concernant l'évacuation
...........................................
26
Planification du système d'évacuation
......................................
27
Installation du système d'évacuation
.........................................
28
INSTALLATION DES PIEDS DE NIVELLEMENT
........................
29
RACCORDEMENT DU CONDUIT D'ÉVACUATION
..................
29
RACCORDEMENT DES TUYAUX D'ALIMENTATION
(MODÈLES À VAPEUR)
................................................................
29
RÉGLAGE DE L'APLOMB DE LA SÉCHEUSE
...........................
30
ACHEVER L'INSTALLATION
.......................................................
30
DÉPANNAGE
.................................................................................
31
W10255469A
W10259188A - SP