Whirlpool WRT111SFDM Use & Care Guide
Whirlpool WRT111SFDM Manual
 |
View all Whirlpool WRT111SFDM manuals
Add to My Manuals
Save this manual to your list of manuals |
Whirlpool WRT111SFDM manual content summary:
- Whirlpool WRT111SFDM | Use & Care Guide - Page 1
5 Connect the Water Supply 5 Refrigerator Doors 7 Adjust the Doors 9 REFRIGERATOR USE 9 Using the Controls 9 Ice Maker 10 REFRIGERATOR FEATURES 10 Refrigerator Shelves 10 Meat Drawer 11 Crisper 11 Utility or Egg Bin 12 FREEZER FEATURES 12 Freezer Shelf 12 DOOR FEATURES 12 Door Rails - Whirlpool WRT111SFDM | Use & Care Guide - Page 2
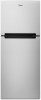
power before servicing. ■ Replace all parts and panels before operating. ■ Remove doors from your old refrigerator. ■ refrigerator. ■ Use two or more people to move and install refrigerator. ■ Disconnect power before installing ice maker (on ice maker kit ready models only). SAVE THESE INSTRUCTIONS - Whirlpool WRT111SFDM | Use & Care Guide - Page 3
problems of the past. Junked or abandoned refrigerators are still dangerous - even if they will sit for "just a few days." If you are getting rid of your old refrigerator, please follow these instructions of the refrigerator. If the insert is removed, ice may migrate down from the freezer and cause - Whirlpool WRT111SFDM | Use & Care Guide - Page 4
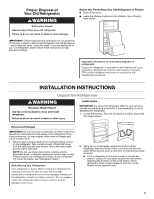
refrigerator, allow ¹⁄₂" (1.25 cm) of space on each side, and between the top of the refrigerator and overhead cabinets. Allow 2" (5 cm) of space behind the refrigerator. If your refrigerator has an ice maker of your refrigerator before using it. See the cleaning instructions in "Refrigerator Care." - Whirlpool WRT111SFDM | Use & Care Guide - Page 5
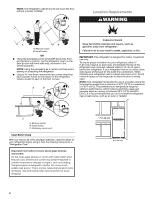
on the model) to the desired setting. See "Using the Controls" in the User Instructions, User Guide, or Use & Care Guide. Water Supply Requirements Read all directions before you begin. IMPORTANT: ■ If you turn the refrigerator on before the water line is connected, turn the ice maker OFF. ■ All - Whirlpool WRT111SFDM | Use & Care Guide - Page 6
to Refrigerator NOTE: On kit models, assemble water valve to refrigerator according to kit instructions. Style 1 1. Unplug refrigerator or disconnect (including connections at the valve) or nuts that leak. 6. The ice maker is equipped with a built-in water strainer. If your water conditions require - Whirlpool WRT111SFDM | Use & Care Guide - Page 7
freezer door free from the cabinet. 4. Remove the parts for the center hinge as shown in the Center Hinge graphic. NOTE: Provide support between the refrigerator the doors, see "Replace Doors and Hinges." Graphics follow these instructions. Door Hinge Hole Plug Cabinet Hinge Hole Plug Cabinet 1. - Whirlpool WRT111SFDM | Use & Care Guide - Page 8
Door Removal & Replacement Top Hinge A B C A. 5/16" Hex-Head Hinge Screws B. Top Hinge C. Spacer Center Hinge A B A. Center Hinge B. 5/16" Hex-Head Hinge Screws Bottom Hinge A B C A. Bottom Hinge B. 5/16" Hex-Head Hinge Screws C. Leveler Door Swing Reversal (optional) 1-1 A A. 5/16" Hex-Head Hinge - Whirlpool WRT111SFDM | Use & Care Guide - Page 9
usage. The controls are set correctly when milk or juice is as cold as you like and when ice cream is firm. ■ If the temperature is too warm or too cold in the refrigerator or freezer, before adjusting the controls, first make sure the air vents are not blocked. Adjust the Temperature Control - Whirlpool WRT111SFDM | Use & Care Guide - Page 10
damage parts of the ice maker and lead to poor quality ice. If a softened water supply cannot be avoided, make sure the water softener is operating properly and is well maintained. ■ Do not store anything on top of the ice maker or in the ice storage bin. REFRIGERATOR FEATURES Your model may have - Whirlpool WRT111SFDM | Use & Care Guide - Page 11
shelf. 5. Replace the meat drawer. NOTE: In some models the meat pan moves sideways on the shelf to allow for flexible positioning. Crisper (on some models Remove the crisper(s). Meat Storage Guide Store most meat in original the cover to remove the cover support. Then lift the cover up and - Whirlpool WRT111SFDM | Use & Care Guide - Page 12
as shown. Style 1 - Door Rails Style 2 - Trivets Freezer Shelf (on some models) To remove and replace the freezer shelf: 1. Remove items from the shelf. 2. Lift back of shelf over stop and slide shelf straight out. 3. Replace the shelf by sliding the back of the shelf into the tracks on walls of - Whirlpool WRT111SFDM | Use & Care Guide - Page 13
closed and tape the power cord to the back of the refrigerator. When you get to your new home, put everything back and refer to the "Installation Instructions" section for preparation instructions. Also, if your refrigerator has an automatic ice maker, remember to reconnect the water supply to the - Whirlpool WRT111SFDM | Use & Care Guide - Page 14
occurs as ice is being ejected from the ice maker mold. The door will not ■ The door is blocked open - Move food packages away from door. Push bin or shelf back into the correct close completely position. Make sure the crisper cover is fully pushed in, so that the back rests on the supports. The - Whirlpool WRT111SFDM | Use & Care Guide - Page 15
." The ice cubes are hollow or small (on some models) NOTE: This is an indication of low water pressure refrigerator. To order, contact us and ask for the Part Number. In the U.S.A., visit our webpage www.whirlpool.com/ accessories or call 1-800-901-2042. Automatic Ice Maker (optional): Order Part - Whirlpool WRT111SFDM | Use & Care Guide - Page 16
few minutes to review the Troubleshooting or Problem Solver section of the Use and Care Guide, scan the QR code on the right to access additional resources, or visit www.whirlpool.com/product_help. 2. All warranty service is provided exclusively by our authorized Whirlpool Service Providers. In the - Whirlpool WRT111SFDM | Use & Care Guide - Page 17
cubierto en SOLUCIÓN DE PROBLEMAS, visite nuestro sitio de internet en www.whirlpool.com para obtener información adicional. Si considera que aún necesita ayuda, importante. Hemos incluido muchos mensajes importantes de seguridad en este manual y en su electrodoméstico. Lea y obedezca siempre todos - Whirlpool WRT111SFDM | Use & Care Guide - Page 18
Advertencias de la Proposición 65 del estado de California: ADVERTENCIA: Este producto contiene una o más sustancias químicas identificadas por el estado de California como causantes de cáncer. ADVERTENCIA: Este producto contiene una o más sustancias químicas identificadas por el estado de - Whirlpool WRT111SFDM | Use & Care Guide - Page 19
niveladores. Están envueltos en una bolsa de plástico dentro del cajón para verduras. A B 2. Con la ayuda de dos o más personas, obtenga acceso a la parte inferior del refrigerador, ya sea inclinándolo primero de un lado y luego del otro, O BIEN acostándolo en el piso a su lado izquierdo, como se - Whirlpool WRT111SFDM | Use & Care Guide - Page 20
congelador dependiendo del modelo) en la posición deseada. Vea "Uso de los controles" en las Instrucciones para el usuario, el Manual del usuario, o el Manual de uso y cuidado. Requisitos del suministro de agua Lea todas las instrucciones antes de comenzar. IMPORTANTE: ■ Si enciende el refrigerador - Whirlpool WRT111SFDM | Use & Care Guide - Page 21
de compresión y manga de compresión como se muestra. Ajuste la tuerca de compresión. No apriete demasiado. 3. Use la abrazadera para tubería en la parte trasera del refrigerador para afianzar la tubería al refrigerador según se muestra. Esto ayudará a evitar daños a la tubería cuando el refrigerador - Whirlpool WRT111SFDM | Use & Care Guide - Page 22
opuesto. 4. Mueva las piezas de la bisagra superior, central e inferior, hacia el lado opuesto. Puertas 1. Quite el tapón del orificio de la bisagra de la parte superior del congelador. Colóquelo del lado opuesto como se indica. Vea la Ilustración 2. 2. Quite el tope de la puerta de la base de las - Whirlpool WRT111SFDM | Use & Care Guide - Page 23
superior. No apriete los tornillos completamente. 4. Alinee las puertas de modo que la base de la puerta del congelador esté alineada con la parte superior de la puerta del refrigerador. Apriete todos los tornillos. Pasos finales 1. Revise todos los orificios para cerciorarse de que los tapones de - Whirlpool WRT111SFDM | Use & Care Guide - Page 24
Cómo quitar y volver a poner la puerta en su lugar Bisagra superior A B C A. Tornillos de cabeza hexagonal de la bisagra de 5/16" B. Bisagra superior C. Espaciador Bisagra central A B A. Bisagra central B. Tornillos de cabeza hexagonal de la bisagra de 5/16" Bisagra inferior A B C A. Bisagra - Whirlpool WRT111SFDM | Use & Care Guide - Page 25
la inclinación del refrigerador. NOTA: Haga que alguien empuje la parte superior del refrigerador, lo cual quita algo de peso de niveladores. desea. De lo contrario, incline el refrigerador ligeramente más hacia la parte posterior, girando ambos niveladores hacia la derecha. Puede tomar varias - Whirlpool WRT111SFDM | Use & Care Guide - Page 26
Verduras de hoja: Lávelas con agua fría, escúrralas y corte o arranque las partes magulladas o amarillentas. Colóquelas en una bolsa o recipiente de plástico y gu del flujo de aire - Gire el cuadrante del control hacia Max Freezer (Congelador al máximo). ■ Control de temperatura - Gire el cuadrante - Whirlpool WRT111SFDM | Use & Care Guide - Page 27
del cajón para carnes: 1. Quite el cajón para carnes. 2. Empuje la tapa hacia atrás para liberar los sujetadores traseros del estante. Levante la parte frontal de la tapa y jálela hacia adelante. Guía para la conservación de carnes Por lo general guarde todas las carnes en su envoltura original - Whirlpool WRT111SFDM | Use & Care Guide - Page 28
la lengüeta larga hacia el frente) en la ranura que está en la parte inferior de la tapa. NOTA: Si el soporte necesita ser regulado, gire la base del congelador: 1. Saque los artículos del estante. 2. Levante la parte posterior del estante por encima del tope y deslice el estante en sentido recto - Whirlpool WRT111SFDM | Use & Care Guide - Page 29
modelos) Para quitar y volver a colocar los rieles o anaqueles: 1. Según su modelo, quite los rieles o anaqueles empujando hacia dentro ligeramente en la parte frontal del soporte mientras jala hacia afuera la lengüeta interior. Repita estos pasos para el otro extremo. 2. Vuelva a colocar los rieles - Whirlpool WRT111SFDM | Use & Care Guide - Page 30
"Uso del(de los) control(es)". 4. Limpie el refrigerador, pásele un paño y séquelo bien. 5. Fije bloques de goma o de madera con cinta adhesiva a la parte superior de ambas puertas para que queden abiertas y el aire circule. Esto evita que se formen olores y que crezcan hongos. Mudanza Si Ud. muda - Whirlpool WRT111SFDM | Use & Care Guide - Page 31
y consulte "Preguntas que se hacen con frecuencia", para evitar posiblemente el costo de una visita de servicio técnico. En EE.UU., www.whirlpool.com ADVERTENCIA ADVERTENCIA Peligro de Choque Eléctrico Conecte a un contacto de pared de conexión a tierra de 3 terminales. No quite la terminal - Whirlpool WRT111SFDM | Use & Care Guide - Page 32
el recipiente o el estante nuevamente a la posición correcta. Asegúrese de empujar bien la tapa del compartimiento para verduras, de manera que la parte posterior descanse sobre los soportes. Es difícil abrir la puerta ■ Las juntas están sucias o pegajosas - Limpie las juntas y las superficies de - Whirlpool WRT111SFDM | Use & Care Guide - Page 33
para su refrigerador. Para hacer un pedido, contáctenos y pida los números de pieza. En EE.UU., visite nuestra página de Internet, www.whirlpool.com/accessories o llame al 1-800-901-2042. Fábrica de hielo automática (opcional): Pida la pieza N° 24ECKMF Limpiador para cocina y electrodomésticos - Whirlpool WRT111SFDM | Use & Care Guide - Page 34
del Manual de uso y cuidado, escanee el código QR que se encuentra a la derecha para acceder a los recursos adicionales o visite www.whirlpool.com adjuntas o provistas con el producto, Whirlpool Corporation o Whirlpool Canada LP (en lo sucesivo denominado "Whirlpool") se hará cargo del costo de - Whirlpool WRT111SFDM | Use & Care Guide - Page 35
35 - Whirlpool WRT111SFDM | Use & Care Guide - Page 36
W10732528A ®/™ ©2014 Whirlpool. All rights reserved. Todos los derechos reservados. 8/14 Printed in Mexico Impreso en México
-
 1
1 -
 2
2 -
 3
3 -
 4
4 -
 5
5 -
 6
6 -
 7
7 -
8
-
9
-
10
-
11
-
12
-
13
-
14
-
15
-
16
-
17
-
18
-
19
-
20
-
21
-
22
-
23
-
24
-
25
-
26
-
27
-
28
-
29
-
30
-
31
-
32
-
33
-
34
-
35
-
36
 |
 |

THANK YOU for purchasing this high-quality product. If you should experience a problem not covered in TROUBLESHOOTING or
PROBLEM SOLVER, please visit our website at
www.whirlpool.com
for additional information. If you still need assistance, call us
at 1-800-253-1301.
You will need your model and serial number, located on the inside wall of the refrigerator compartment.
Table of Contents
/
Índice
REFRIGERATOR SAFETY
.....................................................................
2
INSTALLATION INSTRUCTIONS
.........................................................
3
Unpack the Refrigerator
......................................................................
3
Proper Disposal of Your Old Refrigerator
...........................................
3
Location Requirements
.......................................................................
4
Electrical Requirements
......................................................................
5
Water Supply Requirements
...............................................................
5
Connect the Water Supply
..................................................................
5
Refrigerator Doors
...............................................................................
7
Adjust the Doors
.................................................................................
9
REFRIGERATOR USE
...........................................................................
9
Using the Controls
..............................................................................
9
Ice Maker
...........................................................................................
10
REFRIGERATOR FEATURES
.............................................................
10
Refrigerator Shelves
..........................................................................
10
Meat Drawer
......................................................................................
11
Crisper
...............................................................................................
11
Utility or Egg Bin
...............................................................................
12
FREEZER FEATURES
.........................................................................
12
Freezer Shelf
.....................................................................................
12
DOOR FEATURES
...............................................................................
12
Door Rails or Trivets
..........................................................................
12
Can Racks and Door Bins
.................................................................
12
REFRIGERATOR CARE
.......................................................................
13
Cleaning
............................................................................................
13
Changing the Light Bulbs
.................................................................
13
Vacation and Moving Care
...............................................................
13
PROBLEM SOLVER
.............................................................................
14
ACCESSORIES
....................................................................................
15
WARRANTY
..........................................................................................
16
SEGURIDAD DEL REFRIGERADOR
..................................................
17
INSTRUCCIONES DE INSTALACIÓN
................................................
18
Desempaque el refrigerador
.............................................................
18
Cómo deshacerse adecuadamente de su refrigerador viejo
...........
18
Requisitos de ubicación
...................................................................
19
Requisitos eléctricos
.........................................................................
20
Requisitos del suministro de agua
...................................................
20
Conexión del suministro de agua
.....................................................
20
Puertas del refrigerador
....................................................................
22
Ajuste las puertas
.............................................................................
25
USO DE SU REFRIGERADOR
............................................................
25
Uso de los controles
.........................................................................
25
Fábrica de hielo
.................................................................................
26
CARACTERÍSTICAS DEL REFRIGERADOR
.....................................
27
Estantes del refrigerador
..................................................................
27
Cajón para carnes
.............................................................................
27
Cajón para verduras
.........................................................................
27
Compartimiento para huevos o de uso general
...............................
28
CARACTERÍSTICAS DEL CONGELADOR
........................................
28
Estante del congelador
.....................................................................
28
CARACTERÍSTICAS DE LA PUERTA
................................................
29
Rieles o anaqueles de la puerta
.......................................................
29
Portalatas y recipientes de la puerta
................................................
29
CUIDADO DE SU REFRIGERADOR
...................................................
29
Limpieza
............................................................................................
29
Cómo cambiar los focos
...................................................................
30
Cuidado durante las vacaciones y mudanzas
.................................
30
SOLUCIÓN DE PROBLEMAS
.............................................................
31
ACCESORIOS
......................................................................................
33
GARANTÍA
............................................................................................
34
REFRIGERATOR
USER INSTRUCTIONS
W10732528A