Xerox 3635MFP Systems Administrator Guide - Page 112
Print Local Copy, From: Field Options
 |
UPC - 095205741049
View all Xerox 3635MFP manuals
Add to My Manuals
Save this manual to your list of manuals |
Page 112 highlights
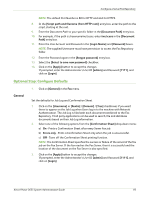
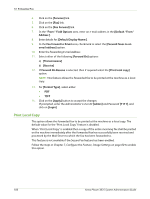
10 Embedded Fax 4. Click on the [Services] link. 5. Click on the [Fax] link. 6. Click on the [Fax Forward] link. 7. In the "From:" Field Options area, enter an e-mail address in the [Default "From:" Address:]. 8. Enter details for [Default Display Name:]. 9. In the Fax forward to Email area, checkmark to select the [Forward faxes to an email address] option. 10. Enter the forwarding E-mail Address. 11. Select either of the following [Forward On] options: a) [Transmissions] b) [Receive] 12. If Forward On Receive is selected, then if required select the [Print local copy] option. NOTE: This feature allows the forwarded fax to be printed at the machine as a local copy. 13. For [Format Type], select either: • PDF • TIFF 14. Click on the [Apply] button to accept the changes. If prompted, enter the Administrator's User ID [admin] and Password [1111], and click on [Login]. Print Local Copy This option allows the forwarded fax to be printed at the machine as a local copy. The default value for the "Print Local Copy" feature is disabled. When "Print Local Copy" is enabled then a copy of the entire incoming fax shall be printed on the machine immediately after the forwarded fax has successfully been received and processed by the Mail Server to which the fax has been forwarded to. This feature is not available if the Secure Fax feature has been enabled. Follow the steps in Chapter 7, Configure the Feature, Image Settings on page 80 to enable this option. 100 Xerox Phaser 3635 System Administration Guide
-
 1
1 -
2
-
3
-
4
-
5
-
6
-
7
-
8
-
9
-
10
-
11
-
12
-
13
-
14
-
15
-
16
-
17
-
18
-
19
-
20
-
21
-
22
-
23
-
24
-
25
-
26
-
27
-
28
-
29
-
30
-
31
-
32
-
33
-
34
-
35
-
36
-
37
-
38
-
39
-
40
-
41
-
42
-
43
-
44
-
45
-
46
-
47
-
48
-
49
-
50
-
51
-
52
-
53
-
54
-
55
-
56
-
57
-
58
-
59
-
60
-
61
-
62
-
63
-
64
-
65
-
66
-
67
-
68
-
69
-
70
-
71
-
72
-
73
-
74
-
75
-
76
-
77
-
78
-
79
-
80
-
81
-
82
-
83
-
84
-
85
-
86
-
87
-
88
-
89
-
90
-
91
-
92
-
93
-
94
-
95
-
96
-
97
-
98
-
99
-
100
-
101
-
102
-
103
-
104
-
105
-
106
-
 107
107 -
 108
108 -
 109
109 -
 110
110 -
 111
111 -
 112
112 -
 113
113 -
 114
114 -
 115
115 -
 116
116 -
 117
117 -
118
-
119
-
120
-
121
-
122
-
123
-
124
-
125
-
126
-
127
-
128
-
129
-
130
-
131
-
132
-
133
-
134
-
135
-
136
-
137
-
138
-
139
-
140
-
141
-
142
-
143
-
144
-
145
-
146
-
147
-
148
-
149
-
150
-
151
-
152
-
153
-
154
-
155
-
156
-
157
-
158
-
159
-
160
-
161
-
162
-
163
-
164
-
165
-
166
-
167
-
168
-
169
-
170
-
171
-
172
-
173
-
174
-
175
-
176
-
177
-
178
-
179
-
180
-
181
-
182
-
183
-
184
-
185
-
186
-
187
-
188
-
189
-
190
-
191
-
192
-
193
-
194
-
195
-
196
-
197
-
198
-
199
-
200
-
201
-
202
-
203
-
204
-
205
-
206
-
207
-
208
-
209
-
210
-
211
-
212
 |
 |
