Xerox 3635MFP Systems Administrator Guide - Page 138
SMart eSolutions Information, Test Communication Now]
 |
UPC - 095205741049
View all Xerox 3635MFP manuals
Add to My Manuals
Save this manual to your list of manuals |
Page 138 highlights
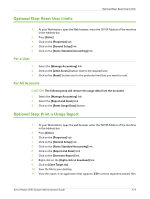
14 SMart eSolutions SMart eSolutions Information 1. Open your Web Browser and enter the TCP/IP address of the machine in the Address or Location field and press [Enter]. Your Browser will display the machine Home Page. 2. Click the [Status] tab. 3. Click [SMart eSolutions]. 4. The device communication section indicates if your device is successfully communicating with Xerox. If there is an error in communication, select the [Settings] button to update the Internet proxy settings. 5. If you click [Settings], you will be prompted to enter the administrator user name and password. The default is [admin] and [1111]. 6. In the Enrollment area, click or verify the [Enrolled] radio button. Enrollment specifies whether or not the printer will communicate with Xerox. The options are: • [Enrolled] - Communication with Xerox is enabled. This is the default state for the printer. • [Not Enrolled] - Communication with Xerox is disabled. Select this option to stop communications with Xerox. When you click [Not Enrolled] a window appears to confirm that you want to deactivate SMart eSolutions enrollment. Click [OK] to deactivate, then click [Apply] to save the selection. Machine Serial Number displays the serial number of the printer. 7. In the Communications Setup area, [Daily Transmission Time] lets you specify the start time (hour and minute) when SMart eSolutions communication occurs with Xerox. 8. If the HTTP Proxy Server is not fully configured, or you want to change or view the current configuration, click [Configure]. 9. On the HTTP Proxy Server page, click [Enabled], enter the HTTP proxy settings, then click [Save]. 10. To automatically detect HTTP Proxy Server settings, click [Enabled] for Auto Detect Proxy Settings. NOTE: Automatically detecting proxy settings may overwrite manual settings. Disable Auto Detect Proxy Settings to ensure use of manual settings. The Auto Detect process will first use the manual settings to access the Internet. If this fails it will then use WPAD to auto detect proxy settings. If WPAD fails it will then try a direct connection. Manual settings will be overwritten if new proxy settings are found. 11. Use the [Test Communication Now]... button on the Smart eSolutions setup page to verify that the communications setup parameters are correct. This button is enabled when the SMart eSolutions Enrollment is enabled. 12. Click [Apply] to save changes. 126 Xerox Phaser 3635 System Administration Guide
-
 1
1 -
2
-
3
-
4
-
5
-
6
-
7
-
8
-
9
-
10
-
11
-
12
-
13
-
14
-
15
-
16
-
17
-
18
-
19
-
20
-
21
-
22
-
23
-
24
-
25
-
26
-
27
-
28
-
29
-
30
-
31
-
32
-
33
-
34
-
35
-
36
-
37
-
38
-
39
-
40
-
41
-
42
-
43
-
44
-
45
-
46
-
47
-
48
-
49
-
50
-
51
-
52
-
53
-
54
-
55
-
56
-
57
-
58
-
59
-
60
-
61
-
62
-
63
-
64
-
65
-
66
-
67
-
68
-
69
-
70
-
71
-
72
-
73
-
74
-
75
-
76
-
77
-
78
-
79
-
80
-
81
-
82
-
83
-
84
-
85
-
86
-
87
-
88
-
89
-
90
-
91
-
92
-
93
-
94
-
95
-
96
-
97
-
98
-
99
-
100
-
101
-
102
-
103
-
104
-
105
-
106
-
107
-
108
-
109
-
110
-
111
-
112
-
113
-
114
-
115
-
116
-
117
-
118
-
119
-
120
-
121
-
122
-
123
-
124
-
125
-
126
-
127
-
128
-
129
-
130
-
131
-
132
-
 133
133 -
 134
134 -
 135
135 -
 136
136 -
 137
137 -
 138
138 -
 139
139 -
 140
140 -
 141
141 -
 142
142 -
 143
143 -
144
-
145
-
146
-
147
-
148
-
149
-
150
-
151
-
152
-
153
-
154
-
155
-
156
-
157
-
158
-
159
-
160
-
161
-
162
-
163
-
164
-
165
-
166
-
167
-
168
-
169
-
170
-
171
-
172
-
173
-
174
-
175
-
176
-
177
-
178
-
179
-
180
-
181
-
182
-
183
-
184
-
185
-
186
-
187
-
188
-
189
-
190
-
191
-
192
-
193
-
194
-
195
-
196
-
197
-
198
-
199
-
200
-
201
-
202
-
203
-
204
-
205
-
206
-
207
-
208
-
209
-
210
-
211
-
212
 |
 |