Xerox 3635MFP Systems Administrator Guide - Page 22
Setup HTTP, Change the Administrator Password, Keep Alive Timeout]
 |
UPC - 095205741049
View all Xerox 3635MFP manuals
Add to My Manuals
Save this manual to your list of manuals |
Page 22 highlights
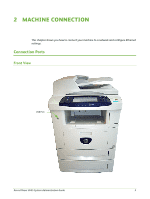
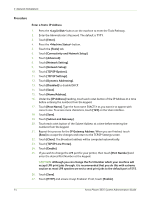
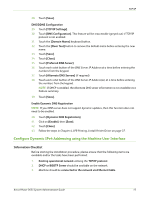
2 Machine Connection Setup HTTP The Internet Services HTTP screen enables the System Administrator to specify the Keep Alive Timeout, Maximum Connections, Port Number and Secure HTTP (SSL) settings. 1. At your Workstation, open the web browser and enter the TCP/IP Address of the machine in the Address bar. 2. Press [Enter]. 3. Click on the [Properties] tab. 4. Click on the [Connectivity] link. 5. Click on the [Protocols] link. 6. Click on the [HTTP] link. 7. The [Keep Alive Timeout] setting determines how long the machine's Internet Services pages will wait for a response from a connected user before terminating the connection. Enter the required number of seconds (1 - 60) in the [Keep Alive Timeout] entry box. NOTE: Generally, longer amounts of time that a user is connected will tend to slow down and tie up connections. Keep Alive Timeout controls the number of seconds that connections remain open from the HTTP server side without any requests from the client reaching the server. 8. The [Maximum Connections] setting is the maximum number of simultaneous connections that can occur at any given moment to Internet Services. Enter a number from 8 - 32 to indicate the maximum number of clients that can be connected (for example, with open sockets) to the HTTP server in the [Maximum Connections] entry box. 9. Change the HTTP [Port Number] if required. The default is 80. 10. Select the [Require SSL] option as the HTTP Security Mode. NOTE: The machine must have a Machine Digital Certificate configured to enable Secure HTTP - see Machine Digital Certificate Management & Trusted Certificate Authorities in the Security chapter on page 148. 11. Click on the [Apply] button to accept the changes. 12. Click on the [OK] button when the confirmation message box appears. Change the Administrator Password It is recommended that you change the default administrator password to a more secure password, so this Xerox device is not compromised. To change the admin password: 1. At your Workstation, open your web browser and enter the TCP/IP Address of the machine in the Address bar. 2. Press [Enter]. 3. Click on the [Properties] tab. 4. Click on the [Maintenance] link. 10 Xerox Phaser 3635 System Administration Guide
-
 1
1 -
2
-
3
-
4
-
5
-
6
-
7
-
8
-
9
-
10
-
11
-
12
-
13
-
14
-
15
-
16
-
 17
17 -
 18
18 -
 19
19 -
 20
20 -
 21
21 -
 22
22 -
 23
23 -
 24
24 -
 25
25 -
 26
26 -
 27
27 -
28
-
29
-
30
-
31
-
32
-
33
-
34
-
35
-
36
-
37
-
38
-
39
-
40
-
41
-
42
-
43
-
44
-
45
-
46
-
47
-
48
-
49
-
50
-
51
-
52
-
53
-
54
-
55
-
56
-
57
-
58
-
59
-
60
-
61
-
62
-
63
-
64
-
65
-
66
-
67
-
68
-
69
-
70
-
71
-
72
-
73
-
74
-
75
-
76
-
77
-
78
-
79
-
80
-
81
-
82
-
83
-
84
-
85
-
86
-
87
-
88
-
89
-
90
-
91
-
92
-
93
-
94
-
95
-
96
-
97
-
98
-
99
-
100
-
101
-
102
-
103
-
104
-
105
-
106
-
107
-
108
-
109
-
110
-
111
-
112
-
113
-
114
-
115
-
116
-
117
-
118
-
119
-
120
-
121
-
122
-
123
-
124
-
125
-
126
-
127
-
128
-
129
-
130
-
131
-
132
-
133
-
134
-
135
-
136
-
137
-
138
-
139
-
140
-
141
-
142
-
143
-
144
-
145
-
146
-
147
-
148
-
149
-
150
-
151
-
152
-
153
-
154
-
155
-
156
-
157
-
158
-
159
-
160
-
161
-
162
-
163
-
164
-
165
-
166
-
167
-
168
-
169
-
170
-
171
-
172
-
173
-
174
-
175
-
176
-
177
-
178
-
179
-
180
-
181
-
182
-
183
-
184
-
185
-
186
-
187
-
188
-
189
-
190
-
191
-
192
-
193
-
194
-
195
-
196
-
197
-
198
-
199
-
200
-
201
-
202
-
203
-
204
-
205
-
206
-
207
-
208
-
209
-
210
-
211
-
212
 |
 |