Xerox 3635MFP Systems Administrator Guide - Page 29
Con IPv4 or IPv6 Settings using CentreWare Internet Services, Self Assigned Address]
 |
UPC - 095205741049
View all Xerox 3635MFP manuals
Add to My Manuals
Save this manual to your list of manuals |
Page 29 highlights
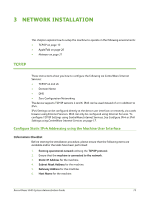
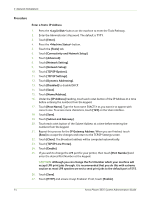
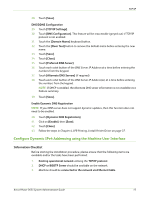
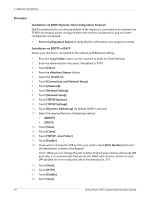
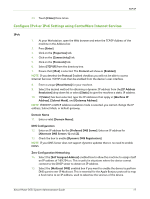
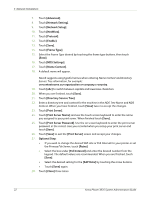
TCP/IP 23. Touch [Close] three times. Configure IPv4 or IPv6 Settings using CentreWare Internet Services IPv4 1. At your Workstation, open the Web browser and enter the TCP/IP Address of the machine in the Address bar. 2. Press [Enter]. 3. Click on the [Properties] tab. 4. Click on the [Connectivity] link. 5. Click on the [Protocols] link. 6. Select [TCP/IP] from the directory tree. 7. Ensure that [IPv4] is selected. The Protocol will show as [Enabled]. NOTE: If you deselect the Protocol Enabled checkbox you will not be able to access Internet Services. TCP/IP must then be enabled from the device's user interface. 8. Enter a unique [Host Name] for your machine. 9. Select the desired method for obtaining a dynamic IP address from the [IP Address Resolution] drop down list or select [Static] to give the machine a static IP address. 10. If [Static] has been selected, type the IP addresses that apply in [Machine IP Address], [Subnet Mask], and [Gateway Address]. NOTE: If BOOTP or DHCP address resolution mode is selected, you cannot change the IP address, Subnet Mask, or default gateway. Domain Name 11. Enter a valid [Domain Name]. DNS Configuration 12. Enter an IP address for the [Preferred DNS Server]. Enter an IP address for [Alternate DNS Servers 1] and [2]. 13. Check the box to enable [Dynamic DNS Registration]. NOTE: If your DNS Server does not support dynamic updates there is no need to enable DDNS. Zero-Configuration Networking 14. Select the [Self Assigned Address] enabled box to allow the machine to assign itself an IP address of 169.254.x.x. This is useful in situations where the device cannot connect to the DHCP server to obtain an IP address. 15. Select the [Multicast DNS] enabled box if you want to enable the device to perform DNS queries over IP Multicast. This is essential for the Apple Bonjour protocol to map a host name to an IP address, used to advertise the services of the device. Xerox Phaser 3635 System Administration Guide 17
-
 1
1 -
2
-
3
-
4
-
5
-
6
-
7
-
8
-
9
-
10
-
11
-
12
-
13
-
14
-
15
-
16
-
17
-
18
-
19
-
20
-
21
-
22
-
23
-
 24
24 -
 25
25 -
 26
26 -
 27
27 -
 28
28 -
 29
29 -
 30
30 -
 31
31 -
 32
32 -
 33
33 -
 34
34 -
35
-
36
-
37
-
38
-
39
-
40
-
41
-
42
-
43
-
44
-
45
-
46
-
47
-
48
-
49
-
50
-
51
-
52
-
53
-
54
-
55
-
56
-
57
-
58
-
59
-
60
-
61
-
62
-
63
-
64
-
65
-
66
-
67
-
68
-
69
-
70
-
71
-
72
-
73
-
74
-
75
-
76
-
77
-
78
-
79
-
80
-
81
-
82
-
83
-
84
-
85
-
86
-
87
-
88
-
89
-
90
-
91
-
92
-
93
-
94
-
95
-
96
-
97
-
98
-
99
-
100
-
101
-
102
-
103
-
104
-
105
-
106
-
107
-
108
-
109
-
110
-
111
-
112
-
113
-
114
-
115
-
116
-
117
-
118
-
119
-
120
-
121
-
122
-
123
-
124
-
125
-
126
-
127
-
128
-
129
-
130
-
131
-
132
-
133
-
134
-
135
-
136
-
137
-
138
-
139
-
140
-
141
-
142
-
143
-
144
-
145
-
146
-
147
-
148
-
149
-
150
-
151
-
152
-
153
-
154
-
155
-
156
-
157
-
158
-
159
-
160
-
161
-
162
-
163
-
164
-
165
-
166
-
167
-
168
-
169
-
170
-
171
-
172
-
173
-
174
-
175
-
176
-
177
-
178
-
179
-
180
-
181
-
182
-
183
-
184
-
185
-
186
-
187
-
188
-
189
-
190
-
191
-
192
-
193
-
194
-
195
-
196
-
197
-
198
-
199
-
200
-
201
-
202
-
203
-
204
-
205
-
206
-
207
-
208
-
209
-
210
-
211
-
212
 |
 |
