Xerox 3635MFP Systems Administrator Guide - Page 31
Test Access, Secondary DNSv6 Server Address] - install
 |
UPC - 095205741049
View all Xerox 3635MFP manuals
Add to My Manuals
Save this manual to your list of manuals |
Page 31 highlights
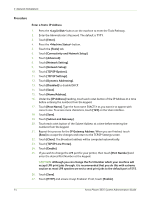
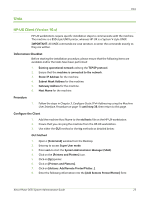
TCP/IP DNSv6 14. Enter a valid [IPv6 Domain Name]. 15. Enter an IP address for the [Primary DNSv6 Server Address]. Enter an IP address for [Secondary DNSv6 Server Address]. 16. Check the box to enable [Dynamic DNSv6 Registration]. NOTE: If your DNS Server does not support dynamic updates there is no need to enable DDNS. 17. Scroll down the page and click on the [Apply] button to save the changes. Test Access 1. At your Workstation, open the Web browser, In the TCP/IP Address bar, enter "http://" followed by the Internet address of the machine. Then press the key on the keyboard. If you use the domain name to specify the machine, use the following format. http://myhost.example.com If you use the IP address to specify the machine, use one of the following formats depending on your machine configuration. The IPv6 format is supported on Windows Vista only. An IPv6 address needs to be enclosed in square brackets. IPv4: http://xxx.xxx.xxx.xxx IPv6: http://[xxxx:xxxx:xxxx:xxxx:xxxx:xxxx:xxxx:xxxx] NOTE: If you have changed the port number from the default port number "80", append the number to the Internet address as follows. In the following examples, the port number is 8080. Domain name: http://myhost.example.com:8080 IPv4: http://xxx.xxx.xxx.xxx:8080 IPv6: http://[xxxx:xxxx:xxxx:xxxx:xxxx:xxxx:xxxx:xxxx]:8080 2. Verify that the home page of CentreWare Internet Services is displayed. The CentreWare Internet Services installation process is now completed. NOTE: If the Accounting feature is enabled, you may be required to enter a user ID and passcode (if one is set up). NOTE: When your access to CentreWare Internet Services is encrypted, enter "https://" followed by the Internet address, instead of "http://". DHCP/DDNS: • Release Registration - Allows DHCP resources to be released when the machine is powering down. This is a display-only item and shows "Enabled". Xerox Phaser 3635 System Administration Guide 19
-
 1
1 -
2
-
3
-
4
-
5
-
6
-
7
-
8
-
9
-
10
-
11
-
12
-
13
-
14
-
15
-
16
-
17
-
18
-
19
-
20
-
21
-
22
-
23
-
24
-
25
-
 26
26 -
 27
27 -
 28
28 -
 29
29 -
 30
30 -
 31
31 -
 32
32 -
 33
33 -
 34
34 -
 35
35 -
 36
36 -
37
-
38
-
39
-
40
-
41
-
42
-
43
-
44
-
45
-
46
-
47
-
48
-
49
-
50
-
51
-
52
-
53
-
54
-
55
-
56
-
57
-
58
-
59
-
60
-
61
-
62
-
63
-
64
-
65
-
66
-
67
-
68
-
69
-
70
-
71
-
72
-
73
-
74
-
75
-
76
-
77
-
78
-
79
-
80
-
81
-
82
-
83
-
84
-
85
-
86
-
87
-
88
-
89
-
90
-
91
-
92
-
93
-
94
-
95
-
96
-
97
-
98
-
99
-
100
-
101
-
102
-
103
-
104
-
105
-
106
-
107
-
108
-
109
-
110
-
111
-
112
-
113
-
114
-
115
-
116
-
117
-
118
-
119
-
120
-
121
-
122
-
123
-
124
-
125
-
126
-
127
-
128
-
129
-
130
-
131
-
132
-
133
-
134
-
135
-
136
-
137
-
138
-
139
-
140
-
141
-
142
-
143
-
144
-
145
-
146
-
147
-
148
-
149
-
150
-
151
-
152
-
153
-
154
-
155
-
156
-
157
-
158
-
159
-
160
-
161
-
162
-
163
-
164
-
165
-
166
-
167
-
168
-
169
-
170
-
171
-
172
-
173
-
174
-
175
-
176
-
177
-
178
-
179
-
180
-
181
-
182
-
183
-
184
-
185
-
186
-
187
-
188
-
189
-
190
-
191
-
192
-
193
-
194
-
195
-
196
-
197
-
198
-
199
-
200
-
201
-
202
-
203
-
204
-
205
-
206
-
207
-
208
-
209
-
210
-
211
-
212
 |
 |