Xerox 3635MFP Systems Administrator Guide - Page 32
AppleTalk, Information Checklist, Procedure - phaser password
 |
UPC - 095205741049
View all Xerox 3635MFP manuals
Add to My Manuals
Save this manual to your list of manuals |
Page 32 highlights
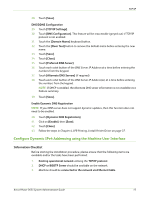
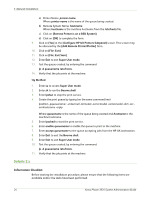
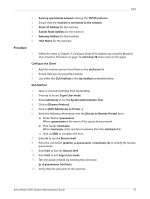
3 Network Installation Zero-Configuration Networking: • Self Assigned Address (IPv4) - Allocates an IPv4 address without using a DHCP server. This check box is selected when [IP Address Resolution] is set to [Autonet]. This is a display-only item. • Self Assigned Address (IPv6) - Displays "Enabled". This is a display-only item. AppleTalk Information Checklist Before starting the installation procedure, please ensure that the following items are available and/or the tasks have been performed: 1. Existing operational AppleTalk network. 2. AppleTalk Name to assign to your printer. 3. AppleTalk Zone (if used) where your printer will reside. Procedure Setup AppleTalk at the machine 1. Press the button on the machine to enter the Tools Pathway. 2. Enter the Administrator's Password. The default is 1111. 3. Touch [Enter]. 4. Press the button. 5. Touch the [Tools] tab. 6. Touch [Connectivity and Network Setup]. 7. Touch [Advanced]. 8. Touch [Network Setting]. 9. Touch [Network Setup]. 10. Touch [AppleTalk]. 11. Touch [Protocol]. 12. Touch [Enable]. 13. Touch [Save]. 14. Touch [Name and Area]. 15. Touch [Printer Name]. 16. Enter the name using the on screen keyboard. When you are finished, touch [Save]. 17. Touch [Area Name]. 20 Xerox Phaser 3635 System Administration Guide
-
 1
1 -
2
-
3
-
4
-
5
-
6
-
7
-
8
-
9
-
10
-
11
-
12
-
13
-
14
-
15
-
16
-
17
-
18
-
19
-
20
-
21
-
22
-
23
-
24
-
25
-
26
-
 27
27 -
 28
28 -
 29
29 -
 30
30 -
 31
31 -
 32
32 -
 33
33 -
 34
34 -
 35
35 -
 36
36 -
 37
37 -
38
-
39
-
40
-
41
-
42
-
43
-
44
-
45
-
46
-
47
-
48
-
49
-
50
-
51
-
52
-
53
-
54
-
55
-
56
-
57
-
58
-
59
-
60
-
61
-
62
-
63
-
64
-
65
-
66
-
67
-
68
-
69
-
70
-
71
-
72
-
73
-
74
-
75
-
76
-
77
-
78
-
79
-
80
-
81
-
82
-
83
-
84
-
85
-
86
-
87
-
88
-
89
-
90
-
91
-
92
-
93
-
94
-
95
-
96
-
97
-
98
-
99
-
100
-
101
-
102
-
103
-
104
-
105
-
106
-
107
-
108
-
109
-
110
-
111
-
112
-
113
-
114
-
115
-
116
-
117
-
118
-
119
-
120
-
121
-
122
-
123
-
124
-
125
-
126
-
127
-
128
-
129
-
130
-
131
-
132
-
133
-
134
-
135
-
136
-
137
-
138
-
139
-
140
-
141
-
142
-
143
-
144
-
145
-
146
-
147
-
148
-
149
-
150
-
151
-
152
-
153
-
154
-
155
-
156
-
157
-
158
-
159
-
160
-
161
-
162
-
163
-
164
-
165
-
166
-
167
-
168
-
169
-
170
-
171
-
172
-
173
-
174
-
175
-
176
-
177
-
178
-
179
-
180
-
181
-
182
-
183
-
184
-
185
-
186
-
187
-
188
-
189
-
190
-
191
-
192
-
193
-
194
-
195
-
196
-
197
-
198
-
199
-
200
-
201
-
202
-
203
-
204
-
205
-
206
-
207
-
208
-
209
-
210
-
211
-
212
 |
 |