Xerox 3635MFP Systems Administrator Guide - Page 37
Procedure, Access to Remote Printer]
 |
UPC - 095205741049
View all Xerox 3635MFP manuals
Add to My Manuals
Save this manual to your list of manuals |
Page 37 highlights
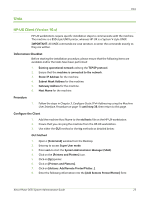
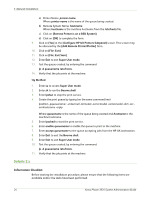
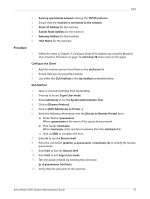
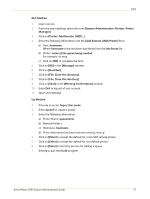
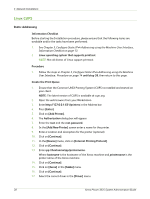
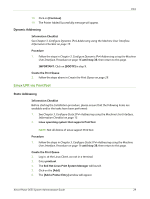
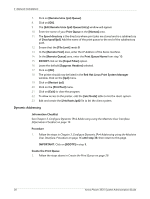
Unix 1. Existing operational network utilising the TCP/IP protocol. 2. Ensure that the machine is connected to the network. 3. Static IP Address for the machine. 4. Subnet Mask Address for the machine. 5. Gateway Address for the machine. 6. Host Name for the machine. Procedure 1. Follow the steps in Chapter 3, Configure Static IPv4 Addressing using the Machine User Interface, Procedure on page 14 until step 38, then return to this page. Configure the Client 1. Add the machine printer Host Name to the etc/hosts file. 2. Ensure that you can ping the machine. 3. Use either the GUI method or the tty method as detailed below: GUI Method 1. Open a command window from the Desktop. 2. Enter su to access Super User mode. 3. Enter admintool to run the System Administrator Tool. 4. Click on [Browse:Printers]. 5. Click on [Edit:Add:Access to Printer...]. 6. Enter the following information into the [Access to Remote Printer] form: a) Printer Name: queuename. Where queuename is the name of the queue being created. b) Print Server: hostname. Where hostname is the machine hostname from the /etc/hosts file. c) Click on [OK] to complete the form. 7. Enter sh to run the Bourne shell. 8. Enter the command: lpadmin -p queuename -s hostname !lp to modify the remote queuename. 9. Enter Exit to exit the Bourne shell. 10. Enter Exit to exit Super User mode. 11. Test the queue created, by entering the command: lp -d queuename /etc/hosts. 12. Verify that the job prints at the machine. Xerox Phaser 3635 System Administration Guide 25
-
 1
1 -
2
-
3
-
4
-
5
-
6
-
7
-
8
-
9
-
10
-
11
-
12
-
13
-
14
-
15
-
16
-
17
-
18
-
19
-
20
-
21
-
22
-
23
-
24
-
25
-
26
-
27
-
28
-
29
-
30
-
31
-
 32
32 -
 33
33 -
 34
34 -
 35
35 -
 36
36 -
 37
37 -
 38
38 -
 39
39 -
 40
40 -
 41
41 -
 42
42 -
43
-
44
-
45
-
46
-
47
-
48
-
49
-
50
-
51
-
52
-
53
-
54
-
55
-
56
-
57
-
58
-
59
-
60
-
61
-
62
-
63
-
64
-
65
-
66
-
67
-
68
-
69
-
70
-
71
-
72
-
73
-
74
-
75
-
76
-
77
-
78
-
79
-
80
-
81
-
82
-
83
-
84
-
85
-
86
-
87
-
88
-
89
-
90
-
91
-
92
-
93
-
94
-
95
-
96
-
97
-
98
-
99
-
100
-
101
-
102
-
103
-
104
-
105
-
106
-
107
-
108
-
109
-
110
-
111
-
112
-
113
-
114
-
115
-
116
-
117
-
118
-
119
-
120
-
121
-
122
-
123
-
124
-
125
-
126
-
127
-
128
-
129
-
130
-
131
-
132
-
133
-
134
-
135
-
136
-
137
-
138
-
139
-
140
-
141
-
142
-
143
-
144
-
145
-
146
-
147
-
148
-
149
-
150
-
151
-
152
-
153
-
154
-
155
-
156
-
157
-
158
-
159
-
160
-
161
-
162
-
163
-
164
-
165
-
166
-
167
-
168
-
169
-
170
-
171
-
172
-
173
-
174
-
175
-
176
-
177
-
178
-
179
-
180
-
181
-
182
-
183
-
184
-
185
-
186
-
187
-
188
-
189
-
190
-
191
-
192
-
193
-
194
-
195
-
196
-
197
-
198
-
199
-
200
-
201
-
202
-
203
-
204
-
205
-
206
-
207
-
208
-
209
-
210
-
211
-
212
 |
 |