Xerox 3635MFP Systems Administrator Guide - Page 54
AppleTalk Printing - driver xp
 |
UPC - 095205741049
View all Xerox 3635MFP manuals
Add to My Manuals
Save this manual to your list of manuals |
Page 54 highlights
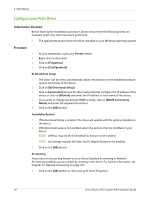
4 Print Drivers i) Click on the [Next] button. j) Click on the [Finish] button. 9. You will return to the Add Printer Wizard window and be prompted for a Printer Driver. 10. Load the Print and Fax Drivers CD into the CD drive. If the CD autoruns, click [Exit]. 11. Click on the [Have Disk] button. 12. Click on the [Browse] button. 13. Locate the Drivers folder on the CD and click on the required driver from the list. 14. Click on the [Open] button. 15. Click on the [OK] button. 16. Select the model of your machine from the list. 17. Click on the [Next] button. 18. Enter Printer Name (or accept the default name). 19. Click on the [Next] button. 20. If you want this to be your default printer, click on [Yes]. 21. Click on the [Next] button. 22. The Printer Sharing Screen appears. If you will be sharing this printer with other clients, then: a) Select: • [Share As:] - Windows 2000. • [Share Name] - Windows XP/2003. b) Enter a Share Name. c) Click on the [Next] button. 23. Enter the [Location] (Add a Comment if necessary.) 24. Click on the [Next] button. 25. Click on [Yes] to print a test page. Close the Test Page window if necessary. 26. Click on the [Next] button. 27. Click on the [Finish] button. The printer driver will install. 28. Verify that the test page is printed at the machine. AppleTalk Printing The Internet Services AppleTalk® page allows you to configure the machine to support AppleTalk®. Information Checklist 1. The AppleTalk settings must be correctly configured on the machine. 2. Locate the CentreWare Print and Fax Drivers CD delivered with your machine. 42 Xerox Phaser 3635 System Administration Guide
-
 1
1 -
2
-
3
-
4
-
5
-
6
-
7
-
8
-
9
-
10
-
11
-
12
-
13
-
14
-
15
-
16
-
17
-
18
-
19
-
20
-
21
-
22
-
23
-
24
-
25
-
26
-
27
-
28
-
29
-
30
-
31
-
32
-
33
-
34
-
35
-
36
-
37
-
38
-
39
-
40
-
41
-
42
-
43
-
44
-
45
-
46
-
47
-
48
-
 49
49 -
 50
50 -
 51
51 -
 52
52 -
 53
53 -
 54
54 -
 55
55 -
 56
56 -
 57
57 -
 58
58 -
 59
59 -
60
-
61
-
62
-
63
-
64
-
65
-
66
-
67
-
68
-
69
-
70
-
71
-
72
-
73
-
74
-
75
-
76
-
77
-
78
-
79
-
80
-
81
-
82
-
83
-
84
-
85
-
86
-
87
-
88
-
89
-
90
-
91
-
92
-
93
-
94
-
95
-
96
-
97
-
98
-
99
-
100
-
101
-
102
-
103
-
104
-
105
-
106
-
107
-
108
-
109
-
110
-
111
-
112
-
113
-
114
-
115
-
116
-
117
-
118
-
119
-
120
-
121
-
122
-
123
-
124
-
125
-
126
-
127
-
128
-
129
-
130
-
131
-
132
-
133
-
134
-
135
-
136
-
137
-
138
-
139
-
140
-
141
-
142
-
143
-
144
-
145
-
146
-
147
-
148
-
149
-
150
-
151
-
152
-
153
-
154
-
155
-
156
-
157
-
158
-
159
-
160
-
161
-
162
-
163
-
164
-
165
-
166
-
167
-
168
-
169
-
170
-
171
-
172
-
173
-
174
-
175
-
176
-
177
-
178
-
179
-
180
-
181
-
182
-
183
-
184
-
185
-
186
-
187
-
188
-
189
-
190
-
191
-
192
-
193
-
194
-
195
-
196
-
197
-
198
-
199
-
200
-
201
-
202
-
203
-
204
-
205
-
206
-
207
-
208
-
209
-
210
-
211
-
212
 |
 |