Xerox 3635MFP Systems Administrator Guide - Page 59
Paper], click [Advanced Paper Selection], Blank or Pre-printed] - manuale
 |
UPC - 095205741049
View all Xerox 3635MFP manuals
Add to My Manuals
Save this manual to your list of manuals |
Page 59 highlights
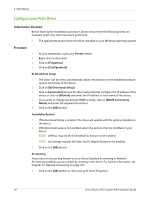
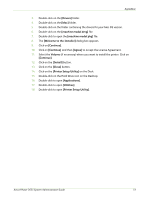
Windows Printing Printing Preferences Printing Preferences contains all the driver features and allows you to set default settings for the driver. 1. Within your Printers folder, right-click on the appropriate print driver and select [Printing Preferences]. NOTE: Click on the [Help] button in the driver to view information about each feature. Paper/Output 2. Click on the [Paper/Output] tab. 3. In [Job Type], select one of the following job types: • Normal Print. • Secure Print. • Sample Set. • Delay Print. • Saved Job. • Fax Job. 4. Click on the [Paper] menu. The Paper menu allows you to select the specific paper that you want to print on. Select the paper supply you require, or set up a custom size paper supply, as described below. To set up a custom paper: a) in [Paper], click [Advanced Paper Selection]. Advanced Paper Selection allows you to input custom measurements for non-standard paper sizes, and also scale your document. b) In [Paper size] select [...]. c) Configure the paper size settings as require, then click the [OK] button. You can specify the original document size, the output paper size, and whether you want to manually or automatically scale the output so that it fits the selected paper size. You can select standard sizes or use the [New...] options to customize the sizes. d) Configure any other settings in the [Advanced Paper Selection] as required, then click the [OK] button. 5. To add covers: a) In [Paper] select [Covers...]. b) In [Cover Options], select the cover options you require. c) In [Paper], select the paper you want to use for the covers. d) If you want to use blank or pre-printed covers, select [Blank or Pre-printed]. If you want to print images from your document on the covers, select [Printed]. Xerox Phaser 3635 System Administration Guide 47
-
 1
1 -
2
-
3
-
4
-
5
-
6
-
7
-
8
-
9
-
10
-
11
-
12
-
13
-
14
-
15
-
16
-
17
-
18
-
19
-
20
-
21
-
22
-
23
-
24
-
25
-
26
-
27
-
28
-
29
-
30
-
31
-
32
-
33
-
34
-
35
-
36
-
37
-
38
-
39
-
40
-
41
-
42
-
43
-
44
-
45
-
46
-
47
-
48
-
49
-
50
-
51
-
52
-
53
-
 54
54 -
 55
55 -
 56
56 -
 57
57 -
 58
58 -
 59
59 -
 60
60 -
 61
61 -
 62
62 -
 63
63 -
 64
64 -
65
-
66
-
67
-
68
-
69
-
70
-
71
-
72
-
73
-
74
-
75
-
76
-
77
-
78
-
79
-
80
-
81
-
82
-
83
-
84
-
85
-
86
-
87
-
88
-
89
-
90
-
91
-
92
-
93
-
94
-
95
-
96
-
97
-
98
-
99
-
100
-
101
-
102
-
103
-
104
-
105
-
106
-
107
-
108
-
109
-
110
-
111
-
112
-
113
-
114
-
115
-
116
-
117
-
118
-
119
-
120
-
121
-
122
-
123
-
124
-
125
-
126
-
127
-
128
-
129
-
130
-
131
-
132
-
133
-
134
-
135
-
136
-
137
-
138
-
139
-
140
-
141
-
142
-
143
-
144
-
145
-
146
-
147
-
148
-
149
-
150
-
151
-
152
-
153
-
154
-
155
-
156
-
157
-
158
-
159
-
160
-
161
-
162
-
163
-
164
-
165
-
166
-
167
-
168
-
169
-
170
-
171
-
172
-
173
-
174
-
175
-
176
-
177
-
178
-
179
-
180
-
181
-
182
-
183
-
184
-
185
-
186
-
187
-
188
-
189
-
190
-
191
-
192
-
193
-
194
-
195
-
196
-
197
-
198
-
199
-
200
-
201
-
202
-
203
-
204
-
205
-
206
-
207
-
208
-
209
-
210
-
211
-
212
 |
 |