Xerox 3635MFP Systems Administrator Guide - Page 64
Con your Apple Mac Print Driver, Printer Setup Utility]
 |
UPC - 095205741049
View all Xerox 3635MFP manuals
Add to My Manuals
Save this manual to your list of manuals |
Page 64 highlights
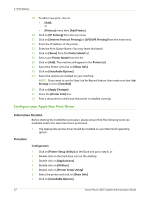
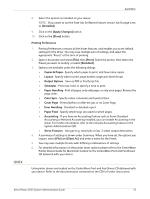
4 Print Drivers 19. To add a new print, click on: • [Add]. or • [Printers] menu then [Add Printer]. 20. Click on [IP Printing] from the top menu. 21. Click on [Internet Protocol Printing] or [LPD/LPR Printing] from the next menu. 22. Enter the IP Address of the printer. 23. Enter the Print Queue Name. (You may leave this blank). 24. Click on [Xerox] from the Printer Model list. 25. Select your Printer Model from the list. 26. Click on [Add]. The machine will appear in the Printer List. 27. Select the Printer and click on [Show Info]. 28. Click on [Installable Options]. 29. Select the options as installed on your machine. NOTE: If you want to use the Save Job for Reprint feature, then make sure that Job Storage is set to [Installed]. 30. Click on [Apply Changes]. 31. Close the [Printer Info] box. 32. Print a document to verify that the printer is installed correctly. Configure your Apple Mac Print Driver Information Checklist Before starting the Installation procedure, please ensure that the following items are available and/or the tasks have been performed: 1. The appropriate printer driver should be installed on your Macintosh operating system. Procedure Configuration 1. Click on [Printer Setup Utility] on the Dock and go to step 6, or: 2. Double-click on the hard drive icon on the desktop. 3. Double-click on [Applications]. 4. Double-click on [Utilities]. 5. Double-click on [Printer Setup Utility]. 6. Select the printer and click on [Show Info]. 7. Click on [Installable Options]. 52 Xerox Phaser 3635 System Administration Guide
-
 1
1 -
2
-
3
-
4
-
5
-
6
-
7
-
8
-
9
-
10
-
11
-
12
-
13
-
14
-
15
-
16
-
17
-
18
-
19
-
20
-
21
-
22
-
23
-
24
-
25
-
26
-
27
-
28
-
29
-
30
-
31
-
32
-
33
-
34
-
35
-
36
-
37
-
38
-
39
-
40
-
41
-
42
-
43
-
44
-
45
-
46
-
47
-
48
-
49
-
50
-
51
-
52
-
53
-
54
-
55
-
56
-
57
-
58
-
 59
59 -
 60
60 -
 61
61 -
 62
62 -
 63
63 -
 64
64 -
 65
65 -
 66
66 -
 67
67 -
 68
68 -
 69
69 -
70
-
71
-
72
-
73
-
74
-
75
-
76
-
77
-
78
-
79
-
80
-
81
-
82
-
83
-
84
-
85
-
86
-
87
-
88
-
89
-
90
-
91
-
92
-
93
-
94
-
95
-
96
-
97
-
98
-
99
-
100
-
101
-
102
-
103
-
104
-
105
-
106
-
107
-
108
-
109
-
110
-
111
-
112
-
113
-
114
-
115
-
116
-
117
-
118
-
119
-
120
-
121
-
122
-
123
-
124
-
125
-
126
-
127
-
128
-
129
-
130
-
131
-
132
-
133
-
134
-
135
-
136
-
137
-
138
-
139
-
140
-
141
-
142
-
143
-
144
-
145
-
146
-
147
-
148
-
149
-
150
-
151
-
152
-
153
-
154
-
155
-
156
-
157
-
158
-
159
-
160
-
161
-
162
-
163
-
164
-
165
-
166
-
167
-
168
-
169
-
170
-
171
-
172
-
173
-
174
-
175
-
176
-
177
-
178
-
179
-
180
-
181
-
182
-
183
-
184
-
185
-
186
-
187
-
188
-
189
-
190
-
191
-
192
-
193
-
194
-
195
-
196
-
197
-
198
-
199
-
200
-
201
-
202
-
203
-
204
-
205
-
206
-
207
-
208
-
209
-
210
-
211
-
212
 |
 |