Xerox 3635MFP Systems Administrator Guide - Page 69
Write down the IP Address or Host Name., Write down the Directory Path Structure. - file repository setup
 |
UPC - 095205741049
View all Xerox 3635MFP manuals
Add to My Manuals
Save this manual to your list of manuals |
Page 69 highlights
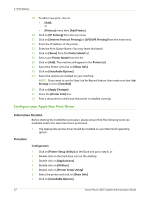
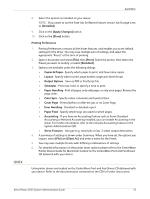
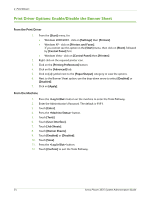
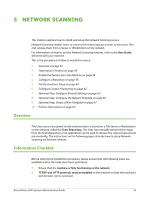
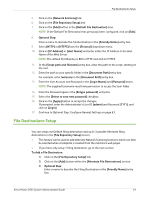
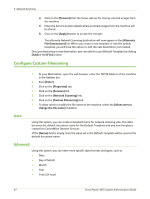
Configure a Repository Write down the IP Address or Host Name. 2. Create a folder within the FTP root. This is the Scan Repository. Write down the Directory Path Structure. 3. Create a User account and password which has read and write access to the folder within the FTP root. Write down the User Account and Password details. 4. Test the FTP connection by logging into the Scan Repository directory from a PC with the User account and password: a) Create a new folder within the directory b) Delete the folder. Procedure 1. At your Workstation, open the web browser, enter the TCP/IP Address of the machine in the Address bar. 2. Press [Enter]. 3. Click on the [Properties] tab. 4. Click on the [Services] link. 5. Click on the [Network Scanning] link. 6. Click on the [File Repository Setup] link. 7. Click on the [Add] button in the [Default File Destination] area. NOTE: If the Default File Destination has previously been configured, click on [Edit]. 8. Optional Step: Enter a name to describe the Filing Destination in the [Friendly Name] entry box. 9. Select [FTP] from the [Protocol] drop-down menu. 10. Click on either [IP Address] or [Host Name], enter the IP Address or Host Name of the FTP location. 11. Enter the FTP Port Number. (Default is 21). NOTE: It is recommended that the default port setting is used. 12. Enter the Path to the location of the Scan folder in [Document Path]. Enter the full path to the directory, starting at the root of FTP services. For example: /(directory name)/(directory name). 13. Enter the User Account and Password in the [Login Name] and [Password] entry boxes. NOTE: The supplied Username must have permission to access the Scan folder. 14. Enter the Password again in the [Retype password] entry box. 15. Select the [Select to save new password] checkbox. Xerox Phaser 3635 System Administration Guide 57
-
 1
1 -
2
-
3
-
4
-
5
-
6
-
7
-
8
-
9
-
10
-
11
-
12
-
13
-
14
-
15
-
16
-
17
-
18
-
19
-
20
-
21
-
22
-
23
-
24
-
25
-
26
-
27
-
28
-
29
-
30
-
31
-
32
-
33
-
34
-
35
-
36
-
37
-
38
-
39
-
40
-
41
-
42
-
43
-
44
-
45
-
46
-
47
-
48
-
49
-
50
-
51
-
52
-
53
-
54
-
55
-
56
-
57
-
58
-
59
-
60
-
61
-
62
-
63
-
 64
64 -
 65
65 -
 66
66 -
 67
67 -
 68
68 -
 69
69 -
 70
70 -
 71
71 -
 72
72 -
 73
73 -
 74
74 -
75
-
76
-
77
-
78
-
79
-
80
-
81
-
82
-
83
-
84
-
85
-
86
-
87
-
88
-
89
-
90
-
91
-
92
-
93
-
94
-
95
-
96
-
97
-
98
-
99
-
100
-
101
-
102
-
103
-
104
-
105
-
106
-
107
-
108
-
109
-
110
-
111
-
112
-
113
-
114
-
115
-
116
-
117
-
118
-
119
-
120
-
121
-
122
-
123
-
124
-
125
-
126
-
127
-
128
-
129
-
130
-
131
-
132
-
133
-
134
-
135
-
136
-
137
-
138
-
139
-
140
-
141
-
142
-
143
-
144
-
145
-
146
-
147
-
148
-
149
-
150
-
151
-
152
-
153
-
154
-
155
-
156
-
157
-
158
-
159
-
160
-
161
-
162
-
163
-
164
-
165
-
166
-
167
-
168
-
169
-
170
-
171
-
172
-
173
-
174
-
175
-
176
-
177
-
178
-
179
-
180
-
181
-
182
-
183
-
184
-
185
-
186
-
187
-
188
-
189
-
190
-
191
-
192
-
193
-
194
-
195
-
196
-
197
-
198
-
199
-
200
-
201
-
202
-
203
-
204
-
205
-
206
-
207
-
208
-
209
-
210
-
211
-
212
 |
 |