Xerox 3635MFP Systems Administrator Guide - Page 74
Con Custom Filenaming, Auto, Advanced
 |
UPC - 095205741049
View all Xerox 3635MFP manuals
Add to My Manuals
Save this manual to your list of manuals |
Page 74 highlights
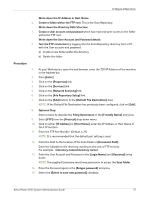
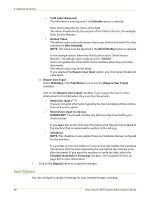
5 Network Scanning 4) Click on the [Protocol] that the Server will use for storing scanned images from the machine. 5) Enter the Server Location details where scanned images from the machine will be stored. 6) Click on the [Apply] button to accept the changes. The alternate Network Scanning destination will now appear in the [Alternate File Destinations] list. When you create a new template or edit the default template, you will have the option to add the new destination just created. Once you have setup a new destination, you can add it to your Default Template by clicking [Add] in the [File] section. Configure Custom Filenaming 1. At your Workstation, open the web browser, enter the TCP/IP Address of the machine in the Address bar. 2. Press [Enter]. 3. Click on the [Properties] tab. 4. Click on the [Services] link. 5. Click on the [Network Scanning] link. 6. Click on the [Custom Filenaming] link. 7. To allow users to modify the file name at the machine, select the [Allow users to change the file name] checkbox. Auto Using this option, you can create a standard name for network scanning jobs. This data becomes the default document name for the Default Template and any new templates created via CentreWare Internet Services. If the [Name] field is empty, then the value set in the Default Template will be used as the default document name. Advanced Using this option, you can enter more specific data formats and types, such as: • Date • Day of Month • Month • Year • Time (24 hour) 62 Xerox Phaser 3635 System Administration Guide
-
 1
1 -
2
-
3
-
4
-
5
-
6
-
7
-
8
-
9
-
10
-
11
-
12
-
13
-
14
-
15
-
16
-
17
-
18
-
19
-
20
-
21
-
22
-
23
-
24
-
25
-
26
-
27
-
28
-
29
-
30
-
31
-
32
-
33
-
34
-
35
-
36
-
37
-
38
-
39
-
40
-
41
-
42
-
43
-
44
-
45
-
46
-
47
-
48
-
49
-
50
-
51
-
52
-
53
-
54
-
55
-
56
-
57
-
58
-
59
-
60
-
61
-
62
-
63
-
64
-
65
-
66
-
67
-
68
-
 69
69 -
 70
70 -
 71
71 -
 72
72 -
 73
73 -
 74
74 -
 75
75 -
 76
76 -
 77
77 -
 78
78 -
 79
79 -
80
-
81
-
82
-
83
-
84
-
85
-
86
-
87
-
88
-
89
-
90
-
91
-
92
-
93
-
94
-
95
-
96
-
97
-
98
-
99
-
100
-
101
-
102
-
103
-
104
-
105
-
106
-
107
-
108
-
109
-
110
-
111
-
112
-
113
-
114
-
115
-
116
-
117
-
118
-
119
-
120
-
121
-
122
-
123
-
124
-
125
-
126
-
127
-
128
-
129
-
130
-
131
-
132
-
133
-
134
-
135
-
136
-
137
-
138
-
139
-
140
-
141
-
142
-
143
-
144
-
145
-
146
-
147
-
148
-
149
-
150
-
151
-
152
-
153
-
154
-
155
-
156
-
157
-
158
-
159
-
160
-
161
-
162
-
163
-
164
-
165
-
166
-
167
-
168
-
169
-
170
-
171
-
172
-
173
-
174
-
175
-
176
-
177
-
178
-
179
-
180
-
181
-
182
-
183
-
184
-
185
-
186
-
187
-
188
-
189
-
190
-
191
-
192
-
193
-
194
-
195
-
196
-
197
-
198
-
199
-
200
-
201
-
202
-
203
-
204
-
205
-
206
-
207
-
208
-
209
-
210
-
211
-
212
 |
 |