Xerox 3635MFP Systems Administrator Guide - Page 84
Copy Jobs to the machine, Store to USB, File], Print], Properties], Preferences], Job Type], Save]
 |
UPC - 095205741049
View all Xerox 3635MFP manuals
Add to My Manuals
Save this manual to your list of manuals |
Page 84 highlights
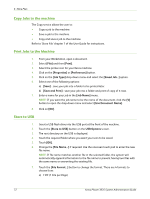
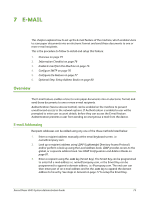
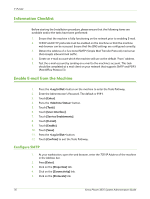
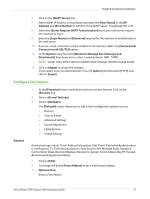
6 Store Files Copy Jobs to the machine The Copy service allows the user to: • Copy a job to the machine. • Save a job to the machine. • Copy and save a job to the machine. Refer to 'Store File' chapter 7 of the User Guide for instructions. Print Jobs to the Machine 1. From your Workstation, open a document. 2. Select [File] and then [Print]. 3. Select the printer icon for your Xerox machine. 4. Click on the [Properties] or [Preferences] button. 5. Click on the [Job Type] drop-down menu and select the [Saved Job...] option. 6. Select one of the following options: a) [Save] - save your job into a folder to be printed later. b) [Save and Print] - save your job into a folder and print of copy of it now. 7. Enter a name for your job in the [Job Name] menu. NOTE: If you want the job name to be the name of the document, click the [V] button to open the drop-down menu and select [Use Document Name]. 8. Click on [OK]. Store to USB 1. Insert a USB flash drive into the USB port at the front of the machine. 2. Touch the [Store to USB] button on the USB Options screen. 3. The root directory on the USB is displayed. 4. Touch the required folder where you want your scan to be saved. 5. Touch [OK]. 6. Change the [File Name...] if required. Use the onscreen touch pad to enter the new file name. NOTE: If file name matches another file in the selected folder, the system will automatically append information to the file name to prevent having two files with the same name or overwriting the existing file. 7. Touch the [File Format...] button to change the format. There are 4 formats to choose from: a) TIFF (1 File per Page) 72 Xerox Phaser 3635 System Administration Guide
-
 1
1 -
2
-
3
-
4
-
5
-
6
-
7
-
8
-
9
-
10
-
11
-
12
-
13
-
14
-
15
-
16
-
17
-
18
-
19
-
20
-
21
-
22
-
23
-
24
-
25
-
26
-
27
-
28
-
29
-
30
-
31
-
32
-
33
-
34
-
35
-
36
-
37
-
38
-
39
-
40
-
41
-
42
-
43
-
44
-
45
-
46
-
47
-
48
-
49
-
50
-
51
-
52
-
53
-
54
-
55
-
56
-
57
-
58
-
59
-
60
-
61
-
62
-
63
-
64
-
65
-
66
-
67
-
68
-
69
-
70
-
71
-
72
-
73
-
74
-
75
-
76
-
77
-
78
-
 79
79 -
 80
80 -
 81
81 -
 82
82 -
 83
83 -
 84
84 -
 85
85 -
 86
86 -
 87
87 -
 88
88 -
 89
89 -
90
-
91
-
92
-
93
-
94
-
95
-
96
-
97
-
98
-
99
-
100
-
101
-
102
-
103
-
104
-
105
-
106
-
107
-
108
-
109
-
110
-
111
-
112
-
113
-
114
-
115
-
116
-
117
-
118
-
119
-
120
-
121
-
122
-
123
-
124
-
125
-
126
-
127
-
128
-
129
-
130
-
131
-
132
-
133
-
134
-
135
-
136
-
137
-
138
-
139
-
140
-
141
-
142
-
143
-
144
-
145
-
146
-
147
-
148
-
149
-
150
-
151
-
152
-
153
-
154
-
155
-
156
-
157
-
158
-
159
-
160
-
161
-
162
-
163
-
164
-
165
-
166
-
167
-
168
-
169
-
170
-
171
-
172
-
173
-
174
-
175
-
176
-
177
-
178
-
179
-
180
-
181
-
182
-
183
-
184
-
185
-
186
-
187
-
188
-
189
-
190
-
191
-
192
-
193
-
194
-
195
-
196
-
197
-
198
-
199
-
200
-
201
-
202
-
203
-
204
-
205
-
206
-
207
-
208
-
209
-
210
-
211
-
212
 |
 |