Xerox 6400S Setup Guide
Xerox 6400S - WorkCentre Color Laser Manual
 |
UPC - 095205743579
View all Xerox 6400S manuals
Add to My Manuals
Save this manual to your list of manuals |
Xerox 6400S manual content summary:
- Xerox 6400S | Setup Guide - Page 1
be scanned at the machine and sent to remote clients as E-mail attachments in TIFF, PDF, XPS, or JPEG* format. SMTP and POP3 mail servers are used to send and receive E-mail respectively. *: The JPEG file format is supported by the WorkCentre 5225A/5230A only. See also: System Administration Guide - Xerox 6400S | Setup Guide - Page 2
IP address. This E-mail address will fill in the "From" field on the Emails sent from the machine. A Local Address Book can be created to store E-mail addresses. Displays only E-mail addresses on the corporate (LDAP) internal address book. * Only if the SMTP server requires login and password for - Xerox 6400S | Setup Guide - Page 3
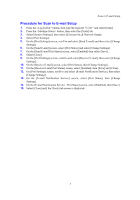
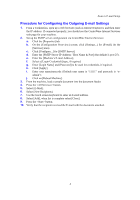
to E-mail Setup Procedure for Scan to E-mail Setup 1. Press the button, then type the login ID "11111" and select [Enter]. 2. Press the button, then select the [Tools] tab. 3. Select [System Settings], then select [Connectivity & Network Setup]. 4. Select [Port Settings - Xerox 6400S | Setup Guide - Page 4
(Default user name is "11111" and passcode is "xadmin"). j. Click on [Reboot Machine]. 3. From the machine, load a sample document into the document feeder. 4. Press the button. 5. Select [E-Mail]. 6. Select [New Recipients]. 7. Use the touch screen keyboard to enter an E-mail address - Xerox 6400S | Setup Guide - Page 5
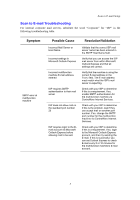
Scan to E-mail Setup Scan to E-mail Troubleshooting For internal corporate mail servers, substitute the word "Corporate" for "ISP" in the following troubleshooting table. Symptom SMTP error at multifunction machine Possible Cause Incorrect Mail Server or Host Name Incorrect settings in Microsoft - Xerox 6400S | Setup Guide - Page 6
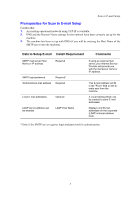
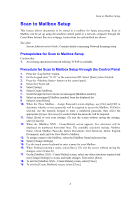
computer through the CentreWare Internet Services webpage. Instructions for each method are shown. See also: System Administration Guide: Contains details concerning Network Scanning setup. Prerequisites for Scan to Mailbox Setup Confirm that: 1. An existing operational network utilizing TCP/IP is - Xerox 6400S | Setup Guide - Page 7
Scan to Mailbox Setup Procedure for Scan to Mailbox Setup through CentreWare Internet Services 1. From a workstation, open up a web browser (such as Internet Explorer), and then enter the machine's IP address. If connected properly, you should see the CentreWare Internet Services web page for your - Xerox 6400S | Setup Guide - Page 8
> button to return to the All Services screen. Note To retrieve the scanned document to a Windows PC, install the scan driver on the PC or use CentreWare Internet Services. More information can be found on the Driver CD-ROM and in the CentreWare Internet Services chapter of the System Administration - Xerox 6400S | Setup Guide - Page 9
properties) and repositories (destination folders) need to be set up to enable network scanning. See also: System Administration Guide: Contains details about Network Scanning setup. Note This guide illustrates the instructions on FTP and SMB protocols only. For detailed information on Netware, HTTP - Xerox 6400S | Setup Guide - Page 10
changes. If you clicked [Apply], be prepared to enter the administrator User Name (default of "11111") and Passcode (default of "x-admin"), if prompted. 9. Click the [Scan] tab at the top of the CentreWare Internet Services screen to create a new Template. 10. Fill in the [Template Name] field with - Xerox 6400S | Setup Guide - Page 11
Network Scanning Setup 15. Click [Apply] to save any changes, or [Undo] to exit without saving changes. If you clicked [Apply], be prepared to enter the administrator User Name (default of "11111") and Passcode (default of "x-admin"), if prompted. 16. To set parameters for Document Management Fields - Xerox 6400S | Setup Guide - Page 12
. See also: System Administration Guide: Contains more details concerning Scan to PC setup. Prerequisites for Scan to FTP When using FTP transmission, one of the following FTP servers, with an account on that server (login name and password), is required. „ Microsoft Windows Vista „ FTP service of - Xerox 6400S | Setup Guide - Page 13
. For information on how to use CentreWare Internet Services, refer to the CentreWare Internet Services section of the System Administration Guide. 1. Display the [System Administrator Menu] screen. a. Press the button. b. Enter the login ID ("11111") using the numeric keypad or the - Xerox 6400S | Setup Guide - Page 14
Select [Scan to PC] from the [All Services] screen. 2. Select [Transfer Protocol], select a protocol, and select [Save]. 3. Select the blank lines on the screen and manually enter Server settings. For SMB you can also browse the Microsoft Network. 4. Load your document and press the button
-
 1
1 -
 2
2 -
 3
3 -
 4
4 -
 5
5 -
 6
6 -
 7
7 -
8
-
9
-
10
-
11
-
12
-
13
-
14
 |
 |

1
Quick Scan Features
Setup Guide
This guide includes instructions for:
Scan to E-mail Setup
on page 1
Scan to Mailbox Setup
on page 6
Network Scanning Setup
on page 9
Scan to PC Setup
on page 12
Some models need to have optional kits installed to use these scan features, and some models
do not support some of the scan features. For details, contact the Xerox Welcome Center.
Scan to E-mail Setup
Hard copies can be scanned at the machine and sent to remote clients as E-mail attachments
in TIFF, PDF, XPS, or JPEG* format. SMTP and POP3 mail servers are used to send and
receive E-mail respectively.
*: The JPEG file format is supported by the WorkCentre 5225A/5230A only.
See also:
System Administration Guide
: Contains details about E-mail setup.
XE3024EN0-2