Xerox 7300DN Trays and Paper Guide
Xerox 7300DN - Phaser Color Laser Printer Manual
 |
View all Xerox 7300DN manuals
Add to My Manuals
Save this manual to your list of manuals |
Xerox 7300DN manual content summary:
- Xerox 7300DN | Trays and Paper Guide - Page 1
P h a s e r® 7300 Color Printer Trays and Paper Guide - Xerox 7300DN | Trays and Paper Guide - Page 2
they are associated. PANTONE® Colors generated by the Phaser 7300 Color Printer are four- and/or three-color process simulations and may not match PANTONE-identified solid color standards. Use current PANTONE Color Reference Manuals for accurate colors. PANTONE Color simulations are only obtainable - Xerox 7300DN | Trays and Paper Guide - Page 3
Contents Supported Papers 1 Trays 2 Loading paper in Trays 1-5 3 Loading paper in the Multi-Purpose Tray 6 Using custom size paper 8 Loading custom size paper in Tray 1 9 Loading custom size paper in the Multi-Purpose Tray 11 Specialty Printing 12 Automatic 2-sided printing 12 Manual 2- - Xerox 7300DN | Trays and Paper Guide - Page 4
Phaser® 7300 Color Printer Supported Papers A large amount of information is stored in your printer as printable pages. The following pages are samples of the printable page for this topic. 7300-58 All the printable pages have this format, with color © 2002 Xerox Corporation. All Rights Reserved. 1 - Xerox 7300DN | Trays and Paper Guide - Page 5
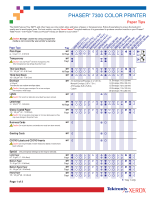
PHASER® 7300 COLOR PRINTER Paper Tips The Multi-Purpose Tray (MPT) and other trays use only certain sizes and types of paper or transparencies. Follow these tables to ensure the best print quality and to avoid paper jams. For best results, use only Xerox Phaser® branded media as it is guaranteed - Xerox 7300DN | Trays and Paper Guide - Page 6
Phaser® Branded Media Premium Color Color Printing Labels, 30/Sheet, 100 Sheets Color Printing Labels, 14/Sheet, 100 Sheets Color Printing Labels, 6/Sheet, 100 Sheets Color A3 Tabloid Extra SRA3 Letter A4 Letter A4 Letter A4 Part Number . Do not use envelopes with windows or metal clasps. • Label - Xerox 7300DN | Trays and Paper Guide - Page 7
Phaser® 7300 Color Printer Trays This section covers: I Loading paper in Supported Papers section of the Trays and Paper Guide on the Interactive Documentation CD-ROM. Instructional videos for loading trays are available on the Interactive Documentation CD-ROM or the Xerox web site at: www.xerox - Xerox 7300DN | Trays and Paper Guide - Page 8
of paper, you MUST specify the type on the front panel of the printer. OK 6200-45 Note Transparencies and glossy coated paper cannot be loaded in out the tray. 7300-21 2. If necessary, adjust the width and length guides to match the size of the paper. 7300-23 Phaser® 7300 Color Printer 3 - Xerox 7300DN | Trays and Paper Guide - Page 9
3. Fan the paper to release sheets that are stuck together. Trays 7300-22 Note Observe the fill lines on the back of the tray. Do not load paper or transparencies above the paper (1) or transparency (2) fill line, because it may cause a jam. MAX 1 2 MAX 7300-81 Phaser® 7300 Color Printer 4 - Xerox 7300DN | Trays and Paper Guide - Page 10
on your right as you face the printer. I Use for the following sizes: Legal, Tabloid (11 x 17 in.), Tabloid Extra (12 x 18 in.), Executive, US Folio, A3, SRA3, A5, A6, and paper-feed problems, make sure that the tray's paper type setting matches the loaded paper type. Phaser® 7300 Color Printer 5 - Xerox 7300DN | Trays and Paper Guide - Page 11
the Multi-Purpose Tray. To load paper in the Multi-Purpose Tray: 1. Open the Multi-Purpose Tray and unfold the two extensions. 1 2 3 7300-18 2. If printing on envelopes or specialty media, open the Left Side Output Tray and swing out the two extensions. 1 2 Phaser® 7300 Color Printer 7300-17 6 - Xerox 7300DN | Trays and Paper Guide - Page 12
in the Multi-Purpose Tray and adjust the width guides to match the size of the paper. Depending on of the page entering the printer first. I Prepunched holes should be towards the front of the printer. 7300-71 7300-72 C4 7300-74 1 2 3 7300-75 7300-93 Phaser® 7300 Color Printer 7 - Xerox 7300DN | Trays and Paper Guide - Page 13
printer's trays, you MUST set the front panel values to agree with the paper you have loaded. Banner paper (paper over 18 inches (450 mm) long must be loaded into the Multi-Purpose Tray. You MUST use the Left Side Output Tray for output. See "Output Trays" on page 26. Phaser® 7300 Color Printer - Xerox 7300DN | Trays and Paper Guide - Page 14
the guides to match the size of the paper. Place the side to be printed facedown. 1 2 7300- Printer Setup Menu (by pressing the Down Arrow key) and press the OK key. c. Scroll to Tray Setup Menu and press the OK key. d. Scroll to Tray # Setup Menu (where # is the number Phaser® 7300 Color Printer 9 - Xerox 7300DN | Trays and Paper Guide - Page 15
the OK key. 4. Scroll to Tray # Setup Menu (where # is the number of the tray) and press the OK key. 5. If you see a selection for Set Custom X, scroll to Custom Size and press the OK key to change Custom Size to Off. This reactivates the tray sensors for that tray. Phaser® 7300 Color Printer 10 - Xerox 7300DN | Trays and Paper Guide - Page 16
on page 6. 2. Insert the custom size paper and adjust the guides to match the size of the paper. Place the side to be printed faceup. 1 20)5-4 %! 2 7300-83 3. If your paper is over 18 inches long, open the illustration in Step 2) and then press the OK key. OK 6200-45 Phaser® 7300 Color Printer 11 - Xerox 7300DN | Trays and Paper Guide - Page 17
by duplexing specialty media may not be covered under your printer warranty. For best results with automatic 2-sided printing, do not use heavy toner coverage on the even-numbered pages of your print job. When you print any job, you can use the printer driver to select the orientation of the images - Xerox 7300DN | Trays and Paper Guide - Page 18
%! PHASER 7300 7300-85 7300-86 2. In the printer driver: I Select the tray containing the paper. I Select the orientation. I Select 2-sided printing. Refer to the table on page 14 for instructions and the wording used in the printer drivers. 3. Send the job to the printer. Phaser® 7300 Color - Xerox 7300DN | Trays and Paper Guide - Page 19
heavy toner coverage on side 1 of a manual 2-sided print. Increase the top margin on side 1 to at least 12 mm (0.48 in.). I Print quality may be degraded on the second side of manual 2-sided prints for weights ranging from 105-203 g/m2 (>28-75 lb. bond, 58-112 lb. index). Phaser® 7300 Color Printer - Xerox 7300DN | Trays and Paper Guide - Page 20
the printer. I Prepunched holes should be towards the front of the printer. 20)5-4 %! 20)5-4 %! 7300-38 2. In the printer driver, select the tray containing the paper. 3. Send the job to the printer so that the odd-numbered pages (side 1) are printed. 7300-39 Phaser® 7300 Color Printer 15 - Xerox 7300DN | Trays and Paper Guide - Page 21
side to be printed is facedown). I Prepunched holes should be at the back of the tray. 20)5-4 %! 7300-44 2. In the printer driver, select the tray containing the paper. 3. Send the job to the printer so that the even-numbered pages (side 2) are printed. 7300-45 Phaser® 7300 Color Printer 16 - Xerox 7300DN | Trays and Paper Guide - Page 22
the printer first. I Prepunched holes should be towards the front of the printer. 7300-71 2. In the printer driver, select the Multi-Purpose Tray as the paper source. 3. Send the job to the printer so that the odd-numbered pages (side 1) are printed. 7300-72 Phaser® 7300 Color Printer 17 - Xerox 7300DN | Trays and Paper Guide - Page 23
toward the back of the printer. PHASER 2135 PHASER 2135 PHASER 7300 PHASER 7300 7300-46 7300-47 2. In the printer driver, select the Multi-Purpose Tray as the paper source. 3. Send the job to the printer so that the even-numbered pages (side 2) are printed. Phaser® 7300 Color Printer 18 - Xerox 7300DN | Trays and Paper Guide - Page 24
Part Number 016-1896-00 016-1897-00 016-1894-00 016-1895-00 To order supplies and accessories, contact your local reseller or visit the Xerox web site at: www.xerox.com/officeprinting/7300supplies Using non-Phaser 35-Series transparency film The printer features a unique oil-less fuser. Phaser - Xerox 7300DN | Trays and Paper Guide - Page 25
the Trays section of the Trays and Paper Guide on the Interactive Documentation CD-ROM. PHASER 7300 7300-35 2. Do not load transparencies above the transparency the printer driver, either select Tray 1 as the paper source or select Transparencies as the paper type. Phaser® 7300 Color Printer 20 - Xerox 7300DN | Trays and Paper Guide - Page 26
refer to the Trays section of the Trays and Paper Guide on the Interactive Documentation CD-ROM. 7300-73 2. When the front panel prompts you to confirm the printer driver, either select Multi-Purpose Tray as the paper source or select Transparencies as the paper type. Phaser® 7300 Color Printer 21 - Xerox 7300DN | Trays and Paper Guide - Page 27
envelope enter the printer first. I Maximum capacity is 10 sheets C4 envelopes I Place the side to be printed faceup with the envelope flap closed and tucked in. I Have the top of the envelope enter the printer last. I Maximum capacity is 10 sheets C4 7300-74 Phaser® 7300 Color Printer 7300-94 22 - Xerox 7300DN | Trays and Paper Guide - Page 28
OK 6200-45 3. Open the Left Side Output Tray. 4. In the printer driver, either select Multi-Purpose Tray as the paper source or select Envelopes as the paper type. 5. Make a test print from your application to confirm that the orientation of your envelope is correct. Phaser® 7300 Color Printer 23 - Xerox 7300DN | Trays and Paper Guide - Page 29
Maximum number of sheets 50 25 25 50 25 Refer to the Supplies section of the Support Guide on the Interactive Documentation CD-ROM for information on part numbers for ordering these items. To order supplies and accessories, contact your local reseller or visit the Xerox web site at: www.xerox.com - Xerox 7300DN | Trays and Paper Guide - Page 30
entering the printer first. For more information, refer to the Trays section of the Trays and Paper Guide on the Interactive Documentation CD-ROM. 7300-75 3. When 5. In the printer driver, either select Multi-Purpose Tray as the paper source or select the paper type. Phaser® 7300 Color Printer 25 - Xerox 7300DN | Trays and Paper Guide - Page 31
Phaser® 7300 Color Printer 2 7300-17 To change the default output destination on the front panel: 1. With Menus highlighted, press the OK key. 2. Scroll to Printer Setup Menu The output goes to the default tray unless specifically changed in the printer driver. Note When you select the Left Side - Xerox 7300DN | Trays and Paper Guide - Page 32
the front panel: 1. With Menus highlighted, press the OK key. 2. Scroll to Printer Setup Menu using the Up Arrow or Down Arrow key and press OK. 3. Scroll to Job change job offsetting in your printer driver, this overrides the front panel setting for your print jobs. Phaser® 7300 Color Printer 27 - Xerox 7300DN | Trays and Paper Guide - Page 33
selections 10 range of sizes supported 8 D driver selections for 2-sided printing 14 duplex unit 12 E envelopes loading in part numbers transparencies 19 Phaser 35-Series Transparencies 19 S short-edge feed in tray 5 size range automatic 2-sided printing 12 custom size paper 8 Copyright © 2002 Xerox - Xerox 7300DN | Trays and Paper Guide - Page 34
part numbers 19 tray sensors turning on 10 trays loading 2 two-sided printing driver selections 14 manual 14 W weight range automatic 2-sided printing 12 width guide in tray 3 X X dimension of custom size paper 8 Y Y dimension of custom size paper 8 Index Phaser® 7300 Color Printer 29
-
 1
1 -
 2
2 -
 3
3 -
 4
4 -
 5
5 -
 6
6 -
 7
7 -
8
-
9
-
10
-
11
-
12
-
13
-
14
-
15
-
16
-
17
-
18
-
19
-
20
-
21
-
22
-
23
-
24
-
25
-
26
-
27
-
28
-
29
-
30
-
31
-
32
-
33
-
34
 |
 |

Phaser
®
Color Printer
7300
Trays and
Paper
Guide