Xerox 7500DX Phaser 7500 User Guide - Page 85
Using Color Corrections, Color by Words
 |
UPC - 095205706048
View all Xerox 7500DX manuals
Add to My Manuals
Save this manual to your list of manuals |
Page 85 highlights
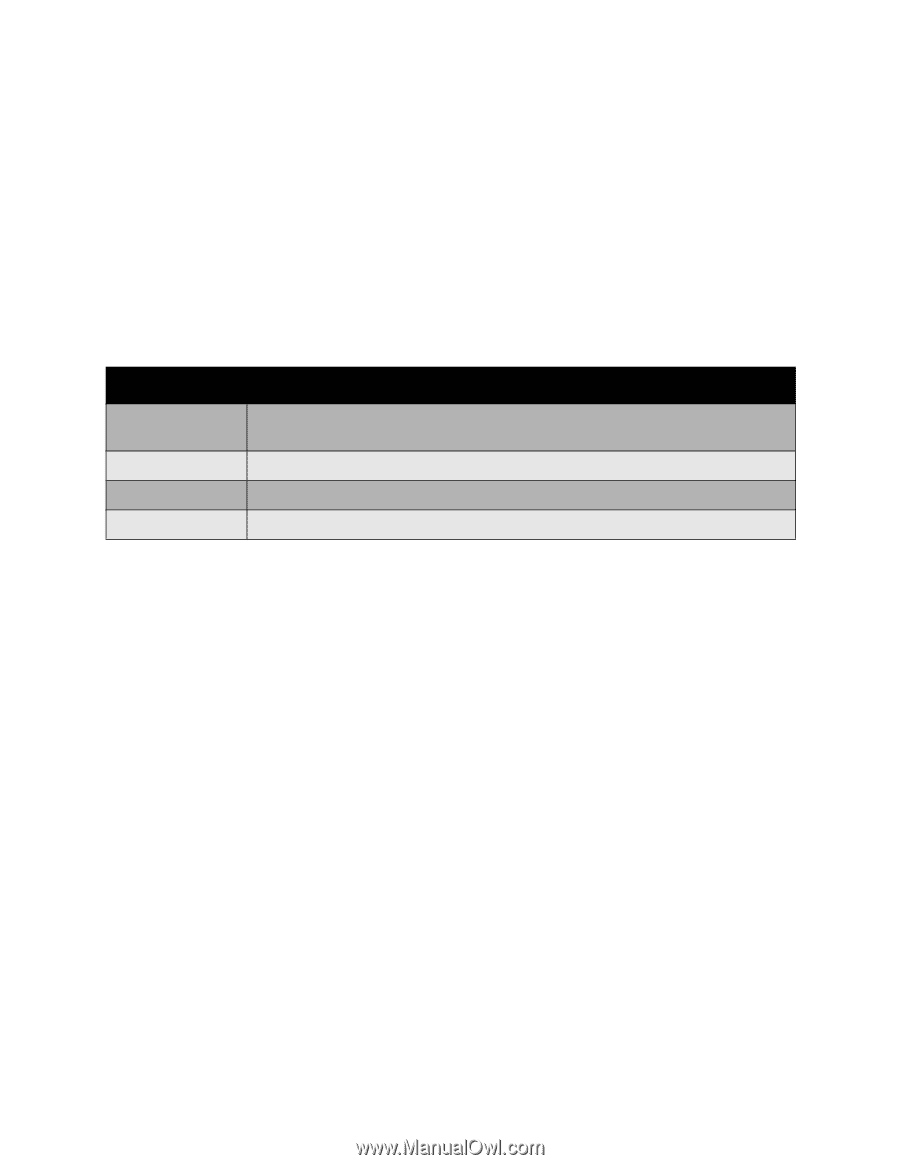
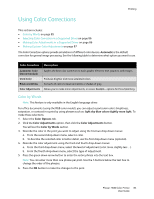
Printing Using Color Corrections This section includes: • Color by Words on page 85 • Selecting Color Correction in a Supported Driver on page 86 • Making Color Adjustments in a Supported Driver on page 86 • Making Custom Color Adjustments on page 87 The Color Correction options provide simulations of different color devices. Automatic is the default correction for general image processing. See the following table to determine what option you want to use. Color Correction Description Automatic Color (Recommended) Vivid Color Black and White Color Adjustments Applies the best color correction to each graphic element: text, graphics, and images. Produces brighter and more saturated colors. Converts all colors to black and white or shades of gray. Allows you to make minor adjustments, or access Custom... options for Press Matching. Color by Words Note: This feature is only available in the English language driver. For office documents (using the RGB color model), you can adjust a particular color's brightness, saturation, or contrast in a print by using phrases such as: light sky-blue colors slightly more light. To make these selections: 1. Select the Color Options tab. 2. Click the Color Adjustments option, then click the Color Adjustments button. You will see the Color by Words section. 3. Describe the color in the print you want to adjust using the first two drop-down menus: a. From the second drop-down menu, select a color. b. To describe the selected color in better detail, use the first drop-down menu (optional). 4. Describe the color adjustment using the third and fourth drop-down menus: a. From the third drop-down menu, select the level of adjustment (a lot more, slightly less...). b. From the fourth drop-down menu, select the type of adjustment. 5. Press the green down arrow button to enter the entire phrase into the text box. Note: You can enter more than one phrase per print. Use the 3 buttons below the text box to change the order of the phrases. 6. Press the OK button to make the changes to the print. Phaser 7500 Color Printer 85 User Guide
-
 1
1 -
2
-
3
-
4
-
5
-
6
-
7
-
8
-
9
-
10
-
11
-
12
-
13
-
14
-
15
-
16
-
17
-
18
-
19
-
20
-
21
-
22
-
23
-
24
-
25
-
26
-
27
-
28
-
29
-
30
-
31
-
32
-
33
-
34
-
35
-
36
-
37
-
38
-
39
-
40
-
41
-
42
-
43
-
44
-
45
-
46
-
47
-
48
-
49
-
50
-
51
-
52
-
53
-
54
-
55
-
56
-
57
-
58
-
59
-
60
-
61
-
62
-
63
-
64
-
65
-
66
-
67
-
68
-
69
-
70
-
71
-
72
-
73
-
74
-
75
-
76
-
77
-
78
-
79
-
 80
80 -
 81
81 -
 82
82 -
 83
83 -
 84
84 -
 85
85 -
 86
86 -
 87
87 -
 88
88 -
 89
89 -
 90
90 -
91
-
92
-
93
-
94
-
95
-
96
-
97
-
98
-
99
-
100
-
101
-
102
-
103
-
104
-
105
-
106
-
107
-
108
-
109
-
110
-
111
-
112
-
113
-
114
-
115
-
116
-
117
-
118
-
119
-
120
-
121
-
122
-
123
-
124
-
125
-
126
-
127
-
128
-
129
-
130
-
131
-
132
-
133
-
134
-
135
-
136
-
137
-
138
-
139
-
140
-
141
-
142
-
143
-
144
-
145
-
146
-
147
-
148
-
149
-
150
-
151
-
152
-
153
-
154
-
155
-
156
-
157
-
158
-
159
-
160
-
161
-
162
-
163
-
164
 |
 |