Xerox 8860MFP User Guide - Page 100
Adjusting Copying Options, Basic Settings
 |
UPC - 095205735574
View all Xerox 8860MFP manuals
Add to My Manuals
Save this manual to your list of manuals |
Page 100 highlights
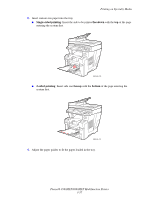
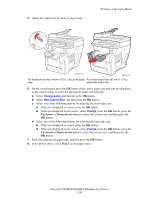
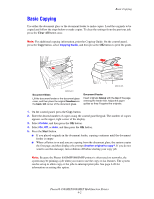
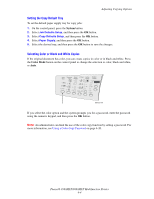
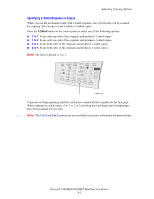
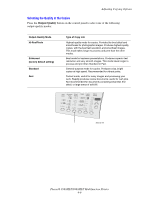
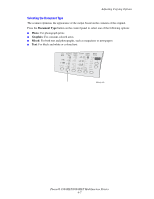
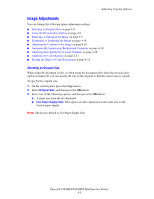
Adjusting Copying Options Adjusting Copying Options This section includes: ■ Basic Settings on page 4-3 ■ Image Adjustments on page 4-8 ■ Image Placement Adjustments on page 4-13 ■ Output Adjustments on page 4-16 ■ Advanced Copying on page 4-18 Basic Settings You can change the following basic settings: ■ Selecting a Tray to Use for Copies on page 4-3 ■ Setting the Copy Default Tray on page 4-4 ■ Selecting Color or Black and White Copies on page 4-4 ■ Specifying 2-Sided Originals or Copies on page 4-5 ■ Selecting the Quality of the Copies on page 4-6 ■ Selecting the Document Type on page 4-7 Selecting a Tray to Use for Copies In some cases, you may want to make copies on letterhead, colored paper, or transparencies. After loading the special paper in a tray, select the tray to use for your copies. To select the tray for copying special paper: 1. On the control panel, press the Copy button. 2. Select Paper Supply, and then press the OK button. 3. Select one of the following trays to use for the copies, and then press the OK button. ■ Tray 1 ■ Tray 2 ■ Tray 3 (if available on your system) ■ Tray 4 (if available on your system) Note: For best results, specify the size and type of paper if using Tray 1. Specify the paper type if using Tray 2, 3, or 4. Phaser® 8560MFP/8860MFP Multifunction Printer 4-3
-
 1
1 -
2
-
3
-
4
-
5
-
6
-
7
-
8
-
9
-
10
-
11
-
12
-
13
-
14
-
15
-
16
-
17
-
18
-
19
-
20
-
21
-
22
-
23
-
24
-
25
-
26
-
27
-
28
-
29
-
30
-
31
-
32
-
33
-
34
-
35
-
36
-
37
-
38
-
39
-
40
-
41
-
42
-
43
-
44
-
45
-
46
-
47
-
48
-
49
-
50
-
51
-
52
-
53
-
54
-
55
-
56
-
57
-
58
-
59
-
60
-
61
-
62
-
63
-
64
-
65
-
66
-
67
-
68
-
69
-
70
-
71
-
72
-
73
-
74
-
75
-
76
-
77
-
78
-
79
-
80
-
81
-
82
-
83
-
84
-
85
-
86
-
87
-
88
-
89
-
90
-
91
-
92
-
93
-
94
-
 95
95 -
 96
96 -
 97
97 -
 98
98 -
 99
99 -
 100
100 -
 101
101 -
 102
102 -
 103
103 -
 104
104 -
 105
105 -
106
-
107
-
108
-
109
-
110
-
111
-
112
-
113
-
114
-
115
-
116
-
117
-
118
-
119
-
120
-
121
-
122
-
123
-
124
-
125
-
126
-
127
-
128
-
129
-
130
-
131
-
132
-
133
-
134
-
135
-
136
-
137
-
138
-
139
-
140
-
141
-
142
-
143
-
144
-
145
-
146
-
147
-
148
-
149
-
150
-
151
-
152
-
153
-
154
-
155
-
156
-
157
-
158
-
159
-
160
-
161
-
162
-
163
-
164
-
165
-
166
-
167
-
168
-
169
-
170
-
171
-
172
-
173
-
174
-
175
-
176
-
177
-
178
-
179
-
180
-
181
-
182
-
183
-
184
-
185
-
186
-
187
-
188
-
189
-
190
-
191
-
192
-
193
-
194
-
195
-
196
-
197
-
198
-
199
-
200
-
201
-
202
-
203
-
204
-
205
-
206
-
207
-
208
-
209
-
210
-
211
-
212
-
213
-
214
-
215
-
216
-
217
-
218
-
219
-
220
-
221
-
222
-
223
-
224
-
225
-
226
-
227
-
228
-
229
-
230
-
231
-
232
-
233
-
234
-
235
-
236
-
237
-
238
-
239
-
240
-
241
-
242
-
243
-
244
-
245
-
246
-
247
-
248
-
249
-
250
-
251
-
252
-
253
-
254
-
255
-
256
-
257
-
258
-
259
-
260
-
261
-
262
-
263
-
264
-
265
-
266
-
267
-
268
-
269
-
270
-
271
-
272
-
273
-
274
-
275
-
276
-
277
-
278
-
279
-
280
-
281
 |
 |