Xerox 8860MFP User Guide - Page 107
Adjusting Scan Sensitivity to Laser Originals, Lightening or Darkening the Image
 |
UPC - 095205735574
View all Xerox 8860MFP manuals
Add to My Manuals
Save this manual to your list of manuals |
Page 107 highlights
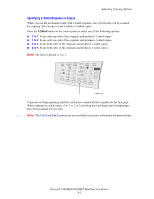
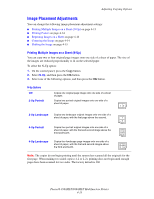
Adjusting Copying Options Lightening or Darkening the Image To lighten or darken an image when it is copied, press the Lighten/Darken button on the control panel to select a lighten/darken option. Adjusting the Contrast of the Image To reduce or increase the contrast of the image when it is copied: 1. On the control panel, press the Copy button. 2. Select Contrast, and then press the OK button. 3. Select a whole number from Highest (+3) to Lowest (-3), and then press the OK button. Note: The factory default is 0. Automatically Suppressing Background Variations When you are using originals printed on thin paper, text or images printed on one side of the paper can sometimes be seen on the other side of the paper. To prevent this from happening in your copy document, use the Auto Suppression setting to minimize the sensitivity of the scanner to variations in light background colors. To change this setting: 1. On the control panel, press the Copy button. 2. Select Auto Suppression, and then press the OK button. 3. Select either On or Off, and then press the OK button. Note: The factory default is Off. Adjusting Scan Sensitivity to Laser Originals The Laser Originals option enables you to turn on/off optimizing scan sensitivity to originals printed on laser systems and printers. To select an optimization option: 1. On the control panel, press the Copy button. 2. Select Laser Originals, and then press the OK button. 3. Select On or Off, and then press the OK button. Note: The factory default is Off. Phaser® 8560MFP/8860MFP Multifunction Printer 4-10
-
 1
1 -
2
-
3
-
4
-
5
-
6
-
7
-
8
-
9
-
10
-
11
-
12
-
13
-
14
-
15
-
16
-
17
-
18
-
19
-
20
-
21
-
22
-
23
-
24
-
25
-
26
-
27
-
28
-
29
-
30
-
31
-
32
-
33
-
34
-
35
-
36
-
37
-
38
-
39
-
40
-
41
-
42
-
43
-
44
-
45
-
46
-
47
-
48
-
49
-
50
-
51
-
52
-
53
-
54
-
55
-
56
-
57
-
58
-
59
-
60
-
61
-
62
-
63
-
64
-
65
-
66
-
67
-
68
-
69
-
70
-
71
-
72
-
73
-
74
-
75
-
76
-
77
-
78
-
79
-
80
-
81
-
82
-
83
-
84
-
85
-
86
-
87
-
88
-
89
-
90
-
91
-
92
-
93
-
94
-
95
-
96
-
97
-
98
-
99
-
100
-
101
-
 102
102 -
 103
103 -
 104
104 -
 105
105 -
 106
106 -
 107
107 -
 108
108 -
 109
109 -
 110
110 -
 111
111 -
 112
112 -
113
-
114
-
115
-
116
-
117
-
118
-
119
-
120
-
121
-
122
-
123
-
124
-
125
-
126
-
127
-
128
-
129
-
130
-
131
-
132
-
133
-
134
-
135
-
136
-
137
-
138
-
139
-
140
-
141
-
142
-
143
-
144
-
145
-
146
-
147
-
148
-
149
-
150
-
151
-
152
-
153
-
154
-
155
-
156
-
157
-
158
-
159
-
160
-
161
-
162
-
163
-
164
-
165
-
166
-
167
-
168
-
169
-
170
-
171
-
172
-
173
-
174
-
175
-
176
-
177
-
178
-
179
-
180
-
181
-
182
-
183
-
184
-
185
-
186
-
187
-
188
-
189
-
190
-
191
-
192
-
193
-
194
-
195
-
196
-
197
-
198
-
199
-
200
-
201
-
202
-
203
-
204
-
205
-
206
-
207
-
208
-
209
-
210
-
211
-
212
-
213
-
214
-
215
-
216
-
217
-
218
-
219
-
220
-
221
-
222
-
223
-
224
-
225
-
226
-
227
-
228
-
229
-
230
-
231
-
232
-
233
-
234
-
235
-
236
-
237
-
238
-
239
-
240
-
241
-
242
-
243
-
244
-
245
-
246
-
247
-
248
-
249
-
250
-
251
-
252
-
253
-
254
-
255
-
256
-
257
-
258
-
259
-
260
-
261
-
262
-
263
-
264
-
265
-
266
-
267
-
268
-
269
-
270
-
271
-
272
-
273
-
274
-
275
-
276
-
277
-
278
-
279
-
280
-
281
 |
 |