Xerox 8860MFP User Guide - Page 123
Using Walk-Up Scanning - scan driver
 |
UPC - 095205735574
View all Xerox 8860MFP manuals
Add to My Manuals
Save this manual to your list of manuals |
Page 123 highlights
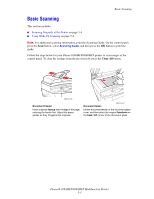
Basic Scanning Using Walk-Up Scanning With the Xerox Scan Utility, you can scan documents to your computer from any Xerox multifunction system that has Walk-Up scanning capability. You do not need to install the specific scan drivers for each system. To perform Walk-Up scanning on the Phaser 8560MFP/8860MFP printer: 1. Access the Xerox Scan Utility on your computer: ■ Windows: Right-click the Xerox Scan Utility icon on the taskbar, and then select Xerox Scan Utility. If the icon does not appear in the taskbar, click Start, select Programs, select Xerox Office Printing, select Scanning, and then select Xerox Scan Utility. ■ Macintosh: Click the Xerox Scan Utility icon in the dock. 2. Select the Walk-Up Scanning tab. 3. Click the Start Walk-Up Scanning button. 4. Follow the instructions in the Walk-Up Scanning dialog box to scan the document at the system: a. Place the document facedown on the system's document glass or faceup in the document feeder. b. On the control panel, press the Scan button. c. Select Scan To, and then press the OK button. d. Select your user name, and then press the OK button. e. If prompted, enter your four-digit numeric password, and then press the OK button. f. Select a template from the list displayed. If you have not set up a template, select Default. The image is scanned using default settings. g. If desired, change the scan options on the control panel. h. Press the Start button. 5. At your computer, click the Finished button in the Xerox Scan Utility's Walk-Up Scanning dialog box, and then view or retrieve images on the Scan to Email or Copy to Folder tab. See also: Including Scanned Images in Email on page 5-9 Copying Scanned Images to Folders on page 5-11 Managing Scan Templates on page 5-20 Phaser® 8560MFP/8860MFP Multifunction Printer 5-6
-
 1
1 -
2
-
3
-
4
-
5
-
6
-
7
-
8
-
9
-
10
-
11
-
12
-
13
-
14
-
15
-
16
-
17
-
18
-
19
-
20
-
21
-
22
-
23
-
24
-
25
-
26
-
27
-
28
-
29
-
30
-
31
-
32
-
33
-
34
-
35
-
36
-
37
-
38
-
39
-
40
-
41
-
42
-
43
-
44
-
45
-
46
-
47
-
48
-
49
-
50
-
51
-
52
-
53
-
54
-
55
-
56
-
57
-
58
-
59
-
60
-
61
-
62
-
63
-
64
-
65
-
66
-
67
-
68
-
69
-
70
-
71
-
72
-
73
-
74
-
75
-
76
-
77
-
78
-
79
-
80
-
81
-
82
-
83
-
84
-
85
-
86
-
87
-
88
-
89
-
90
-
91
-
92
-
93
-
94
-
95
-
96
-
97
-
98
-
99
-
100
-
101
-
102
-
103
-
104
-
105
-
106
-
107
-
108
-
109
-
110
-
111
-
112
-
113
-
114
-
115
-
116
-
117
-
 118
118 -
 119
119 -
 120
120 -
 121
121 -
 122
122 -
 123
123 -
 124
124 -
 125
125 -
 126
126 -
 127
127 -
 128
128 -
129
-
130
-
131
-
132
-
133
-
134
-
135
-
136
-
137
-
138
-
139
-
140
-
141
-
142
-
143
-
144
-
145
-
146
-
147
-
148
-
149
-
150
-
151
-
152
-
153
-
154
-
155
-
156
-
157
-
158
-
159
-
160
-
161
-
162
-
163
-
164
-
165
-
166
-
167
-
168
-
169
-
170
-
171
-
172
-
173
-
174
-
175
-
176
-
177
-
178
-
179
-
180
-
181
-
182
-
183
-
184
-
185
-
186
-
187
-
188
-
189
-
190
-
191
-
192
-
193
-
194
-
195
-
196
-
197
-
198
-
199
-
200
-
201
-
202
-
203
-
204
-
205
-
206
-
207
-
208
-
209
-
210
-
211
-
212
-
213
-
214
-
215
-
216
-
217
-
218
-
219
-
220
-
221
-
222
-
223
-
224
-
225
-
226
-
227
-
228
-
229
-
230
-
231
-
232
-
233
-
234
-
235
-
236
-
237
-
238
-
239
-
240
-
241
-
242
-
243
-
244
-
245
-
246
-
247
-
248
-
249
-
250
-
251
-
252
-
253
-
254
-
255
-
256
-
257
-
258
-
259
-
260
-
261
-
262
-
263
-
264
-
265
-
266
-
267
-
268
-
269
-
270
-
271
-
272
-
273
-
274
-
275
-
276
-
277
-
278
-
279
-
280
-
281
 |
 |