Xerox 8860MFP User Guide - Page 145
Using the Control Panel, Using CentreWare IS, Address, Scans, Administrative, Folder Cleanup
 |
UPC - 095205735574
View all Xerox 8860MFP manuals
Add to My Manuals
Save this manual to your list of manuals |
Page 145 highlights
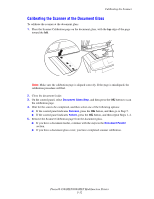
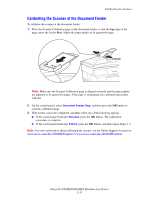
Managing Files and Scanning Policies Using the Control Panel To remove all scan files from the Public Folder: 1. On the control panel, press the Scan button. 2. Select Scan To, and then press the OK button. 3. Select Public Folder, and then press the OK button. 4. Select Clear Folder, and then press the OK button. 5. When prompted to remove all scan files from this folder, select Yes, and then press the OK button. Using CentreWare IS To remove one or more scan files from the Public Folder or a private folder: 1. Launch your web browser. 2. Enter your system's IP address in the browser's Address field. 3. Click the Scans button to view the Scans tab. 4. To delete scanned images from the Public Folder: a. Select Administrative on the left navigation panel. b. Click Folder Cleanup. c. If prompted, enter a four-digit password, and then press the OK button. d. Select options from the items displayed. e. Click Save Changes when you are finished. 5. To delete scanned images from a private folder: a. Select Private Folders on the left navigation panel. b. Click the name of the private folder in the list displayed. c. If prompted, enter a four-digit password, and then press the OK button. ■ If you want to delete all image files in a folder, click the Delete All button. ■ If you want to delete a specific file, click the Delete button to the right of the file. Note: For more information, click the Help button to view online help. Phaser® 8560MFP/8860MFP Multifunction Printer 5-28
-
 1
1 -
2
-
3
-
4
-
5
-
6
-
7
-
8
-
9
-
10
-
11
-
12
-
13
-
14
-
15
-
16
-
17
-
18
-
19
-
20
-
21
-
22
-
23
-
24
-
25
-
26
-
27
-
28
-
29
-
30
-
31
-
32
-
33
-
34
-
35
-
36
-
37
-
38
-
39
-
40
-
41
-
42
-
43
-
44
-
45
-
46
-
47
-
48
-
49
-
50
-
51
-
52
-
53
-
54
-
55
-
56
-
57
-
58
-
59
-
60
-
61
-
62
-
63
-
64
-
65
-
66
-
67
-
68
-
69
-
70
-
71
-
72
-
73
-
74
-
75
-
76
-
77
-
78
-
79
-
80
-
81
-
82
-
83
-
84
-
85
-
86
-
87
-
88
-
89
-
90
-
91
-
92
-
93
-
94
-
95
-
96
-
97
-
98
-
99
-
100
-
101
-
102
-
103
-
104
-
105
-
106
-
107
-
108
-
109
-
110
-
111
-
112
-
113
-
114
-
115
-
116
-
117
-
118
-
119
-
120
-
121
-
122
-
123
-
124
-
125
-
126
-
127
-
128
-
129
-
130
-
131
-
132
-
133
-
134
-
135
-
136
-
137
-
138
-
139
-
 140
140 -
 141
141 -
 142
142 -
 143
143 -
 144
144 -
 145
145 -
 146
146 -
 147
147 -
 148
148 -
 149
149 -
 150
150 -
151
-
152
-
153
-
154
-
155
-
156
-
157
-
158
-
159
-
160
-
161
-
162
-
163
-
164
-
165
-
166
-
167
-
168
-
169
-
170
-
171
-
172
-
173
-
174
-
175
-
176
-
177
-
178
-
179
-
180
-
181
-
182
-
183
-
184
-
185
-
186
-
187
-
188
-
189
-
190
-
191
-
192
-
193
-
194
-
195
-
196
-
197
-
198
-
199
-
200
-
201
-
202
-
203
-
204
-
205
-
206
-
207
-
208
-
209
-
210
-
211
-
212
-
213
-
214
-
215
-
216
-
217
-
218
-
219
-
220
-
221
-
222
-
223
-
224
-
225
-
226
-
227
-
228
-
229
-
230
-
231
-
232
-
233
-
234
-
235
-
236
-
237
-
238
-
239
-
240
-
241
-
242
-
243
-
244
-
245
-
246
-
247
-
248
-
249
-
250
-
251
-
252
-
253
-
254
-
255
-
256
-
257
-
258
-
259
-
260
-
261
-
262
-
263
-
264
-
265
-
266
-
267
-
268
-
269
-
270
-
271
-
272
-
273
-
274
-
275
-
276
-
277
-
278
-
279
-
280
-
281
 |
 |