Xerox 8860MFP User Guide - Page 19
Left Side of the Control Panel, Control Panel, Phaser® 8560MFP/8860MFP Multifunction Printer - phaser d
 |
UPC - 095205735574
View all Xerox 8860MFP manuals
Add to My Manuals
Save this manual to your list of manuals |
Page 19 highlights
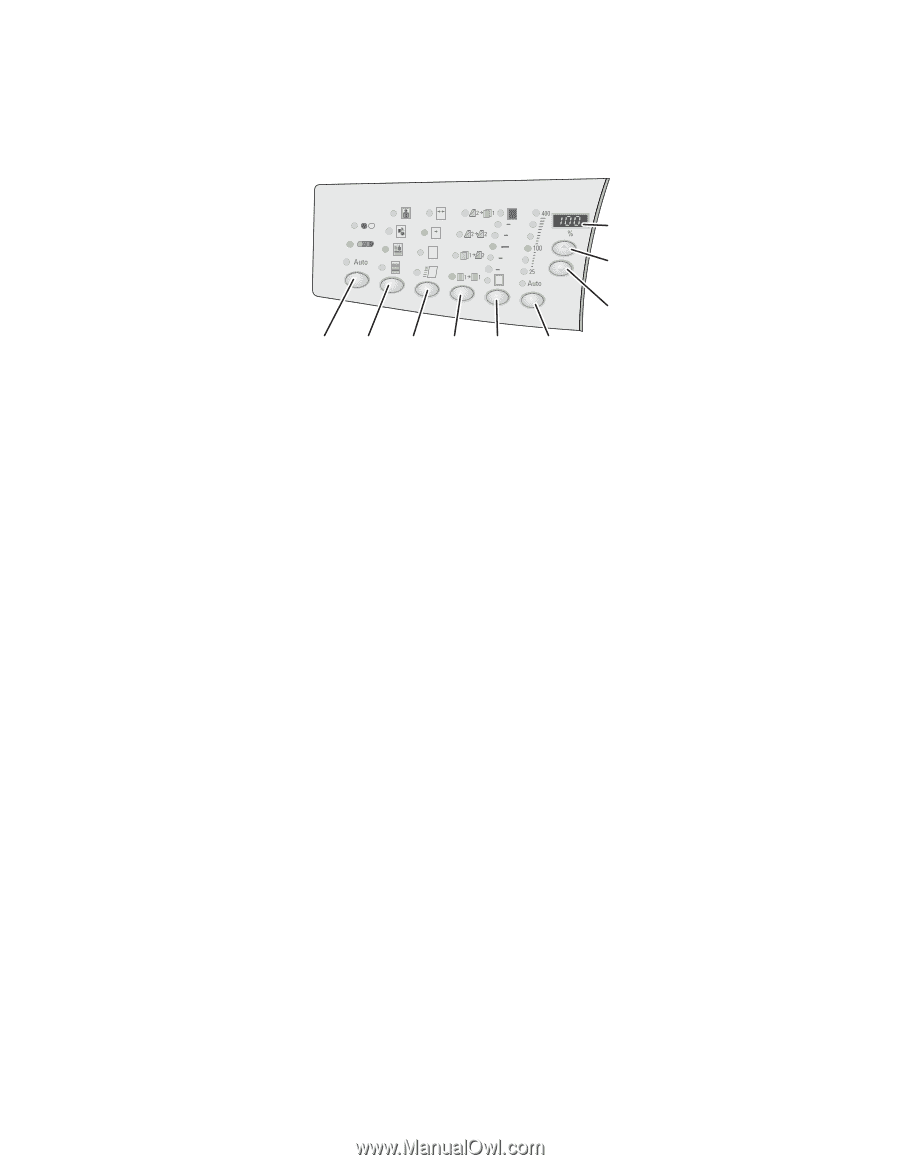
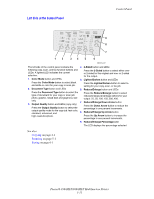
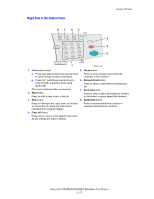
Left Side of the Control Panel Control Panel Color Document Output 2 Sided Lighten Mode Type Quality Darken Reduce Enlarge 9 8 7 12 34 5 6 8860mfp-007 The left side of the control panel contains the 4. 2-Sided button and LEDs following copy, scan, and fax function buttons and LEDs. A lighted LED indicates the current selection. Press the 2-Sided button to select either oneor 2-sided for the original and one- or 2-sided for the output. 1. Color Mode button and LEDs 5. Lighten/Darken button and LEDs Press the Color Mode button to select black and white or color for your copy or scan job. Press the Lighten/Darken button to select a setting for your copy, scan, or fax job. 2. Document Type button and LEDs 6. Reduce/Enlarge button and LEDs Press the Document Type button to select the Press the Reduce/Enlarge button to select type of document for your copy or scan job: reduce/enlarge percentage options for your photo, graphic, mixed (text and graphics), text output: 25, 50, 100, 150, 200, 400. only. 7. Reduce/Enlarge Down Arrow button 3. Output Quality button and LEDs (copy only) Press the Down Arrow button to reduce the Press the Output Quality button to select the percentage in one percent increments. output quality mode for the copy job: fast color, standard, enhanced, and 8. Reduce/Enlarge Up Arrow button high-resolution/photo. Press the Up Arrow button to increase the percentage in one percent increments. 9. Reduce/Enlarge Percentage LED The LED displays the percentage selected. See also: Copying on page 4-1 Scanning on page 5-1 Faxing on page 6-1 Phaser® 8560MFP/8860MFP Multifunction Printer 1-11
-
 1
1 -
2
-
3
-
4
-
5
-
6
-
7
-
8
-
9
-
10
-
11
-
12
-
13
-
 14
14 -
 15
15 -
 16
16 -
 17
17 -
 18
18 -
 19
19 -
 20
20 -
 21
21 -
 22
22 -
 23
23 -
 24
24 -
25
-
26
-
27
-
28
-
29
-
30
-
31
-
32
-
33
-
34
-
35
-
36
-
37
-
38
-
39
-
40
-
41
-
42
-
43
-
44
-
45
-
46
-
47
-
48
-
49
-
50
-
51
-
52
-
53
-
54
-
55
-
56
-
57
-
58
-
59
-
60
-
61
-
62
-
63
-
64
-
65
-
66
-
67
-
68
-
69
-
70
-
71
-
72
-
73
-
74
-
75
-
76
-
77
-
78
-
79
-
80
-
81
-
82
-
83
-
84
-
85
-
86
-
87
-
88
-
89
-
90
-
91
-
92
-
93
-
94
-
95
-
96
-
97
-
98
-
99
-
100
-
101
-
102
-
103
-
104
-
105
-
106
-
107
-
108
-
109
-
110
-
111
-
112
-
113
-
114
-
115
-
116
-
117
-
118
-
119
-
120
-
121
-
122
-
123
-
124
-
125
-
126
-
127
-
128
-
129
-
130
-
131
-
132
-
133
-
134
-
135
-
136
-
137
-
138
-
139
-
140
-
141
-
142
-
143
-
144
-
145
-
146
-
147
-
148
-
149
-
150
-
151
-
152
-
153
-
154
-
155
-
156
-
157
-
158
-
159
-
160
-
161
-
162
-
163
-
164
-
165
-
166
-
167
-
168
-
169
-
170
-
171
-
172
-
173
-
174
-
175
-
176
-
177
-
178
-
179
-
180
-
181
-
182
-
183
-
184
-
185
-
186
-
187
-
188
-
189
-
190
-
191
-
192
-
193
-
194
-
195
-
196
-
197
-
198
-
199
-
200
-
201
-
202
-
203
-
204
-
205
-
206
-
207
-
208
-
209
-
210
-
211
-
212
-
213
-
214
-
215
-
216
-
217
-
218
-
219
-
220
-
221
-
222
-
223
-
224
-
225
-
226
-
227
-
228
-
229
-
230
-
231
-
232
-
233
-
234
-
235
-
236
-
237
-
238
-
239
-
240
-
241
-
242
-
243
-
244
-
245
-
246
-
247
-
248
-
249
-
250
-
251
-
252
-
253
-
254
-
255
-
256
-
257
-
258
-
259
-
260
-
261
-
262
-
263
-
264
-
265
-
266
-
267
-
268
-
269
-
270
-
271
-
272
-
273
-
274
-
275
-
276
-
277
-
278
-
279
-
280
-
281
 |
 |