Xerox 8860MFP User Guide - Page 20
Middle of the Control Panel, Print, System Setup - phaser errors
 |
UPC - 095205735574
View all Xerox 8860MFP manuals
Add to My Manuals
Save this manual to your list of manuals |
Page 20 highlights
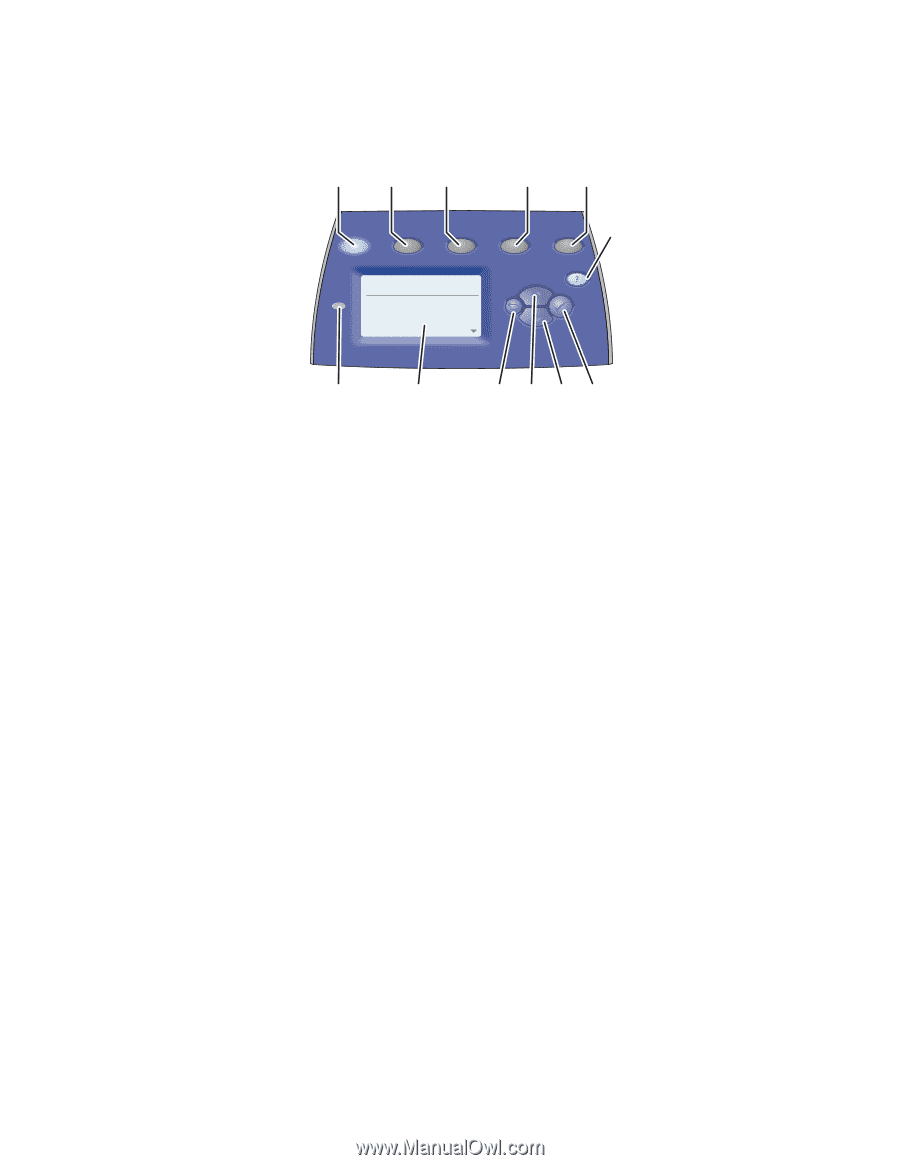
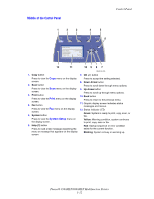
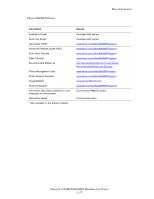
Middle of the Control Panel 1 2 3 4 5 Copy Scan Print Fax System 6 Ready to Copy 1 Paper Supply... Reduce/Enlarge... Lighten/Darken... Original Size... 2: Letter 8.5X11 100% 0 Tray/Auto Control Panel 12 11 10 9 8 7 8860mfp-006 1. Copy button Press to view the Copy menu on the display screen. 2. Scan button Press to view the Scan menu on the display screen. 3. Print button Press to view the Print menu on the display screen. 4. Fax button Press to view the Fax menu on the display screen. 5. System button Press to view the System Setup menu on the display screen. 6. Help (?) button Press to read a help message explaining the menu or message that appears on the display screen. 7. OK (✓) button Press to accept the setting selected. 8. Down Arrow button Press to scroll down through menu options. 9. Up Arrow button Press to scroll up through menu options. 10. Back button Press to return to the previous menu. 11. Graphic display screen indicates status messages and menus. 12. Status indicator LED: Green: System is ready to print, copy, scan, or fax. Yellow: Warning condition, system continues to print, copy, scan or fax. Red: Startup sequence or error condition exists for the current function. Blinking: System is busy or warming up. Phaser® 8560MFP/8860MFP Multifunction Printer 1-12
-
 1
1 -
2
-
3
-
4
-
5
-
6
-
7
-
8
-
9
-
10
-
11
-
12
-
13
-
14
-
 15
15 -
 16
16 -
 17
17 -
 18
18 -
 19
19 -
 20
20 -
 21
21 -
 22
22 -
 23
23 -
 24
24 -
 25
25 -
26
-
27
-
28
-
29
-
30
-
31
-
32
-
33
-
34
-
35
-
36
-
37
-
38
-
39
-
40
-
41
-
42
-
43
-
44
-
45
-
46
-
47
-
48
-
49
-
50
-
51
-
52
-
53
-
54
-
55
-
56
-
57
-
58
-
59
-
60
-
61
-
62
-
63
-
64
-
65
-
66
-
67
-
68
-
69
-
70
-
71
-
72
-
73
-
74
-
75
-
76
-
77
-
78
-
79
-
80
-
81
-
82
-
83
-
84
-
85
-
86
-
87
-
88
-
89
-
90
-
91
-
92
-
93
-
94
-
95
-
96
-
97
-
98
-
99
-
100
-
101
-
102
-
103
-
104
-
105
-
106
-
107
-
108
-
109
-
110
-
111
-
112
-
113
-
114
-
115
-
116
-
117
-
118
-
119
-
120
-
121
-
122
-
123
-
124
-
125
-
126
-
127
-
128
-
129
-
130
-
131
-
132
-
133
-
134
-
135
-
136
-
137
-
138
-
139
-
140
-
141
-
142
-
143
-
144
-
145
-
146
-
147
-
148
-
149
-
150
-
151
-
152
-
153
-
154
-
155
-
156
-
157
-
158
-
159
-
160
-
161
-
162
-
163
-
164
-
165
-
166
-
167
-
168
-
169
-
170
-
171
-
172
-
173
-
174
-
175
-
176
-
177
-
178
-
179
-
180
-
181
-
182
-
183
-
184
-
185
-
186
-
187
-
188
-
189
-
190
-
191
-
192
-
193
-
194
-
195
-
196
-
197
-
198
-
199
-
200
-
201
-
202
-
203
-
204
-
205
-
206
-
207
-
208
-
209
-
210
-
211
-
212
-
213
-
214
-
215
-
216
-
217
-
218
-
219
-
220
-
221
-
222
-
223
-
224
-
225
-
226
-
227
-
228
-
229
-
230
-
231
-
232
-
233
-
234
-
235
-
236
-
237
-
238
-
239
-
240
-
241
-
242
-
243
-
244
-
245
-
246
-
247
-
248
-
249
-
250
-
251
-
252
-
253
-
254
-
255
-
256
-
257
-
258
-
259
-
260
-
261
-
262
-
263
-
264
-
265
-
266
-
267
-
268
-
269
-
270
-
271
-
272
-
273
-
274
-
275
-
276
-
277
-
278
-
279
-
280
-
281
 |
 |