Xerox XDM2525D-WU User Guide
Xerox XDM2525D-WU - DocuMate 252 Manual
 |
UPC - 785414106035
View all Xerox XDM2525D-WU manuals
Add to My Manuals
Save this manual to your list of manuals |
Xerox XDM2525D-WU manual content summary:
- Xerox XDM2525D-WU | User Guide - Page 1
DocuMate 252 scanner user's guide - Xerox XDM2525D-WU | User Guide - Page 2
DocuMate 252 scanner user's guide - Xerox XDM2525D-WU | User Guide - Page 3
DocuMate is a trademark of Xerox Corporation used under license. All other Xerox product names and product numbers mentioned in this publication are trademarks of Xerox Corporation. The Visioneer the part of Visioneer. The software described is furnished under a licensing agreement. The software may - Xerox XDM2525D-WU | User Guide - Page 4
Xerox DocuMate 252 Scanner 2 What You Need 3 Documentation 3 Installation Before You Begin 4 Step 1: Assemble the Scanner 5 Step 2: Install the Software on Your Scanner 31 Configuring the One Touch Buttons 32 About the One Touch Properties Window 32 DocuMate 252 Scanner User's Guide iii - Xerox XDM2525D-WU | User Guide - Page 5
Light Troubleshooting Codes 114 Uninstalling Your Scanner 116 Step 1: Uninstalling the Scanner and One Touch Software 116 Step 2: Uninstalling the PaperPort Software 116 To Install Another Driver 117 Xerox DocuMate 252 Scanner Specifications 118 Xerox DocuMate 252 Scanner Parts List 119 - Xerox XDM2525D-WU | User Guide - Page 6
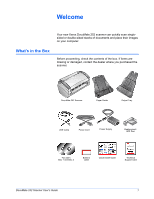
or damaged, contact the dealer where you purchased the scanner. DocuMate 252 Scanner Paper Guide Output Tray USB Cable Power Cord Power Supply Replacement ADF Pad Two CD's Disc 1 and Disc 2 Buttons Label Quick Install Guide Technical Support Card DocuMate 252 Scanner User's Guide 1 - Xerox XDM2525D-WU | User Guide - Page 7
Welcome The Xerox DocuMate 252 Scanner Paper guide LED Number Destination Selector button Simplex button Duplex button Status light Output tray ADF cover release Power switch Power jack USB port Paper guide-Holds documents in place. Adjusts to fit the document width. LED Number-Shows the current - Xerox XDM2525D-WU | User Guide - Page 8
and resolution: • Open the Windows Control Panel • Double-click on Display then select the Settings tab The following documentation is provided with your scanner: • Quick Install Guide-Abbreviated installation instructions. • Xerox DocuMate 252 Scanner User's Guide-On the Installation CD; contains - Xerox XDM2525D-WU | User Guide - Page 9
Xerox DocuMate 252 scanner. Please see "Troubleshooting" on page 113 for more information, and "Uninstalling Your Scanner" on page 116 for basic instructions to uninstall driver programs. Also see the User's Guide that you received with your other scanner for specific instructions. 4 DocuMate 252 - Xerox XDM2525D-WU | User Guide - Page 10
Remove all shipping tape from the top and bottom of the scanner. 2. Carefully remove the protective foam from the ADF cover release, the cover. 4. Align the slots on the paper guide with the ridges on the scanner and slide it down until it snaps into place. DocuMate 252 Scanner User's Guide 5 - Xerox XDM2525D-WU | User Guide - Page 11
Installation 5. Insert the pins on each side of the output tray into the holes on the scanner. 6. Flip open the extension on the output tray so it is fully extended. 7. Proceed to "Step 2: Install the Software." 6 DocuMate 252 Scanner User's Guide - Xerox XDM2525D-WU | User Guide - Page 12
received with your scanner. Please be sure to install from Disc 1 first. To install the software: 1. Start Microsoft Windows and make proper direction (label side up). To launch the CD manually: • Open the Windows option for My Computer. You can do this by double DocuMate 252 Scanner User's Guide 7 - Xerox XDM2525D-WU | User Guide - Page 13
(known as sPDF and nPDF). NOTE: The software provided with your scanner may differ slightly from the list shown in the window. 5. Click Install Now. 6. The Select Language window opens. Click the drop-down menu arrow and select the language to use. Click OK. 8 DocuMate 252 Scanner User's Guide - Xerox XDM2525D-WU | User Guide - Page 14
and the PaperPort software will not be installed. 9. On the Customer Information window, accept the current window, click Finish. If a message window opens instructing you to restart your computer, click Restart. The Welcome to the One Touch 4.0 Setup Wizard opens. DocuMate 252 Scanner User's Guide - Xerox XDM2525D-WU | User Guide - Page 15
you cannot use the One Touch features. You can use the Xerox DocuMate 252 TWAIN driver to scan from applications with a TWAIN interface. You can also scan from applications that use the ISIS driver. You will not be able to scan with the buttons on the scanner. 10 DocuMate 252 Scanner User's Guide - Xerox XDM2525D-WU | User Guide - Page 16
• TWAIN only-The TWAIN driver is installed without the One Touch 4.0 software or the ISIS driver. You can use the Xerox DocuMate 252 TWAIN driver to scan from TWAIN applications. You will not be able to scan with the buttons on the scanner. • ISIS only-The ISIS driver is installed. You can use - Xerox XDM2525D-WU | User Guide - Page 17
proceed. NOTE: If you want to see more information about your scanner and a quick explanation of how to use the One Touch features, click the More button on the window. When you're finished, return to the window above to continue with the installation process. 12 DocuMate 252 Scanner User's Guide - Xerox XDM2525D-WU | User Guide - Page 18
scanner. Connecting any other type of power supply may damage your scanner, and will void its warranty. 2. Plug the power cord into the power supply and into a wall outlet. Now proceed to the next section, "Step 4: Connect the USB Cable and Turn on the Power." DocuMate 252 Scanner User's Guide - Xerox XDM2525D-WU | User Guide - Page 19
Installation Step 4: Connect the USB Cable and Turn on the Power The DocuMate 252 scanner connects to any available USB port. Check your computer's manual for USB port locations. NOTE: You can connect the scanner to your computer while the computer is running. You do not have to shut down your - Xerox XDM2525D-WU | User Guide - Page 20
loads the appropriate software to run the scanner. Do not proceed until you receive a message that your computer has found the new hardware, or updated the driver database. If your computer is running Windows XP, you will see the following message. DocuMate 252 Scanner User's Guide 15 - Xerox XDM2525D-WU | User Guide - Page 21
Panel. When you're finished reading the additional information, click OK. The scanner's status light is green when the scanner and computer are communicating properly. 6. Click Close on the Installation Complete window to close and exit the software installer. 16 DocuMate 252 Scanner User's Guide - Xerox XDM2525D-WU | User Guide - Page 22
window instructions. 8. Insert Disc 2 into the CD-ROM drive. The OmniPage Pro Installation menu opens automatically. If it does not open, see the note on page 7. 9. Select Install OmniPage Pro. 10. Follow the instructions on the screen to install OmniPage Pro. DocuMate 252 Scanner User's Guide - Xerox XDM2525D-WU | User Guide - Page 23
Applications Available with Your Scanner." 12. When you are finished saving the OmniPage Pro User Guide, return to the Installation menu and click Exit. 13. Remove Disc 2 from the CD-ROM drive. 14. You can now install additional applications on Disc 1. 18 DocuMate 252 Scanner User's Guide - Xerox XDM2525D-WU | User Guide - Page 24
Products. You will see the screen that shows the applications. Applications already installed have Installed! next to them. 3. See the following table to decide which software you would like to install. DocuMate 252 Scanner User's Guide 19 - Xerox XDM2525D-WU | User Guide - Page 25
you try the software first. If you install the Kofax VRS software, you may see the following message. Please disregard this message and click OK. The Kofax VRS Certified ISIS® driver is installed correctly when you install your Xerox DocuMate 252 scanner. 20 DocuMate 252 Scanner User's Guide - Xerox XDM2525D-WU | User Guide - Page 26
® Reader® in case your computer does not have it already installed. The Scanner Readme file is in HTML format and will open in any standard browser. If you need to, click Acrobat Reader to install it now. Follow the instructions on the installation windows. DocuMate 252 Scanner User's Guide 21 - Xerox XDM2525D-WU | User Guide - Page 27
news about your scanner. 3. When you're finished, click Main Menu to return to the Main Menu window and click Exit. 4. Remove the CD and store both CD's in a safe place. That's it! Installation is finished and your Xerox DocuMate 252 scanner is ready to scan. 22 DocuMate 252 Scanner User's Guide - Xerox XDM2525D-WU | User Guide - Page 28
your RegID. Your RegID is important as you will need it when accessing free telephone support, or checking for online updates. 4. After receiving your RegID, write it down on a piece of paper and keep it with your scanner so you will be able to find it easily. DocuMate 252 Scanner User's Guide 23 - Xerox XDM2525D-WU | User Guide - Page 29
then you have several different options to scan with your Xerox DocuMate 252 scanner. Each method scans equally well, so use the one with appropriate options for the item you are scanning. NOTE: During installation, the One Touch 4.0 software searches your computer and links to all the applications - Xerox XDM2525D-WU | User Guide - Page 30
your scanner's warranty. 2. Load the documents with their tops into the Automatic Document Feeder. For Simplex (one-sided) scans, load the documents face down. For Duplex (two-sided) scans, the documents can be face up or down because both sides are scanned. DocuMate 252 Scanner User's Guide 25 - Xerox XDM2525D-WU | User Guide - Page 31
Simplex button. To scan a two-sided document, press the Duplex button. A scan progress window opens and the image is sent to the selected application from the One Touch utility. In this Put the page back into the scanner and click Continue to resume scanning. 26 DocuMate 252 Scanner User's Guide - Xerox XDM2525D-WU | User Guide - Page 32
button to see the setting for the selected LED number. The One Touch Properties window opens for you to view and change the settings before scanning. This sample shows the or click OK to close the window then click the button on the One Touch Button Panel. DocuMate 252 Scanner User's Guide 27 - Xerox XDM2525D-WU | User Guide - Page 33
on the One Touch icon in the Windows Notification Area (at the bottom right corner scanner begins scanning. When the process finishes, the scanned images appear in the Destination Application, just as if you scanned with the Simplex or Duplex scanner buttons. 28 DocuMate 252 Scanner User's Guide - Xerox XDM2525D-WU | User Guide - Page 34
all nine buttons. • The Detail View shows the current scan settings for a button. If the Properties window is not open, right-click the icon on the Detail View or Button View to open it. • The Hardware View shows the current scanners connected to your computer. DocuMate 252 Scanner User's Guide 29 - Xerox XDM2525D-WU | User Guide - Page 35
button 5 in the examples above, means your computer does not have appropriate software for the initial factory settings (Fax software in the example above). In that case, you would probably want to change settings of the buttons on the One Touch Button Panel. 30 DocuMate 252 Scanner User's Guide - Xerox XDM2525D-WU | User Guide - Page 36
Button Panel, you can scan directly from PaperPort and other software applications. See the sections "Scanning with the TWAIN Interface from PaperPort" on page 85, "Scanning with the WIA Interface" on page 99 and "Scanning with the ISIS Interface" on page 104. DocuMate 252 Scanner User's Guide 31 - Xerox XDM2525D-WU | User Guide - Page 37
window also contains special scanning features such as scanning and burn to a CD, scanning and converting text directly into an HTML web page, and scanning with optical character recognition (OCR) that turns a scanned image into text that you can edit. 32 DocuMate 252 Scanner User's Guide - Xerox XDM2525D-WU | User Guide - Page 38
Scanning NOTE: Some of the options on the One Touch Properties Window (and other One Touch windows and dialog boxes) are "grayed out" and are not available. Grayed out options are not appropriate for your Xerox DocuMate 252 scanner. For example, on the figure below, the option "Use Document Feeder - Xerox XDM2525D-WU | User Guide - Page 39
NOTE: Use Configure Before Scan if you want to set the scanning mode manually before scanning. See "Configuring Before Scanning" on page 63. You can -Displays a window for selecting options related to the selected destination application for the scanned image. 34 DocuMate 252 Scanner User's Guide - Xerox XDM2525D-WU | User Guide - Page 40
the button whose settings you want to change. Select a software application as the destination to send scanned documents. Select arrows to cycle through the buttons, the available settings on the window change to show them for each button. 2. From the Select DocuMate 252 Scanner User's Guide 35 - Xerox XDM2525D-WU | User Guide - Page 41
window first. However, you can scan at any time by pressing the Simplex or Duplex button on the scanner. When you are finished selecting new settings for a button and you press or click a scanner button, the document is scanned using the newly configured settings for that button. 36 DocuMate 252 - Xerox XDM2525D-WU | User Guide - Page 42
Applications have various properties that you can select. 1. On the One Touch Properties window, click a Destination Application. 2. Click the Properties button. Click a Destination Application. and are for designating the folder to receive your scanned items. DocuMate 252 Scanner User's Guide 37 - Xerox XDM2525D-WU | User Guide - Page 43
scanned image to be located. 2. Click OK. 3. Click OK or Apply on the One Touch Properties window. When PaperPort opens after you finish scanning, the thumbnails of your scanned documents are on the Desktop in if the OCR reader does not detect text in the image. 38 DocuMate 252 Scanner User's Guide - Xerox XDM2525D-WU | User Guide - Page 44
icons in the One Touch Properties window for that group of applications. 6. Click the Add button. 7. Click OK or Apply on the Link Properties window. 8. Click Refresh on the One Touch Properties window. 9. Click OK or Apply on the One Touch Properties window. DocuMate 252 Scanner User's Guide 39 - Xerox XDM2525D-WU | User Guide - Page 45
These properties apply to OmniPage Pro that you received with your scanner, plus Microsoft Paint and other image processing applications. 1. Click . 4. Click Refresh on the One Touch Properties window. 5. Click OK or Apply on the One Touch Properties window. 40 DocuMate 252 Scanner User's Guide - Xerox XDM2525D-WU | User Guide - Page 46
options are not shown on the dialog box. The Burn to CD option is only available for Windows XP. 1. Click the Storage Layout options you want. All documents are in the root-The scanned . For more information about mapped drives, see your network administrator. DocuMate 252 Scanner User's Guide 41 - Xerox XDM2525D-WU | User Guide - Page 47
Burn to CD button. 3. Click OK on the Link Properties window. eMail Properties These properties apply to email applications so you can to know which folder contains the scanned documents so you can manually attach them to your email messages. 1. Click the Browse DocuMate 252 Scanner User's Guide - Xerox XDM2525D-WU | User Guide - Page 48
These are the standard Windows Internet options. Please see your Windows documentation for more information about Internet options. If you are using AOL, please see the AOL user manual for making changes to file types. See "Text Formats" on page 45 for details. DocuMate 252 Scanner User's Guide 43 - Xerox XDM2525D-WU | User Guide - Page 49
the JPEG format is often used for images on web pages, or if file size might be a problem when electronically sending the files. JPEG files are reduced in size by lowering their image quality, and you format. 2. Right-click on the JPG or PDF icon. A menu opens. 44 DocuMate 252 Scanner User's Guide - Xerox XDM2525D-WU | User Guide - Page 50
Properties window. supports several file types, and you can right-click on the icon to choose the particular file type for that application. To select a file type for the text format: 1. Select the Destination Application. 2. Right-click on the text format icon. DocuMate 252 Scanner User's Guide - Xerox XDM2525D-WU | User Guide - Page 51
Properties window. Other software, the fields are maintained so you can copy and paste them to a database or spreadsheet application. Excel Spreadsheet-The .xls file format used by Microsoft Excel. HTML Document-The .htm file format used to create web pages. 46 DocuMate 252 Scanner User's Guide - Xerox XDM2525D-WU | User Guide - Page 52
window. 2. Using the arrows, choose the button that you want to rename. 3. Select the name's text and type a new name. Click the arrows to get to the button to Type a new name for the button. rename, then select the name text. 4. Click OK or Apply. The button is now renamed. DocuMate 252 Scanner - Xerox XDM2525D-WU | User Guide - Page 53
the location of the files of your scanned items. To select options: 1. Open the One Touch Properties window and click the Options tab. Options tab. 2. Click the Select Button menu arrow and select the for processing and keeping track of your scanned documents. 48 DocuMate 252 Scanner User's Guide - Xerox XDM2525D-WU | User Guide - Page 54
is for sending your scanned documents directly to your printer or fax software for faxing. • Sti event forwarding is for using another application's to the list. Show Progress Window-Select this option to display the progress window of the document(s) during DocuMate 252 Scanner User's Guide 49 - Xerox XDM2525D-WU | User Guide - Page 55
folders when the selections are Group items by type and Group items by month. 5. Click OK to save the options for the selected button. 50 DocuMate 252 Scanner User's Guide - Xerox XDM2525D-WU | User Guide - Page 56
factory-set configurations available. To create a new configuration: 1. Open the One Touch Properties window and make sure the Multi Function tab is selected. 2. Scroll through the applications in 4. On the Scan Configuration Properties dialog box, type a name. DocuMate 252 Scanner User's Guide 51 - Xerox XDM2525D-WU | User Guide - Page 57
the darkest and lightest portions of the image. The greater the contrast, the more difference between the lighter and darker shades in the image. 52 DocuMate 252 Scanner User's Guide - Xerox XDM2525D-WU | User Guide - Page 58
size of the photo. When using the AutoCrop to Original option, always use the paper guides on the scanner so the page is not skewed. Skewed pages may not crop properly. For single-sided scans is only available for the GrayScale or Color Mode at 300dpi or less. DocuMate 252 Scanner User's Guide 53 - Xerox XDM2525D-WU | User Guide - Page 59
scan a stack of two-sided pages which have a number of blank sides. This option is only available for Duplex scanning in Black&White Mode. 54 DocuMate 252 Scanner User's Guide - Xerox XDM2525D-WU | User Guide - Page 60
Scanning • Color Filter-Color filter is the ability of your scanner to automatically remove a color from a scanned item. For example, if you are in the list of Scan Configurations on the One Touch Properties window for the appropriate Destination Applications. DocuMate 252 Scanner User's Guide 55 - Xerox XDM2525D-WU | User Guide - Page 61
specific to the device. For example, if the device is your printer, the dialog box is your printer's setup settings. 2. Click OK or Apply. 56 DocuMate 252 Scanner User's Guide - Xerox XDM2525D-WU | User Guide - Page 62
in a folder based on your selection for the Storage Location. For example, if the file type is TIFF, and you select Documents are put into DocuMate 252 Scanner User's Guide 57 - Xerox XDM2525D-WU | User Guide - Page 63
the new scan configurations. 2. Open the One Touch Properties window. 3. Select Transfer to Storage as the Destination Application. 4. Click the New button. Select Transfer to Storage. Click the New button. The Scan Configuration Properties dialog box opens. 58 DocuMate 252 Scanner User's Guide - Xerox XDM2525D-WU | User Guide - Page 64
scanned documents. If you haven't created the folder yet, you can click the Make New Folder button and type the name for the new folder. DocuMate 252 Scanner User's Guide 59 - Xerox XDM2525D-WU | User Guide - Page 65
the Transfer to Storage destination, and each configuration scans documents to separate folders. The new configurations apply to the Transfer to Storage Destination Application. 60 DocuMate 252 Scanner User's Guide - Xerox XDM2525D-WU | User Guide - Page 66
: 1. Insert the documents you want to scan to storage. 2. Press the Destination Selector buttons on the scanner to get to one of the buttons set up for scanning to storage. 3. Press the Simplex or Duplex you will need to uninstall then re-install your scanner. DocuMate 252 Scanner User's Guide 61 - Xerox XDM2525D-WU | User Guide - Page 67
Scanning To edit or delete a scan configuration: 1. Open the One Touch Properties window. 2. Select the scan configuration you want to edit or delete. Select the scan configuration to . 5. Edit the settings and click OK. 6. Click OK to close the dialog box. 62 DocuMate 252 Scanner User's Guide - Xerox XDM2525D-WU | User Guide - Page 68
Interface" on page 104. WIA-The Windows Image Acquisition Interface (WIA) opens for you to make changes prior to scanning (available for Windows XP only). See "Scanning with the WIA Interface" on page 99. 5. Click OK or Apply on the One Touch Properties window. DocuMate 252 Scanner User's Guide 63 - Xerox XDM2525D-WU | User Guide - Page 69
OmniPage Pro software on your computer in order to use the OCR options with the One Touch 4.0 software and your DocuMate 252 scanner. One scanner in case you haven't installed it yet. If OmniPage Pro is installed, the OCR process is automatic when the page format on the One Touch Properties window - Xerox XDM2525D-WU | User Guide - Page 70
OCR the text. 2. To scan from the One Touch Button Panel, click the One Touch icon in the Windows Notification Area, click the arrows to see Button 6, then click Button 6. Click the arrows until Button 6 with the figures and text from the original spreadsheets. DocuMate 252 Scanner User's Guide 65 - Xerox XDM2525D-WU | User Guide - Page 71
apply to Button 6. To select OmniPage OCR options: 1. Open the One Touch Properties window. 2. Using the arrows, choose a button that has Destination Applications that use the text from the menu. The OmniPage OCR Options window opens with the OCR tab selected. 66 DocuMate 252 Scanner User's Guide - Xerox XDM2525D-WU | User Guide - Page 72
options you want from the OCR window. Languages in Document-Select the language the languages in the list. The dictionary icon indicates a language with dictionary support available. The dictionary is consulted to help in the OCR process. It in your documents. DocuMate 252 Scanner User's Guide 67 - Xerox XDM2525D-WU | User Guide - Page 73
the lists to their defaults, click Use Defaults. Click OK when you're finished. 7. Click the Process tab and choose the options from the Process window. 68 DocuMate 252 Scanner User's Guide - Xerox XDM2525D-WU | User Guide - Page 74
this option if the document is too big to fit into the scanner's paper guide. Automatically correct page orientation-Select this option to have the OCR language to use on the OmniPage windows. The available languages may differ for different parts of the world. DocuMate 252 Scanner User's Guide 69 - Xerox XDM2525D-WU | User Guide - Page 75
Scanning 8. Click the Format tab and choose the options you want from the Format window. Note that as you select formats, the image changes to represent the selection so you can , or have treated as a table. No flowing text or graphics zones will be detected. 70 DocuMate 252 Scanner User's Guide - Xerox XDM2525D-WU | User Guide - Page 76
be retained. When exporting to Text or Unicode file types, graphics and tables are not supported. Retain Fonts and Paragraphs (RFP)-This output format retains the font and paragraph styling, To scan with sPDF or nPDF: 1. Open the One Touch Properties window. DocuMate 252 Scanner User's Guide 71 - Xerox XDM2525D-WU | User Guide - Page 77
page format selection. The page format icon is now set to the selection from the menu. 6. Choose a Scan Configuration. 7. Click OK. The One Touch Properties window closes. 72 DocuMate 252 Scanner User's Guide - Xerox XDM2525D-WU | User Guide - Page 78
Acrobat user manual for more about finding text in a PDF file, or about editing PDF text. Scan and Burn to a CD If you have a CD burner attached to your computer, you can scan directly from your Xerox DocuMate 252 scanner onto a CD. This feature is available only on computers running Windows XP. To - Xerox XDM2525D-WU | User Guide - Page 79
on the screen tells you that files are waiting to be burned to the CD. 8. Open the One Touch window and make sure that the Burn to CD Destination Application is still selected and click the Properties button. The One Touch 4.0 Link Properties window opens. 74 DocuMate 252 Scanner User's Guide - Xerox XDM2525D-WU | User Guide - Page 80
Likewise, when you create a custom configuration for CD burning, the OneTouch software will automatically make sure the storage location is correct. To create a Otherwise, the Windows XP CD writing wizard will not be able to find the images to burn onto the CD. DocuMate 252 Scanner User's Guide 75 - Xerox XDM2525D-WU | User Guide - Page 81
you cannot choose a page format for this option because the actual destination application is not selected until after the scanner feeds in the first page of your document. 4. Choose a Scan Configuration. 5. Click OK. The One Touch Properties window closes. 76 DocuMate 252 Scanner User's Guide - Xerox XDM2525D-WU | User Guide - Page 82
the application in the box and click OK. Now the application you selected opens and you can continue the scanning from that application's TWAIN interface. DocuMate 252 Scanner User's Guide 77 - Xerox XDM2525D-WU | User Guide - Page 83
to be in color on the HTML page, choose a color configuration. 6. Click OK. The One Touch Properties window closes. 7. Now on the One Touch Button Panel, click Button 8 (or if you used another button, click Explorer then opens showing your converted page. 78 DocuMate 252 Scanner User's Guide - Xerox XDM2525D-WU | User Guide - Page 84
. 9. You can now use Microsoft Internet Explorer or other application to post the document to your web page as you would any other HTML page. DocuMate 252 Scanner User's Guide 79 - Xerox XDM2525D-WU | User Guide - Page 85
folder in one step. The process is ideal for archiving documents without having to manually save or process them in any other way. If you choose a text format for the One Touch 4.0 Link Properties window. Your scanned documents will be stored at this location. 80 DocuMate 252 Scanner User's Guide - Xerox XDM2525D-WU | User Guide - Page 86
On either the One Touch 4.0 Link Properties window, or from the Scan Configuration Properties window, click the Browse button. The Browse For Folder window opens. 2. Select a storage location on the , the documents are stored on the server or mapped drive. DocuMate 252 Scanner User's Guide 81 - Xerox XDM2525D-WU | User Guide - Page 87
Configuration. 6. Click OK. The One Touch Properties window closes. 7. Now start scanning using Button 7 (or other button you set up for archiving). When scanning is finished, the documents are saved in the text file format and in the location you specified. 82 DocuMate 252 Scanner User's Guide - Xerox XDM2525D-WU | User Guide - Page 88
the scanner icon at the top of the One Touch Button Panel. The Hardware icon. If the Hardware View of the panel is open you can also rightclick on the DM252 icon. The Hardware Properties dialog box opens and shows information about your Xerox DocuMate 252 scanner. DocuMate 252 Scanner User's Guide - Xerox XDM2525D-WU | User Guide - Page 89
a time setting. To turn the lamp on and off manually without turning off power to the scanner, click the Lamp On or Lamp Off buttons. To return the scanner to its factory settings, click Reset Device. 4. Click OK to save the changes and close the dialog box. 84 DocuMate 252 Scanner User's Guide - Xerox XDM2525D-WU | User Guide - Page 90
you can still use the instructions in this User's Guide for scanning with your Xerox DocuMate 252 scanner. To access the TWAIN interface from other software, please refer to their user's guides, then return to this User's Guide for the steps to scan. The instructions for scanning are in the section - Xerox XDM2525D-WU | User Guide - Page 91
. To access the TWAIN interface from PaperPort: 1. On the Windows taskbar, click Start, point to Programs, point to PaperPort, then click PaperPort. The PaperPort desktop opens. Scan icon. Folders pane. 2. Click the Scan icon on the PaperPort command bar. 86 DocuMate 252 Scanner User's Guide - Xerox XDM2525D-WU | User Guide - Page 92
the scanner. See the section, "Setting Up PaperPort to Work With Your Scanner" on page 94. 3. Click the Scanner drop-down arrow, and select TWAIN: Xerox DocuMate 252 from so on. See the PaperPort User's Guide for more information about the PaperPort Settings. DocuMate 252 Scanner User's Guide 87 - Xerox XDM2525D-WU | User Guide - Page 93
questions about each feature of the software. To open the Help Topics window, press the F1 key or choose PaperPort Help from the Help menu. You can also refer to the PaperPort Getting Started Guide and PaperPort User's Guide on the Disc 1 Installation CD. 88 DocuMate 252 Scanner User's Guide - Xerox XDM2525D-WU | User Guide - Page 94
Scanning with the TWAIN Interface The TWAIN interface lists the scanning options available with your Xerox DocuMate 252 scanner. The options on the TWAIN interface are: • Mode-Select a scanning mode: for precision work, such as photographs or fine artwork. DocuMate 252 Scanner User's Guide 89 - Xerox XDM2525D-WU | User Guide - Page 95
limit or eliminate moire patterns in the scanned image. This option is only available for the Greyscale or Color Mode at 300dpi or less. 90 DocuMate 252 Scanner User's Guide - Xerox XDM2525D-WU | User Guide - Page 96
option cannot be used with AutoCrop to original. • AutoScan on document insertion-Your Xerox DocuMate 252 scanner includes AutoLaunch technology that senses when an item is inserted into the paper feed and down. To scan both sides, either side can be face up. DocuMate 252 Scanner User's Guide 91 - Xerox XDM2525D-WU | User Guide - Page 97
-Scan window. 3. If software. This example shows a thumbnail image of a scanned page on the PaperPort Desktop. A thumbnail image of the scanned item appears on the PaperPort desktop. The small icon represents the file format, in this case the .pdf format. 92 DocuMate 252 Scanner User's Guide - Xerox XDM2525D-WU | User Guide - Page 98
the TWAIN Interface from PaperPort Display the Device Configuration 1. Click the Xerox DocuMate 252 icon in the top right corner of the TWAIN interface. The Device configuration window opens and shows the information about your scanner. See the section "Checking the Hardware and Setting the Lamp - Xerox XDM2525D-WU | User Guide - Page 99
Twain: Xerox DocuMate 252 and WIA: Xerox DocuMate 252. The setup process, described below, is the same for each option. You will not have to set up PaperPort again for either option unless you uninstall the scanner and PaperPort software, then re-install them. 94 DocuMate 252 Scanner User's Guide - Xerox XDM2525D-WU | User Guide - Page 100
the options, such as Twain: Xerox DocuMate 252. 2. Click the Setup button. A window opens to begin the setup process. 3. Click Yes then click Next. The next window offers you the option to run hardware diagnostics. 4. Click Yes (recommended) then click Next. DocuMate 252 Scanner User's Guide 95 - Xerox XDM2525D-WU | User Guide - Page 101
Setup Wizard checks the connections, the next window is displayed. It has a series of setup options, but only the Basic scan test is necessary because your scanner was already tested and calibrated when you installed the One Touch 4.0 software 6. Click Next. 96 DocuMate 252 Scanner User's Guide - Xerox XDM2525D-WU | User Guide - Page 102
scanner, face-down, and the Scan button on the TWAIN Interface will become active. 8. Click the Scan button on the TWAIN interface. The Setup Wizard runs the scan test. A message window opens that says "Basic scan test passed." 9. Click Next on the message window. DocuMate 252 Scanner User's Guide - Xerox XDM2525D-WU | User Guide - Page 103
Setup window opens to let you know the setup process is finished. 10. Click Finish. PaperPort is now setup for the scanning option you selected (in the example above, it's the TWAIN option) and the Scan button on the PaperPort window will now become active. 98 DocuMate 252 Scanner User's Guide - Xerox XDM2525D-WU | User Guide - Page 104
from WIA. To scan an item from PaperPort using WIA: 1. On the Windows taskbar, click Start, point to Programs, point to PaperPort, then click PaperPort. The PaperPort desktop opens. Scan icon. Folders pane. 2. Click the Scan icon on the PaperPort command bar. DocuMate 252 Scanner User's Guide 99 - Xerox XDM2525D-WU | User Guide - Page 105
for the WIA scanning option. 3. From the Scanner drop-down list, select WIA: Xerox DocuMate 252. NOTE: If the Scan button at the bottom of files cannot be stacked on the desktop. See the PaperPort User's Guide for more information about the PaperPort Settings. 5. When scanning documents, - Xerox XDM2525D-WU | User Guide - Page 106
options and start the scanner. 9. Click the button most appropriate for the item you're scanning. 10. Select a paper size from the Page Size list. 11. Click Preview to preview the image before scanning. The image is displayed on the right side of the window. DocuMate 252 Scanner User's Guide 101 - Xerox XDM2525D-WU | User Guide - Page 107
of the stack feeds through the ADF for the preview. After adjusting the scanner settings, replace that page on the stack so it is scanned with the rest scanner settings before you scan: 1. On the scan window, click Adjust the quality of the scanned picture. 102 DocuMate 252 Scanner User's Guide - Xerox XDM2525D-WU | User Guide - Page 108
Custom Settings button is now set to scan with the options you selected. If you want to reset the settings and start over, click Reset. DocuMate 252 Scanner User's Guide 103 - Xerox XDM2525D-WU | User Guide - Page 109
the ISIS interface from the One Touch window, right-click on the Configure Before Scan configuration and select it from the menu. Right-click on Configure Before Scan to get the menu, and choose ISIS to use the ISIS as the interface to configure before scan. 104 DocuMate 252 Scanner User's Guide - Xerox XDM2525D-WU | User Guide - Page 110
Click Preview One to preview the image before scanning. The image is displayed on the right side of the window. NOTE: If you preview when scanning a stack of documents, the first page of the stack feeds . The document is scanned with the new scan settings. DocuMate 252 Scanner User's Guide 105 - Xerox XDM2525D-WU | User Guide - Page 111
apply. Resolution-Click the menu arrow and choose a resolution (dpi). Your Xerox DocuMate 252 scanner can scan at up to 600 dpi. Page-Click the menu arrow and choose a page size. Your Xerox DocuMate 252 scanner can scan a page up to 8.5" x 14". 2. Click OK. 106 DocuMate 252 Scanner User's Guide - Xerox XDM2525D-WU | User Guide - Page 112
on a black-and-white screen.The preview image shows the effect of your Dither selection so you can see which one is best for scanning. DocuMate 252 Scanner User's Guide 107 - Xerox XDM2525D-WU | User Guide - Page 113
and choose a resolution (dpi). Your Xerox DocuMate 252 scanner can scan at up to 600 dpi. Page Size-Click the menu arrow and choose a page size. Your Xerox DocuMate 252 scanner can scan a page up to 8.5" appears as an image in the Destination Application. 108 DocuMate 252 Scanner User's Guide - Xerox XDM2525D-WU | User Guide - Page 114
's Guide. If you open the QuickScan software to scan directly from it, you may see the following warning message: 1. Please disregard this message and click Continue. The Pixel Translations ISIS drivers were installed correctly during the installation of your Xerox DocuMate 252 scanner. The Scanner - Xerox XDM2525D-WU | User Guide - Page 115
, troubleshooting, uninstalling, scanner specifications, and spare parts. scanner to feed pages incorrectly. 4. Wipe the pad from top to bottom. Be careful not to snag the cloth on the springs on either side of the pad. 5. Close the cover when you're finished. 110 DocuMate 252 Scanner User's Guide - Xerox XDM2525D-WU | User Guide - Page 116
on the top-left of the scanner body to open the Automatic Document Feeder cover. 2. Remove the jammed paper and close the cover. To reduce the number of paper jams, smooth and straighten the paper before scanning and adjust the guides to the paper size. DocuMate 252 Scanner User's Guide 111 - Xerox XDM2525D-WU | User Guide - Page 117
Replacing the ADF Pad Assembly The ADF pad may wear out and is designed to be a userreplaceable part. Problems with documents feeding into the ADF is an indication that the pad is wearing thin. See the "Xerox DocuMate 252 Scanner Parts List" on page 119 for ordering information. To replace - Xerox XDM2525D-WU | User Guide - Page 118
make sure Xerox DocuMate 252 is selected as the scanner. Problem: During installation I got the error message: PaperPort Installation is not complete. What do I do? The installation procedure was not successful. You need to reinstall the PaperPort software. DocuMate 252 Scanner User's Guide 113 - Xerox XDM2525D-WU | User Guide - Page 119
and One Touch options, and you need to remove those other drivers and re-install your Xerox DocuMate 252 scanner. Please see the documentation that you received with the other scanner for the steps to remove its driver programs. You can also use the basic steps in the section "Uninstalling - Xerox XDM2525D-WU | User Guide - Page 120
Support. 9 Paper jam See "Clearing Paper Jams" on page 111. All Other Codes An internal part in the scanner may have malfunctioned. Turn off the power to your scanner, then turn it back on again. If the problem persists, contact Xerox Technical Support. DocuMate 252 Scanner User's Guide - Xerox XDM2525D-WU | User Guide - Page 121
Maintenance Uninstalling Your Scanner To uninstall the Xerox DocuMate 252 scanner, remove the scanner software first, then remove PaperPort, or other scanner software. Step 1: Uninstalling the Scanner and One Touch Software 1. On the Windows taskbar, click Start, point to Settings, then click - Xerox XDM2525D-WU | User Guide - Page 122
the Software" on page 7 of this User Guide and follow steps for installing one of the other driver options. NOTE: The One Touch 4.0 driver is required for the scanner's buttons to function. If you select a driver without One Touch 4.0, the scanner buttons will not initiate scanning. DocuMate 252 - Xerox XDM2525D-WU | User Guide - Page 123
(on standby); ≤ 6 Watts (power save after 15 minutes without scanning, can be adjusted by software); ≤ 1 Watt (power off) AC, US, 3P, 10A/125V, 180 cm, 3C, 18AWG, RoHS compliant 185 cm, 28AWG, with core, RoHS compliant UL, C-UL, FCC Class B, CE, TUV/GS, WEEE 118 DocuMate 252 Scanner User's Guide - Xerox XDM2525D-WU | User Guide - Page 124
Maintenance Xerox DocuMate 252 Scanner Parts List Please use the following part names and numbers when ordering replacements for your scanner. Part Name Part Number Paper Guide 57-0104-000 Output Tray 57-0105-000 ADF Pad USB Cable 57-0103-000 35-0107-000 AC Power Cord 35-0103-000 Power - Xerox XDM2525D-WU | User Guide - Page 125
Maintenance 120 DocuMate 252 Scanner User's Guide - Xerox XDM2525D-WU | User Guide - Page 126
issued under any Act of Congress. 2. Adjusted Compensation Certificates for Veterans of the World Wars. 3. Obligations or Securities of any Foreign Government, Bank, or Corporation. DocuMate 252 Scanner User's Guide 121 - Xerox XDM2525D-WU | User Guide - Page 127
Income Dependency Status Court Record Previous military service Physical or mental condition Exception: U. following is also prohibited in certain states: Automobile Licenses - Drivers' Licenses - Automobile Certificates of Title. The above list of law. 122 DocuMate 252 Scanner User's Guide - Xerox XDM2525D-WU | User Guide - Page 128
with the limits for the class B digital device, pursuant to part 15 of the FCC Rules. These limits are designed to if not installed, and used in accordance with the instructions, may cause harmful interference to radio communications. However cables must DocuMate 252 Scanner User's Guide 123 - Xerox XDM2525D-WU | User Guide - Page 129
part Xerox program and you are managing its disposal, please note that the product may contain lead and other materials whose disposal may be regulated due to environmental considerations. For recycling and disposal information, contact your local authorities. 124 DocuMate 252 Scanner User's Guide - Xerox XDM2525D-WU | User Guide - Page 130
, 89 GrayScale Document button 106 H Halftone 107 help 3, 88 htm file format 46 HTML Document 46 HTML page 79 HTML Web Page 78 hue 55 DocuMate 252 Scanner User's Guide 125 - Xerox XDM2525D-WU | User Guide - Page 131
names 30, 47 OCR 65 One Touch icon 28, 29, 32 One Touch ISIS Scan window 105 One Touch Properties window 27, 32, 37 options 48, 51 optical character recognition 8 P Page Format HTML 78 Configuration 32 scan with event forwarding 76 scanner components 2 connecting 13 DocuMate 252 Scanner User's Guide - Xerox XDM2525D-WU | User Guide - Page 132
format 45 Text Formats 45 TIFF 44 Transfer to Storage 80 troubleshooting 113 true page 71 TWAIN 63, 77 TWAIN standard 85 U uninstall 116 USB port 14 W watermark, remove 55, 90 WIA 63, 99 Windows Image Acquisition 99 Word Document 46 DocuMate 252 Scanner User's Guide X xls file format 46 Index 127 - Xerox XDM2525D-WU | User Guide - Page 133
05-0612-200
-
 1
1 -
 2
2 -
 3
3 -
 4
4 -
 5
5 -
 6
6 -
 7
7 -
8
-
9
-
10
-
11
-
12
-
13
-
14
-
15
-
16
-
17
-
18
-
19
-
20
-
21
-
22
-
23
-
24
-
25
-
26
-
27
-
28
-
29
-
30
-
31
-
32
-
33
-
34
-
35
-
36
-
37
-
38
-
39
-
40
-
41
-
42
-
43
-
44
-
45
-
46
-
47
-
48
-
49
-
50
-
51
-
52
-
53
-
54
-
55
-
56
-
57
-
58
-
59
-
60
-
61
-
62
-
63
-
64
-
65
-
66
-
67
-
68
-
69
-
70
-
71
-
72
-
73
-
74
-
75
-
76
-
77
-
78
-
79
-
80
-
81
-
82
-
83
-
84
-
85
-
86
-
87
-
88
-
89
-
90
-
91
-
92
-
93
-
94
-
95
-
96
-
97
-
98
-
99
-
100
-
101
-
102
-
103
-
104
-
105
-
106
-
107
-
108
-
109
-
110
-
111
-
112
-
113
-
114
-
115
-
116
-
117
-
118
-
119
-
120
-
121
-
122
-
123
-
124
-
125
-
126
-
127
-
128
-
129
-
130
-
131
-
132
-
133
 |
 |

DocuMate 252
user’s guide
scanner