Xerox XDM5205DWU User Guide
Xerox XDM5205DWU - DocuMate 520 Manual
 |
UPC - 785414106011
View all Xerox XDM5205DWU manuals
Add to My Manuals
Save this manual to your list of manuals |
Xerox XDM5205DWU manual content summary:
- Xerox XDM5205DWU | User Guide - Page 1
DocuMate 520 scanner user's guide - Xerox XDM5205DWU | User Guide - Page 2
DocuMate 520 scanner user's guide - Xerox XDM5205DWU | User Guide - Page 3
except as allowed under the copyright laws. XEROX ® is a trademark of Xerox Corporation in the United States and/or other countries and is used under license. DocuMate ® is a registered trademark of Xerox Corporation used under license. All other Xerox product names and product numbers mentioned in - Xerox XDM5205DWU | User Guide - Page 4
Contents Welcome What's in the Box 1 The Xerox DocuMate 520 Scanner 2 What You Need 4 Documentation 4 Installation Before You Begin 5 Step 1: Assemble the Scanner 6 Step 2: Install the Software 9 Step 3: and Setting the Lamp Power Saving 87 DocuMate 520 Scanner Installation Guide iii - Xerox XDM5205DWU | User Guide - Page 5
Adjusting the Resolution 100 Adjusting Troubleshooting Codes 132 Uninstalling Your Scanner 133 Step 1: Uninstalling the Scanner and One Touch Software 133 Step 2: Uninstalling the PaperPort Software 133 To Install Another Driver 134 DocuMate 520 Scanner Specifications 135 Xerox DocuMate 520 - Xerox XDM5205DWU | User Guide - Page 6
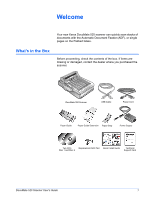
Your new Xerox DocuMate 520 scanner can quickly scan scanner. DocuMate 520 Scanner USB Cable Power Cord Paper Guide Paper Guide Extension Paper Stop Power Supply Two CD's Replacement ADF Pad Quick Install Guide Technical Disc 1 and Disc 2 Support Card DocuMate 520 Scanner User's Guide - Xerox XDM5205DWU | User Guide - Page 7
The Xerox DocuMate 520 Scanner Scanner Cover Document Pad Glass Reference Frame Paper Stop Paper Guide Extension Paper Guide Automatic Document Feeder Scanner Lock DocuMate Buttons and Status Light USB Port ADF port Power jack Power On/Off Switch ADF Cable 2 DocuMate 520 Scanner User's Guide - Xerox XDM5205DWU | User Guide - Page 8
Power Jack-Connects the power cord to the scanner. Power switch-On/Off power switch. ADF cable-Supplies power from the scanner body to the Automatic Document Feeder. The cable must be securely plugged into the ADF port for the Automatic Document Feeder to work. DocuMate 520 Scanner User's Guide 3 - Xerox XDM5205DWU | User Guide - Page 9
(Service Pack 4) or XP (Service Pack resolution: • Open the Windows Control Panel • Double-click on Display then select the Settings tab Your scanner is delivered with the following documentation: • Quick Install Guide-Abbreviated installation instructions. • Xerox DocuMate 520 Scanner User's Guide - Xerox XDM5205DWU | User Guide - Page 10
functionality on one, or both of the units. You can remove these programs from the Windows Add/Remove programs list. Please refer to the user manual provided with your other scanner hardware for instructions about removing the driver and software for that unit. DocuMate 520 Scanner User's Guide 5 - Xerox XDM5205DWU | User Guide - Page 11
in the box. To assemble the scanner: 1. Remove all shipping tape from the top and bottom of the scanner. 2. Open the ADF cover and carefully remove any foam particles that may have gotten inside the Automatic Document Feeder. Close the cover so it snaps shut. 6 DocuMate 520 Scanner User's Guide - Xerox XDM5205DWU | User Guide - Page 12
. The scanner will not scan when locked. 4. Insert the slots (A) on the Paper Guide onto their tabs (B) on the scanner and slide the Guide down into place. The catch tabs (C) snap into place. Refer to the picture on page 2 to see the location of the assembled parts. A B C DocuMate 520 Scanner User - Xerox XDM5205DWU | User Guide - Page 13
securely plugged into the port. The ADF will not function properly if the ADF cable is loose or unplugged. 8. Proceed to "Step 2: Install the Software". 8 DocuMate 520 Scanner User's Guide - Xerox XDM5205DWU | User Guide - Page 14
sure the CD was inserted in the drive in the proper direction (label side up). To launch the CD manually: • Open the Windows option for My Computer. You can do this by double-clicking on the My Computer files on the CD, double-click the file named START32.EXE. DocuMate 520 Scanner User's Guide 9 - Xerox XDM5205DWU | User Guide - Page 15
Installation menu, select Install Products. 4. Make sure the boxes for Nuance PaperPort®, Scanner Driver, and OmniPage Pro® are checked. NOTE: The OmniPage Pro software is required for Click the drop-down menu arrow and select the language to use. Click OK. 10 DocuMate 520 Scanner User's Guide - Xerox XDM5205DWU | User Guide - Page 16
form. • Select Remind me in 7 days and click OK. 13. At the Installshield Wizard Completed window, click Finish. If a message window opens instructing you to restart your computer, click Restart. 14. The Welcome to the One Touch 4.0 Setup Wizard opens. DocuMate 520 Scanner User's Guide 11 - Xerox XDM5205DWU | User Guide - Page 17
you cannot use the One Touch features. You can use the Xerox DocuMate 520 TWAIN driver to scan from applications with a TWAIN interface. You can also scan from applications that use the ISIS driver. You will not be able to scan with the buttons on the scanner. 12 DocuMate 520 Scanner User's Guide - Xerox XDM5205DWU | User Guide - Page 18
scanner so scanned items look good on your monitor. Gamma controls the brightness of the midtones of colors. That setting can be changed later as you're scanning. 19. Select the option that looks best to you and click Next. The driver installation will now begin. DocuMate 520 Scanner User's Guide - Xerox XDM5205DWU | User Guide - Page 19
proceed. NOTE: If you want to see more information about your scanner and a quick explanation of how to use the One Touch features, click the More button on the window. When you're finished, return to the window above to continue with the installation process. 14 DocuMate 520 Scanner User's Guide - Xerox XDM5205DWU | User Guide - Page 20
. Connecting any other type of power supply may damage your scanner, and will void its warranty. 2. Plug the power cord into the power supply and then into a wall outlet. Now proceed to the next section, "Step 4: Connect the USB Cable and Turn on the Power." DocuMate 520 Scanner User's Guide 15 - Xerox XDM5205DWU | User Guide - Page 21
Installation Step 4: Connect the USB Cable and Turn on the Power The DocuMate 520 scanner connects to any available USB port. Check your computer's manual for USB port locations. NOTE: You can connect the scanner to your computer while the computer is running. 1. Remove any protective tape from the - Xerox XDM5205DWU | User Guide - Page 22
loads the appropriate software to run the scanner. Do not proceed until you receive a message that your computer has found the new hardware, or updated the driver database. If your computer is running Windows XP, you will see the following message. DocuMate 520 Scanner User's Guide 17 - Xerox XDM5205DWU | User Guide - Page 23
the additional information, return to the screen above and click OK. The scanner's status light is green when the scanner and computer are communicating properly. 6. Click Close on the Installation Complete window to close and exit the software installer. 18 DocuMate 520 Scanner User's Guide - Xerox XDM5205DWU | User Guide - Page 24
to insert the second CD to install it. NOTE: OmniPage Pro is required for your scanner to have its full range of features. Please make sure to install OmniPage Pro before Install OmniPage Pro. 4. Follow the instructions on the screen to install OmniPage Pro. DocuMate 520 Scanner User's Guide 19 - Xerox XDM5205DWU | User Guide - Page 25
"Additional Applications Available with Your Scanner." 6. When you are finished saving the OmniPage Pro User Guide, return to the Installation menu and click Exit. 7. Remove Disc 2 from the CD-ROM drive. 8. You can now install additional applications on Disc 1. 20 DocuMate 520 Scanner User's Guide - Xerox XDM5205DWU | User Guide - Page 26
CD with the User Guides. See the steps on page 23 to install Adobe Acrobat Reader. 2. Click Install Products. You will see the screen that shows the list of applications provided with your scanner. Applications already installed have Installed! next to them. DocuMate 520 Scanner User's Guide 21 - Xerox XDM5205DWU | User Guide - Page 27
the other software you want to install, and click Install Now. Follow the instructions on the screen to install each of the additional products. Software Adobe® Acrobat ® driver is installed correctly when you install it with your Xerox DocuMate 520 scanner. 22 DocuMate 520 Scanner User's Guide - Xerox XDM5205DWU | User Guide - Page 28
. Follow the instructions on the installation windows. If your computer already has Adobe Acrobat Reader installed, please do not select it unless the version provided on the installation CD is a newer version than the one currently installed on your computer. DocuMate 520 Scanner User's Guide 23 - Xerox XDM5205DWU | User Guide - Page 29
news about your scanner. 3. When you're finished, click Main Menu to return to the Main Menu window and click Exit. 4. Remove the CD and store both CD's in a safe place. That's it! Installation is finished and your Xerox DocuMate 520 scanner is ready to scan. 24 DocuMate 520 Scanner User's Guide - Xerox XDM5205DWU | User Guide - Page 30
the instructions on the screen and register your scanner by entering your scanner's serial support, or checking for online updates. 4. After receiving your RegID, write it down on a piece of paper and keep it with your scanner so you will be able to find it easily. DocuMate 520 Scanner User's Guide - Xerox XDM5205DWU | User Guide - Page 31
12), then you have several different options to scan with your Xerox DocuMate 520 scanner. Each method scans equally well, so use the one with appropriate in the scanner, then click a button on the ISIS window. See "Scanning with the ISIS Interface" on page 117. DocuMate 520 Scanner User's Guide - Xerox XDM5205DWU | User Guide - Page 32
Paper Guide Extension and adjust the Paper Guide for the size of paper. Paper Stop Slide. 3. Adjust the Paper Stop at the back of the scanner for the size of the paper. Pull out the slide on the Paper Stop for letter-sized pages. Push it in for legal-sized pages. DocuMate 520 Scanner User's Guide - Xerox XDM5205DWU | User Guide - Page 33
Lift the scanner cover and place the document face down on the glass. 3. Align the item with the arrow on the reference frame then close the cover. 4. You can now scan the document using the scanner buttons, One Touch, or one of the other scanning interfaces. 28 DocuMate 520 Scanner User's Guide - Xerox XDM5205DWU | User Guide - Page 34
cover. 2. Press a scanner button. A scan progress window opens and the image is sent to the selected application from the One Touch utility. In this example, the Destination Application is the PaperPort software. To Cancel scanning, click the Cancel button. DocuMate 520 Scanner User's Guide 29 - Xerox XDM5205DWU | User Guide - Page 35
computer's printer or copier. Scans the manually. For example, if your computer does not have email software installed, the E-mail button is not preconfigured so when you press the E-Mail button, the window opens so you can select other settings for the button. 30 DocuMate 520 Scanner User's Guide - Xerox XDM5205DWU | User Guide - Page 36
Your scanner comes with 3 factory-preset One Touch button settings. You can reconfigure all three. The scanner begins scanning. When the process finishes, the scanned images appear in the Destination Application, just as if you scanned with the scanner buttons. DocuMate 520 Scanner User's Guide 31 - Xerox XDM5205DWU | User Guide - Page 37
with the description of the selected settings. The icon indicates the Destination Your document will be Application for this setting. scanned with these settings. 32 DocuMate 520 Scanner User's Guide - Xerox XDM5205DWU | User Guide - Page 38
right-click) the button on the Button Panel. NOTE: The One Touch Properties window must be closed before you can scan from the Button Panel. DocuMate 520 Scanner User's Guide 33 - Xerox XDM5205DWU | User Guide - Page 39
can also click on the hardware icon to return to the Button View. 5. To close the One Touch Button Panel, click its close button. 34 DocuMate 520 Scanner User's Guide - Xerox XDM5205DWU | User Guide - Page 40
if you want to use the scanner for archiving documents, you can easily choose this pre-configured setting for a button. See the next section, "Configuring the One Touch Buttons" on page 36, to change the settings of the buttons on the One Touch Button Panel. DocuMate 520 Scanner User's Guide 35 - Xerox XDM5205DWU | User Guide - Page 41
on the scanner and One Touch Button Panel. Right-click on a button, for example the Scan button, and the One Touch Properties window opens for that button. The tab at the top of the One Touch Properties window shows which button's settings are being displayed. 36 DocuMate 520 Scanner User's Guide - Xerox XDM5205DWU | User Guide - Page 42
available. Grayed out options are not appropriate for your Xerox DocuMate 520 scanner. If you use the One Touch application with other Xerox scanners, grayed out options become active, if appropriate. The are linked to One Touch 4.0, click the Refresh button. DocuMate 520 Scanner User's Guide 37 - Xerox XDM5205DWU | User Guide - Page 43
button. The configuration's basic settings include: scanning mode, resolution (dpi), page size, brightness (Br), and contrast ( Use Configure Before Scan if you want to set the scanning mode manually before scanning. See "Configuring Before Scanning" on page 64. You DocuMate 520 Scanner User's Guide - Xerox XDM5205DWU | User Guide - Page 44
" on page 52 to display a full list of the Destination Applications that you can use with the scanner. NOTE: If you select a word processing program such as Microsoft WordPad or Microsoft Word and a format see "Creating a New Scan Configuration" on page 55. DocuMate 520 Scanner User's Guide 39 - Xerox XDM5205DWU | User Guide - Page 45
window first. However, you can scan at any time by pressing a button on the scanner. When you are finished selecting new settings for a button and you press or click a scanner button, the document is scanned using the newly configured settings for that button. 40 DocuMate 520 Scanner User's Guide - Xerox XDM5205DWU | User Guide - Page 46
options are for that type of application. PaperPort Properties These properties apply to PaperPort, and are for designating the folder to receive your scanned items. DocuMate 520 Scanner User's Guide 41 - Xerox XDM5205DWU | User Guide - Page 47
applications. Show message if text recognition failed-A message will open on the screen if the OCR reader does not detect text in the image. 42 DocuMate 520 Scanner User's Guide - Xerox XDM5205DWU | User Guide - Page 48
or Apply on the Link Properties window. 8. Click Refresh on the One Touch Properties window. 9. Click OK or Apply on the One Touch Properties window. DocuMate 520 Scanner User's Guide 43 - Xerox XDM5205DWU | User Guide - Page 49
options will apply to all the applications in the group. Convert Bitmaps using Screen Resolution-Use this option to ensure that an image will fit on the computer's screen. When a computer screen window. 5. Click OK or Apply on the One Touch Properties window. 44 DocuMate 520 Scanner User's Guide - Xerox XDM5205DWU | User Guide - Page 50
the box. If you are scanning to a shared network drive, it must be a mapped drive. For more information about mapped drives, see your network administrator. DocuMate 520 Scanner User's Guide 45 - Xerox XDM5205DWU | User Guide - Page 51
America Online® (AOL), you need to know which folder contains the scanned documents so you can manually attach them to your email messages. 1. Click the Browse button for Folder for storing attachments and the folder location in which AOL stores attachments. 46 DocuMate 520 Scanner User's Guide - Xerox XDM5205DWU | User Guide - Page 52
please see the AOL user manual for making changes to the Internet options applicable to AOL. 4. Select the options for color document handling. Convert Bitmaps using Screen Resolution-Use this option to ensure types. See "Text Formats" on page 49 for details. DocuMate 520 Scanner User's Guide 47 - Xerox XDM5205DWU | User Guide - Page 53
the JPEG format is often used for images on web pages, or if file size might be a problem when electronically sending the files. JPEG files are reduced in size by lowering their image quality, and you format. 2. Right-click on the JPG or PDF icon. A menu opens. 48 DocuMate 520 Scanner User's Guide - Xerox XDM5205DWU | User Guide - Page 54
Application supports several file types, and you can right-click on the icon to choose the particular file type for that application. To select a file type for the text format: 1. Select the Destination Application. 2. Right-click on the text format icon. DocuMate 520 Scanner User's Guide 49 - Xerox XDM5205DWU | User Guide - Page 55
on your computer. Excel Spreadsheet-The .xls file format used by Microsoft Excel. HTML Document-The .htm file format used to create web pages. 50 DocuMate 520 Scanner User's Guide - Xerox XDM5205DWU | User Guide - Page 56
you change them for one button, those changes apply to the other buttons as well. 5. Click OK or Apply on the One Touch Properties window. DocuMate 520 Scanner User's Guide 51 - Xerox XDM5205DWU | User Guide - Page 57
all the applications on your computer that fall into these categories. The list also includes printers and other devices connected to your computer so, for example, you can scan an item applications for processing and keeping track of your scanned documents. 52 DocuMate 520 Scanner User's Guide - Xerox XDM5205DWU | User Guide - Page 58
74 for details. • Fax and Print is for sending your scanned documents directly to your printer or fax software for faxing. • Sti event forwarding is for using another application's interface for when you scan directly to a printer or scan to a fax application. DocuMate 520 Scanner User's Guide 53 - Xerox XDM5205DWU | User Guide - Page 59
folders when the selections are Group items by type and Group items by month. 5. Click OK to save the options for the selected button. 54 DocuMate 520 Scanner User's Guide - Xerox XDM5205DWU | User Guide - Page 60
Scanning Creating a New Scan Configuration The scan configurations are where you select the scanning resolution, brightness, mode (color, black&white, or grayscale), and a number of other select the configuration, then click the Copy button (not the Copy tab). DocuMate 520 Scanner User's Guide 55 - Xerox XDM5205DWU | User Guide - Page 61
configuration. Select the scan mode and drag the slider to set the resolution. Drag the sliders to set the Brightness and Contrast. If the becomes a key as shown here. NOTE: If you select a printer or other device in the Select Destinations list, the dialog box DocuMate 520 Scanner User's Guide - Xerox XDM5205DWU | User Guide - Page 62
a 5"x 7" photo, the scanner will determine the size of the photo. When using the AutoCrop to Original option for a single page on the Flatbed Glass, make sure to align the top left corner of the item with the arrows at the top left corner of the Flatbed Glass. DocuMate 520 Scanner User's Guide 57 - Xerox XDM5205DWU | User Guide - Page 63
image may not straighten correctly. In that case, rescan the page using the paper guides to feed the paper in straight. • Invert Image-Only available for Black&White Mode, this option reverses the black and whites of an image. Original Image. Inverted Image. 58 DocuMate 520 Scanner User's Guide - Xerox XDM5205DWU | User Guide - Page 64
Scanning • Color Filter-Color filter is the ability of your scanner to automatically remove a color from a scanned item. For example, if you are scanning a Scan Configurations on the One Touch Properties window for the appropriate Destination Applications. DocuMate 520 Scanner User's Guide 59 - Xerox XDM5205DWU | User Guide - Page 65
dialog box when your selected Destination Application sends the scanned image to a printer, fax application, or other device. You use the options on the Device device is your printer, the dialog box is your printer's setup settings. 2. Click OK or Apply. 60 DocuMate 520 Scanner User's Guide - Xerox XDM5205DWU | User Guide - Page 66
. 3. If you want to store your archive documents in some other location, click the Browse button to specify the new location. 4. Click OK or Apply. DocuMate 520 Scanner User's Guide 61 - Xerox XDM5205DWU | User Guide - Page 67
want to get the factory pre-sets back again, you will need to uninstall then re-install your scanner. To edit or delete a scan configuration: 1. Open the One Touch Properties window and click the tab changes to be saved, the configuration must first be unlocked. 62 DocuMate 520 Scanner User's Guide - Xerox XDM5205DWU | User Guide - Page 68
. The key icon indicates the configuration is unlocked. Click the Key/Lock icon to toggle between locked and unlocked. 5. Edit the settings and click OK. DocuMate 520 Scanner User's Guide 63 - Xerox XDM5205DWU | User Guide - Page 69
scanning interface when you press or click a button. You can then use the interface to change the Resolution, Scan Mode, and other settings. When you scan, the scanned image will still be sent as the 113. 4. Click OK or Apply on the One Touch Properties window. 64 DocuMate 520 Scanner User's Guide - Xerox XDM5205DWU | User Guide - Page 70
NOTE: Xerox recommends that all OCR processing use the original factory settings for OCR scanning that came with your scanner. When scanning with other settings, use at least 300 dpi for the resolution. If Excel with its text and figures ready to be edited. DocuMate 520 Scanner User's Guide 65 - Xerox XDM5205DWU | User Guide - Page 71
use the text format as its file type. 3. Right-click on the format icon to see the menu. 4. Choose OCR Options from the menu. 66 DocuMate 520 Scanner User's Guide - Xerox XDM5205DWU | User Guide - Page 72
to one of the languages in the list. The dictionary icon indicates a language with dictionary support available. The dictionary is consulted to help in the OCR process. It can also offer listed. A dictionary named Custom is your default Word dictionary. DocuMate 520 Scanner User's Guide 67 - Xerox XDM5205DWU | User Guide - Page 73
fonts in the documents you plan to scan. To add new fonts to that list, select a font in the Fonts on System list and 68 DocuMate 520 Scanner User's Guide - Xerox XDM5205DWU | User Guide - Page 74
pages-Select this option if the document is too big to fit into the scanner's paper guide. Automatically correct page orientation-Select this option to have the OCR process check orientation text transformed to normal text of black text on a white background. DocuMate 520 Scanner User's Guide 69 - Xerox XDM5205DWU | User Guide - Page 75
kept in separate columns, similar to the original layout. If table-like data is encountered, it is placed in columns, not in a gridded table. 70 DocuMate 520 Scanner User's Guide - Xerox XDM5205DWU | User Guide - Page 76
be retained. When exporting to Text or Unicode file types, graphics and tables are not supported. Retain Fonts and Paragraphs (RFP)-This output format retains the font and paragraph styling, including select any scan button with a text format as the page format. DocuMate 520 Scanner User's Guide 71 - Xerox XDM5205DWU | User Guide - Page 77
on your computer. NOTE: If you did not install the OmniPage Pro software as part of the scanner installation, and you choose to install it at this time, you may have to restart your computer Microsoft Word, for example, does not have them as scanning options. 72 DocuMate 520 Scanner User's Guide - Xerox XDM5205DWU | User Guide - Page 78
from the Edit menu choose Find. 10. On the Find dialog box, enter the text to find, then click Find. See the Adobe Acrobat user manual for more about finding text in a PDF file, or about editing PDF text. DocuMate 520 Scanner User's Guide 73 - Xerox XDM5205DWU | User Guide - Page 79
to a CD If you have a CD burner attached to your computer, you can scan directly from your scanner onto a CD. This feature is available only on computers running Windows XP. To scan and burn to Application is still selected and click the Properties button. 74 DocuMate 520 Scanner User's Guide - Xerox XDM5205DWU | User Guide - Page 80
automatic CD writing wizard. If other files are also waiting in this location, they will get written with the One Touch files on the CD. DocuMate 520 Scanner User's Guide 75 - Xerox XDM5205DWU | User Guide - Page 81
to CD Destination Application. Otherwise, the Windows XP CD writing wizard will not be able to find the images to burn onto the CD. 76 DocuMate 520 Scanner User's Guide - Xerox XDM5205DWU | User Guide - Page 82
that you cannot choose a format for this option because the actual Destination Application is not selected until after the scanner feeds in the first page of your document. 4. Choose a Scan Configuration. 5. Click OK. The One Touch Properties window closes. DocuMate 520 Scanner User's Guide 77 - Xerox XDM5205DWU | User Guide - Page 83
application in the box and click OK. Now the application you selected opens and you can continue the scanning from that application's TWAIN interface. 78 DocuMate 520 Scanner User's Guide - Xerox XDM5205DWU | User Guide - Page 84
without the need for any internet plug-ins or other special processing. This is, essentially, from your scanner to a web-ready format in one automatic step. To scan and create an HTML web page: 1. . 6. Click OK. The One Touch Properties window closes. DocuMate 520 Scanner User's Guide 79 - Xerox XDM5205DWU | User Guide - Page 85
Scanning 7. Now press the scanner button or the One Touch Button that you've set up for HTML. When scanning is finished, the document is first Internet Explorer or other application to post the document to your web page as you would any other HTML page. 80 DocuMate 520 Scanner User's Guide - Xerox XDM5205DWU | User Guide - Page 86
them in a folder in one step. The process is ideal for archiving documents without having to manually save or process them in any other way. If you choose a text format for the file format you want the archived documents to be in color, choose a color configuration. DocuMate 520 Scanner User's Guide 81 - Xerox XDM5205DWU | User Guide - Page 87
storage location for that set. Then switch to another scan configuration and scan the next set of documents to store them in their folder. 82 DocuMate 520 Scanner User's Guide - Xerox XDM5205DWU | User Guide - Page 88
tabs, and select the settings you want. 8. Click the Storage Options tab. This is where you set the different folder locations for the new configurations. DocuMate 520 Scanner User's Guide 83 - Xerox XDM5205DWU | User Guide - Page 89
now listed as a Transfer to Storage configuration. 13. Repeat the process to create additional new configurations, such as one named "Storage for Personal Receipts." 84 DocuMate 520 Scanner User's Guide - Xerox XDM5205DWU | User Guide - Page 90
you created for storage. 8. Click OK. The One Touch Properties window closes. 9. Now either press the button on the scanner again, or click it on the One Touch Button Panel. When scanning is finished, the documents are stored in the two separate folders. DocuMate 520 Scanner User's Guide 85 - Xerox XDM5205DWU | User Guide - Page 91
. 4. Click OK. Now when you scan using Transfer to Storage as the Destination Application, the documents are stored on the server or mapped drive. 86 DocuMate 520 Scanner User's Guide - Xerox XDM5205DWU | User Guide - Page 92
the scanner icon at the top of the One Touch Button Panel. The Hardware icon. If the Hardware View of the panel is open you can also rightclick on the DM 520 icon. The Hardware Properties dialog box opens and shows information about your Xerox DocuMate 520 scanner. DocuMate 520 Scanner User's Guide - Xerox XDM5205DWU | User Guide - Page 93
a time setting. To turn the lamp on and off manually without turning off power to the scanner, click the Lamp On or Lamp Off buttons. To return the scanner to its factory settings, click Reset Device. 4. Click OK to save the changes and close the dialog box. 88 DocuMate 520 Scanner User's Guide - Xerox XDM5205DWU | User Guide - Page 94
you use to open it, you can still use the instructions in this User's Guide for scanning with your Xerox DocuMate 520 scanner. To access the TWAIN interface from other software, please refer to their user's guides, then return to this User's Guide for the steps to scan. NOTE: You can also access - Xerox XDM5205DWU | User Guide - Page 95
with the TWAIN Interface from PaperPort Accessing the TWAIN Interface from PaperPort The instructions in this section are for accessing the TWAIN interface from the PaperPort application. icon. Folders pane. 2. Click the Scan icon on the PaperPort command bar. 90 DocuMate 520 Scanner User's Guide - Xerox XDM5205DWU | User Guide - Page 96
section, "Setting Up Your Scanner to Work With PaperPort" on page 108. 3. Click the Scanner drop-down arrow, and select TWAIN: Xerox DocuMate 520 from the drop-down list. so on. See the PaperPort User's Guide for more information about the PaperPort Settings. DocuMate 520 Scanner User's Guide 91 - Xerox XDM5205DWU | User Guide - Page 97
the Help Topics window, press the F1 key or choose PaperPort Help from the Help menu. You can also refer to the PaperPort Getting Started Guide and PaperPort User's Guide on the Disc 1 Installation CD. 92 DocuMate 520 Scanner User's Guide - Xerox XDM5205DWU | User Guide - Page 98
don't need to make many adjustments to the image before scanning. You can adjust brightness, contrast, resolution, page size, and picture type. You can also choose to scan from the ADF or Flatbed. , click the Basic Interface or Advanced Interface button. DocuMate 520 Scanner User's Guide 93 - Xerox XDM5205DWU | User Guide - Page 99
. 3. Choose a resolution from the Resolution menu. 4. Choose a page size from the Page Size menu. 5. Click the Preview button. The scanner scans the item and displays a preview image. You can now use the options on the Basic Interface to adjust the image. 94 DocuMate 520 Scanner User's Guide - Xerox XDM5205DWU | User Guide - Page 100
stack at its original position and load the stack into the scanner. Then just click the Scan button. 6. Adjust the Brightness, Contrast, and Resolution until the picture is what you want. You can also in PaperPort, or the other TWAIN application you're using. DocuMate 520 Scanner User's Guide 95 - Xerox XDM5205DWU | User Guide - Page 101
the option to scan: • Auto Document Feeder-Simplex-Scans documents from the Automatic Document Feeder. • Scan Reflective Using-Scans the document on the Flatbed. 96 DocuMate 520 Scanner User's Guide - Xerox XDM5205DWU | User Guide - Page 102
finished scanning items, click Done to close the Advanced Interface. 11. The scanned images will appear in PaperPort, or other TWAIN application you're using. DocuMate 520 Scanner User's Guide 97 - Xerox XDM5205DWU | User Guide - Page 103
. Resolution Brightness/Contrast Color (Gamma, Saturation, and Hue) Scan Size NOTE: The list of scan settings for a configuration applies only to that type of configuration. For example, the Black&White Configuration does not have a setting for adjusting the Color Hue. 98 DocuMate 520 Scanner - Xerox XDM5205DWU | User Guide - Page 104
on the various settings panels are interactive. As you change the settings on the panel, the numbers in the list on the left also change. DocuMate 520 Scanner User's Guide 99 - Xerox XDM5205DWU | User Guide - Page 105
or to the right to increase it. You can also type a number directly into the resolution setting box, or click the up and down arrows to increase or decrease the setting. The resolution settings on your Xerox DocuMate 520 scanner range from 50 dpi to 600 dpi. 100 DocuMate 520 Scanner User's Guide - Xerox XDM5205DWU | User Guide - Page 106
with the TWAIN Interface from PaperPort 3. Click Reset to return the resolution to its original setting. The resolution panel also includes an advanced setting for Moire patterns. Moire patterns . 3. Click Reset to return the settings to their original numbers DocuMate 520 Scanner User's Guide 101 - Xerox XDM5205DWU | User Guide - Page 107
the setting boxes, or click the up and down arrows next to the boxes. 2. Click Reset to return the settings to their original numbers. 102 DocuMate 520 Scanner User's Guide - Xerox XDM5205DWU | User Guide - Page 108
input size options. To set the image size: 1. Select the image size from the menu. The dotted outline shows the selected area in the image. DocuMate 520 Scanner User's Guide 103 - Xerox XDM5205DWU | User Guide - Page 109
with the TWAIN Interface from PaperPort The following figure shows an example of a manually selected area. This is the image that appears on the PaperPort desktop when scanning Info box. NOTE: Clicking Remove causes the entire 8.5" x 14" area to be selected. 104 DocuMate 520 Scanner User's Guide - Xerox XDM5205DWU | User Guide - Page 110
your computer's hard drive. Physical size of the image to scan. Size of the file of the scanned image. Click to remove the selected area. DocuMate 520 Scanner User's Guide 105 - Xerox XDM5205DWU | User Guide - Page 111
the configuration list. 2. Make changes to the profile as needed, and then click Save. 3. If you want to delete the selected profile, click Delete. 106 DocuMate 520 Scanner User's Guide - Xerox XDM5205DWU | User Guide - Page 112
button on the Advanced Interface. The Device configuration window opens and shows the information about your scanner. See the section "Checking the Hardware and Setting the Lamp Power Saving" on page 87 for more information about the device settings. DocuMate 520 Scanner User's Guide 107 - Xerox XDM5205DWU | User Guide - Page 113
, WIA: Xerox DocuMate 520, and ISIS: Xerox DocuMate 520. The setup process, described below, is the same for each option. You will not have to set up the scanner again for an option unless you uninstall the scanner and PaperPort software, then re-install them. 108 DocuMate 520 Scanner User's Guide - Xerox XDM5205DWU | User Guide - Page 114
the options, such as Twain: Xerox DocuMate 520. 2. Click the Setup button. A window opens to begin the setup process. 3. Click Yes then click Next. The next window offers you the option to run hardware diagnostics. 4. Click Yes (recommended) then click Next. DocuMate 520 Scanner User's Guide 109 - Xerox XDM5205DWU | User Guide - Page 115
Wizard checks the connections, the next window is displayed. It has a series of setup options, but only the Basic scan test is necessary because your scanner was already tested and calibrated when you installed the One Touch 4.0 software 6. Click Next. 110 DocuMate 520 Scanner User's Guide - Xerox XDM5205DWU | User Guide - Page 116
scanner, face up, and the Scan button on the Basic Interface will become active. 8. Click the Scan button on the Basic interface. The Setup Wizard runs the scan test. A message window opens that says "Basic scan test passed." 9. Click Next on the message window. DocuMate 520 Scanner User's Guide - Xerox XDM5205DWU | User Guide - Page 117
window opens to let you know the setup process is finished. 10. Click Finish. Your scanner is now set up for the scanning option you selected (in the example above, it's the TWAIN option) and the Scan button on the PaperPort window will now become active. 112 DocuMate 520 Scanner User's Guide - Xerox XDM5205DWU | User Guide - Page 118
its own scanning interface-known as Windows Image Acquisition (WIA)-for acquiring images from scanners, digital cameras, and other digital devices. This section shows how to use Microsoft Paint window opens. 2. From the File menu choose From Scanner or Camera. DocuMate 520 Scanner User's Guide 113 - Xerox XDM5205DWU | User Guide - Page 119
Scanning with the WIA Interface The Scan using Xerox DocuMate 520 window opens.Use this window to select scanning options and start the scan process. 3. From the Paper . 7. Preview the image again. When you are satisfied with the image, click the Scan button. 114 DocuMate 520 Scanner User's Guide - Xerox XDM5205DWU | User Guide - Page 120
Scans You can select new settings before you scan an item to fine tune exactly how you want to scan a particular item. To select the scanner settings before you scan: DocuMate 520 Scanner User's Guide 115 - Xerox XDM5205DWU | User Guide - Page 121
apply to the setting Black and White picture or text. Resolution (DPI)-Click the menu arrow and choose the dots per inch (dpi) of the resolution. The maximum resolution is 600 dpi; the minimum is 50 dpi. The to reset the settings and start over, click Reset. 116 DocuMate 520 Scanner User's Guide - Xerox XDM5205DWU | User Guide - Page 122
ISIS scanning applications. If you are using an ISIS application to scan, please see its User's Guide for the steps to open the interface. To open the ISIS interface from the One Touch application, Flatbed, and to select scanning options then start scanning. DocuMate 520 Scanner User's Guide 117 - Xerox XDM5205DWU | User Guide - Page 123
stack of documents, the first page of the stack feeds through the ADF for the preview. After adjusting the scanner settings, replace that page on the stack so it is scanned with the rest of the pages. 4. Click Feeder and are scanned with the new scan settings. 118 DocuMate 520 Scanner User's Guide - Xerox XDM5205DWU | User Guide - Page 124
case you decide to scan with it instead. 5. When you're ready to scan, click Scan. The document is scanned with the new scan settings. DocuMate 520 Scanner User's Guide 119 - Xerox XDM5205DWU | User Guide - Page 125
. Because the Text Document option scans in Black and White, the contrast option does not apply. Resolution-Click the menu arrow and choose a resolution (dpi). Your scanner can scan up to 600 dpi. Page-Click the menu arrow and choose a page size. 2. Click OK. 120 DocuMate 520 Scanner User's Guide - Xerox XDM5205DWU | User Guide - Page 126
sizes and is often used to produce newspaper and magazine images. Use this setting for lower resolution black and white images. The halftone settings also produce small file sizes. Diffusion-Also converts the so you can see which one is best for scanning. DocuMate 520 Scanner User's Guide 121 - Xerox XDM5205DWU | User Guide - Page 127
Scanning with the ISIS Interface Dots per inch-Click the menu arrow and choose a resolution (dpi). Your scanner can scan up to 600 dpi. Page Size-Click the menu arrow and choose , only the selected area appears as an image in the Destination Application. 122 DocuMate 520 Scanner User's Guide - Xerox XDM5205DWU | User Guide - Page 128
The ISIS drivers were installed correctly during the installation of your scanner. The Scanner Selection dialog box will then appear. 2. Select Xerox DocuMate 520 from the list of scanners and click OK. Your scanner is then ready to work with the ISIS driver. DocuMate 520 Scanner User's Guide 123 - Xerox XDM5205DWU | User Guide - Page 129
information about maintenance, troubleshooting, uninstalling, scanner specifications, and spare parts. Clearing Paper Jams If your scanner stops scanning due paper before scanning, adjust the guides to the paper size, and insert the paper evenly into the ADF. 124 DocuMate 520 Scanner User's Guide - Xerox XDM5205DWU | User Guide - Page 130
. Forcing the roller to rotate will damage it, and may cause the scanner to feed pages incorrectly. 4. Wipe the ADF pad from top to bottom. Be careful not to snag the cloth on the springs on either side of the pad. 5. Close the cover when you're finished. DocuMate 520 Scanner User's Guide 125 - Xerox XDM5205DWU | User Guide - Page 131
Problems with documents feeding into the ADF is an indication that the pad is wearing thin. You received a replacement pad in the original scanner box, and you can also order a new one. See the "Xerox DocuMate 520 to replace the new pad into its slots. 126 DocuMate 520 Scanner User's Guide - Xerox XDM5205DWU | User Guide - Page 132
Assembly After extended use, the roller may wear out and may need to be replaced. It is a user-replaceable part and can be ordered. See the section, "Xerox DocuMate 520 Parts List" on page 136 for the the ADF cover. 2. The roller is located in the ADF cover. DocuMate 520 Scanner User's Guide 127 - Xerox XDM5205DWU | User Guide - Page 133
its housing. 6. Reverse the procedure to replace the new roller. Make sure both sides of the roller assembly are seated properly into their housings. 128 DocuMate 520 Scanner User's Guide - Xerox XDM5205DWU | User Guide - Page 134
bar and make sure DocuMate 520 is selected as your scanner. Problem: During installation I got the error message: PaperPort Installation is not complete. What do I do? The installation procedure was not successful. You need to reinstall the PaperPort software. DocuMate 520 Scanner User's Guide 129 - Xerox XDM5205DWU | User Guide - Page 135
. Problem: How do I uninstall PaperPort? See the section, "Uninstalling Your Scanner" drivers and re-install your Xerox DocuMate 520 scanner. Please see the documentation that you received with the other scanner for the steps to remove its driver instructions. 130 DocuMate 520 Scanner User's Guide - Xerox XDM5205DWU | User Guide - Page 136
is plugged back in. Unplug the power cable from the scanner, and then plug it back in. If the scanner does not reconnect: 1. Unplug the power cable from the scanner. 2. Restart your computer. 3. After the restart is complete, plug the power cable back in. DocuMate 520 Scanner User's Guide 131 - Xerox XDM5205DWU | User Guide - Page 137
location. All Other Codes An internal part in the scanner may have malfunctioned. Turn off the power to your scanner, then turn it back on again. If the problem persists, re-boot your computer. If the problem still persists, contact Xerox Technical Support. 132 DocuMate 520 Scanner User's Guide - Xerox XDM5205DWU | User Guide - Page 138
Uninstalling Your Scanner To uninstall the Xerox DocuMate 520 scanner, remove the One Touch software first, then remove PaperPort, or other scanner software. Step 1: Uninstalling the Scanner and One removed. 5. Close all open windows and restart your computer. DocuMate 520 Scanner User's Guide 133 - Xerox XDM5205DWU | User Guide - Page 139
this User Guide and follow the steps for installing one of the other driver options. NOTE: The One Touch 4.0 driver is required for the scanner's buttons to function. If you select a driver without One Touch 4.0, the scanner buttons will not initiate scanning. 134 DocuMate 520 Scanner User's Guide - Xerox XDM5205DWU | User Guide - Page 140
DocuMate 520 Scanner Specifications Bit depth True 48-Bit color (internal), 16-Bit gray (internal), 1-Bit line art/text Scanning resolution Optical resolution: 600 x 1200 dpi, Hardware supersampling Interpolated resolution , TUV/GS, FCC Class B, CE, WEEE DocuMate 520 Scanner User's Guide 135 - Xerox XDM5205DWU | User Guide - Page 141
Maintenance Xerox DocuMate 520 Parts List Please use the following part names and numbers when ordering replacements for your DocuMate 520 scanner. Part Name Part Number Paper Guide 57-0097-000 Paper Guide Extension 57-0098-000 Paper Stop ADF Pad Roller Assembly 57-0099-000 57-0100-000 57- - Xerox XDM5205DWU | User Guide - Page 142
be issued under any Act of Congress. 2. Adjusted Compensation Certificates for Veterans of the World Wars. 3. Obligations or Securities of any Foreign Government, Bank, or Corporation. DocuMate 520 Scanner User's Guide 137 - Xerox XDM5205DWU | User Guide - Page 143
Income Dependency Status Court Record Previous military service Physical or mental condition Exception: U. following is also prohibited in certain states: Automobile Licenses - Drivers' Licenses - Automobile Certificates of Title. The above list of law. 138 DocuMate 520 Scanner User's Guide - Xerox XDM5205DWU | User Guide - Page 144
to purport to have been printed by the Queen's Printer for Canada, or the equivalent printer for a province). 6. Marks, brands, seals, wrappers not installed, and used in accordance with the instructions, may cause harmful interference to radio communications. DocuMate 520 Scanner User's Guide 139 - Xerox XDM5205DWU | User Guide - Page 145
the Xerox program and you are managing its disposal, please note that the product may contain lead and other materials whose disposal may be regulated due to environmental considerations. For recycling and disposal information, contact your local authorities. 140 DocuMate 520 Scanner User's Guide - Xerox XDM5205DWU | User Guide - Page 146
buttons configuring 36 C CD-ROM drive 4 Color 56, 97 color hue 102 options 102 Color Document 39 Color Document button 120 DocuMate 520 Scanner Installation Guide color filter 59 Comma Delimited 50 computer specifications 4 Configure Before Scan 64, 117 Contrast 56, 101, 116, 120 create single page - Xerox XDM5205DWU | User Guide - Page 147
character recognition 10 P page format options 47 page settings 57 page size 57 paper guide 3, 7 paper jam 124, 127, 132 paper stop 3, 8 PaperPort 89 help Resolution 56, 100, 116, 120 Rich Text Format 50 roller replacement 127 rtf file format 50 ruler units 105 DocuMate 520 Scanner Installation Guide - Xerox XDM5205DWU | User Guide - Page 148
45 Straighten Image 58 system requirements 4 T technical support 129 template 71 text color 69 Text Document button 120 Text Documents Properties 42 Text Editors 53 text file format 49 Text Formats 49 TIFF 48 Transfer to Storage 81 DocuMate 520 Scanner Installation Guide true page 71 TWAIN 64, 78 - Xerox XDM5205DWU | User Guide - Page 149
05-0595-200
-
 1
1 -
 2
2 -
 3
3 -
 4
4 -
 5
5 -
 6
6 -
 7
7 -
8
-
9
-
10
-
11
-
12
-
13
-
14
-
15
-
16
-
17
-
18
-
19
-
20
-
21
-
22
-
23
-
24
-
25
-
26
-
27
-
28
-
29
-
30
-
31
-
32
-
33
-
34
-
35
-
36
-
37
-
38
-
39
-
40
-
41
-
42
-
43
-
44
-
45
-
46
-
47
-
48
-
49
-
50
-
51
-
52
-
53
-
54
-
55
-
56
-
57
-
58
-
59
-
60
-
61
-
62
-
63
-
64
-
65
-
66
-
67
-
68
-
69
-
70
-
71
-
72
-
73
-
74
-
75
-
76
-
77
-
78
-
79
-
80
-
81
-
82
-
83
-
84
-
85
-
86
-
87
-
88
-
89
-
90
-
91
-
92
-
93
-
94
-
95
-
96
-
97
-
98
-
99
-
100
-
101
-
102
-
103
-
104
-
105
-
106
-
107
-
108
-
109
-
110
-
111
-
112
-
113
-
114
-
115
-
116
-
117
-
118
-
119
-
120
-
121
-
122
-
123
-
124
-
125
-
126
-
127
-
128
-
129
-
130
-
131
-
132
-
133
-
134
-
135
-
136
-
137
-
138
-
139
-
140
-
141
-
142
-
143
-
144
-
145
-
146
-
147
-
148
-
149
 |
 |

DocuMate 520
user's guide
scanner