Xerox XDM6325D-WU User Manual
Xerox XDM6325D-WU Manual
 |
View all Xerox XDM6325D-WU manuals
Add to My Manuals
Save this manual to your list of manuals |
Xerox XDM6325D-WU manual content summary:
- Xerox XDM6325D-WU | User Manual - Page 1
DocuMate 632 scanner user's guide - Xerox XDM6325D-WU | User Manual - Page 2
DocuMate 632 scanner user's guide - Xerox XDM6325D-WU | User Manual - Page 3
prohibited, except as allowed under the copyright laws. XEROX ® is a trademark of Xerox Corporation in the United States and/or other countries on any medium except as specifically allowed in the licensing agreement. No part of this document may be reproduced or transmitted in any form or by - Xerox XDM6325D-WU | User Manual - Page 4
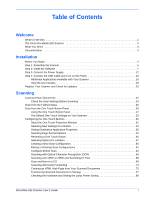
Box 1 The Xerox DocuMate 632 Scanner 2 What You Need 3 Documentation 3 Installation Before You Begin 4 Step 1: Assemble the Scanner 5 Step 2: Power 13 Additional Applications Available with Your Scanner 16 View the User Guides 18 Register Your Scanner and Check for Updates 20 Scanning Load - Xerox XDM6325D-WU | User Manual - Page 5
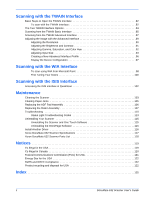
110 Status Light Troubleshooting Codes 113 Uninstalling Your Scanner 115 Uninstalling the Scanner and One Touch Software 115 Uninstalling the OmniPage Software 115 Install Another Driver 116 Xerox DocuMate 632 Scanner Specifications 117 Xerox DocuMate 632 Scanner Parts List 118 Notices - Xerox XDM6325D-WU | User Manual - Page 6
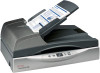
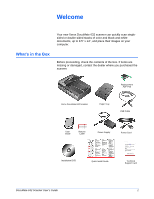
missing or damaged, contact the dealer where you purchased the scanner. Replacement ADF Pad Xerox DocuMate 632 Scanner Paper Tray USB Cable User Guide Buttons Label Power Supply Power Cord Installation DVD Quick Install Guide Technical Support Card DocuMate 632 Scanner User's Guide 1 - Xerox XDM6325D-WU | User Manual - Page 7
the output tray. Status light-Shows the scanner's status. A steady green light indicates the scanner is available to scan. A rapidly flashing green light indicates the scanner is preparing to scan or scanning. Refer to the Troubleshooting section for additional details. Destination Selector buttons - Xerox XDM6325D-WU | User Manual - Page 8
available Universal Serial Bus (USB) port • Microsoft® Windows® operating system: 2000 (Service Pack 4), XP (Service Pack 1 and 2) or Vista • Windows 2000 and XP: Minimum of 512 megabytes scanner: • Quick Install Guide-Abbreviated installation instructions. • Xerox DocuMate 632 Scanner User's Guide- - Xerox XDM6325D-WU | User Manual - Page 9
programs first before beginning the installation of your Xerox DocuMate 632 scanner. Please see "Uninstalling Your Scanner" on page 115 for basic instructions, or see the User's Guide that you received with your other scanner for specific instructions. • If your computer is running Windows Vista - Xerox XDM6325D-WU | User Manual - Page 10
Step 1: Assemble the Scanner Installation To assemble the scanner: 1. Remove all shipping tape from the scanner and from the Paper Tray. 2. Slide the tray in so the pins seat into particles that may have gotten inside the document feeder, and close the cover. DocuMate 632 Scanner User's Guide 5 - Xerox XDM6325D-WU | User Manual - Page 11
ADF port on the back of the scanner. Make sure the cable is plugged in the scanner's scan head by holding it securely in position. Lock the scanner when scanner will not scan when locked. 8. When you're finished assembling the scanner, place it on a level surface on your desk. If the scanner - Xerox XDM6325D-WU | User Manual - Page 12
sure the DVD was inserted in the drive in the proper direction (label side up). To launch the DVD manually: • Open the Windows option for My Computer. You can do this by double-clicking on the My Computer icon on the DVD, double-click the file named START32.EXE. DocuMate 632 Scanner User's Guide 7 - Xerox XDM6325D-WU | User Manual - Page 13
Installation 3. On the Installation menu, select Install Products. 4. Make sure the box Scanner Driver is checked. NOTE: The software provided with your scanner may differ slightly from the list shown in the window. 8 DocuMate 632 Scanner User's Guide - Xerox XDM6325D-WU | User Manual - Page 14
your scanner. Please visit our web site at: www.xeroxscanners.com for the latest updates. 6. Click Next. 7. On the Xerox License Agreement scanner driver will not be installed. The next window lists the choices of the drivers that you can install for your scanner. DocuMate 632 Scanner User's Guide - Xerox XDM6325D-WU | User Manual - Page 15
you can use several different methods to scan, as explained in this User Guide. • TWAIN and ISIS-The TWAIN and ISIS drivers are installed. The One on the scanner. • TWAIN only-The TWAIN driver is installed without the One Touch 4.0 software or the ISIS driver. You can use the Xerox DocuMate 632 - Xerox XDM6325D-WU | User Manual - Page 16
of the images for your Color Space setting. The Color Space setting sets the gamma value for the scanner so scanned items look good on your monitor. Gamma controls the brightness of the midtones of colors. to "Step 3: Connect the Power Supply" on page 12. DocuMate 632 Scanner User's Guide 11 - Xerox XDM6325D-WU | User Manual - Page 17
To connect your Xerox DocuMate 632 scanner: 1. Plug the power supply into the power port on the scanner. NOTE: Only use the power supply (HEG42-240200-7L made by HiTron) included with your scanner. Connecting any other type of power supply may damage your scanner, and will void its warranty. 2. Plug - Xerox XDM6325D-WU | User Manual - Page 18
Xerox DocuMate 632 scanner connects to any available USB port. Check your computer's manual for USB port locations. NOTE: You can connect the scanner however your scanner will also connect You can also connect the scanner to a USB hub. If you have not installed the scanner driver, unplug the USB cable - Xerox XDM6325D-WU | User Manual - Page 19
to the left of the power port. The status light comes on and flashes indicating that the scanner is receiving power. If you are using Windows XP Service Pack 2 or Windows Vista, and have plugged the USB cable into a USB 1.1 port, an information bubble may open explaining that "A HI-SPEED USB - Xerox XDM6325D-WU | User Manual - Page 20
's status light is green when the scanner and computer are communicating properly. 7. Click Close on the Installation Complete window to close and exit the software installer. You can now install the additional applications you received with your scanner. DocuMate 632 Scanner User's Guide 15 - Xerox XDM6325D-WU | User Manual - Page 21
Available with Your Scanner Your scanner includes free, additional applications on the installation DVD. 1. Reinsert the installation DVD into the DVD-ROM drive. The Installation menu opens. The free Adobe Acrobat Reader software is located on the DVD with the User Guides. See the steps - Xerox XDM6325D-WU | User Manual - Page 22
to install, and click Install Now. Follow the instructions on the screen to install each of the additional search, and print PDF files. The User Guides on your scanner's installation DVD are in PDF format and require when you install it with your Xerox DocuMate 632 scanner driver and ISIS is one - Xerox XDM6325D-WU | User Manual - Page 23
follow the instructions on the installation window. If your computer already has Adobe Acrobat Reader installed, please do not select it unless the version provided on the installation DVD is a newer version than the one currently installed on your computer. 18 DocuMate 632 Scanner User's Guide - Xerox XDM6325D-WU | User Manual - Page 24
return to the Main Menu window and click Exit. 4. Remove the DVD and store it in a safe place. That's it! Installation is finished and your Xerox DocuMate 632 scanner is ready to scan. DocuMate 632 Scanner User's Guide 19 - Xerox XDM6325D-WU | User Manual - Page 25
support service. Registration also gives you free access to software updates for your scanner. To register your scanner instructions on the screen and register your scanner by entering your scanner side of the scanner. The Serial Number when accessing free telephone support, or checking for online - Xerox XDM6325D-WU | User Manual - Page 26
Xerox DocuMate 632 scanner. Each method scans equally well, so use the one with appropriate options for the item you are scanning. • Scanner scanner, scanner's TWAIN interface to scan. Select scanning options before scanning, put the document in the scanner in the scanner, then scanner, then use - Xerox XDM6325D-WU | User Manual - Page 27
labels, stickers, or Post-ItTM notes that may come off during the scanning process and get stuck in the scanner. Misuse as described here will void your scanner's warranty. 2. Adjust the paper guides for the width of the paper then load the documents so the tops of the pages are inserted into the - Xerox XDM6325D-WU | User Manual - Page 28
window opens and the image is sent to the selected application from the One Touch utility. To Cancel scanning, click the Cancel button. DocuMate 632 Scanner User's Guide 23 - Xerox XDM6325D-WU | User Manual - Page 29
This sample shows the current description of setting 6. This number corresponds to the LED on the scanner. Note: The configurations shown on this example of the One Touch Properties window are for illustration Panel" on page 26 for more about the Button Panel. 24 DocuMate 632 Scanner User's Guide - Xerox XDM6325D-WU | User Manual - Page 30
any pages from the Automatic Document Feeder. 2. Open the scanner lid and place the page on the scanner glass, face down. 3. Align the paper with the arrows on the scanner for the size of paper you are using. 4. Close Application from the One Touch utility. DocuMate 632 Scanner User's Guide 25 - Xerox XDM6325D-WU | User Manual - Page 31
scan from the One Touch Button Panel on the screen. 1. Adjust the paper guide for the width of paper and load the documents with their tops into the these arrows to navigate through the buttons. 3. On the screen-not on the scanner-click the button you want to use to scan. For example, if you want - Xerox XDM6325D-WU | User Manual - Page 32
controls for the scanner. The One Touch Button Panel shows information about the scanner and its settings. Detail View • The Button View is your main scanner control panel. Use it to scan or to see . • The Hardware View shows the current scanners connected to your computer. From the Hardware View - Xerox XDM6325D-WU | User Manual - Page 33
. A folder icon for a button, such as show for buttons 1, 2, and 7, means that the scanner sends the scanned image to the default folder at C:\Documents and Settings\\My Documents\My One settings of the buttons on the One Touch Button Panel. 28 DocuMate 632 Scanner User's Guide - Xerox XDM6325D-WU | User Manual - Page 34
Scanning The Default One Touch Settings on Your Scanner Based on the recommended full install of your scanner driver, your scanner buttons are pre-configured to scan items for various basic tasks, program specified in the internet options of Internet Explorer. DocuMate 632 Scanner User's Guide 29 - Xerox XDM6325D-WU | User Manual - Page 35
that left-clicking a button on the One Touch Button Panel starts the scanner scanning. Right-clicking opens the One Touch Properties window. The One Touch you press, hold down, and release the Simplex or Duplex button on the scanner. NOTE: Some of the options on the One Touch Properties Window (and - Xerox XDM6325D-WU | User Manual - Page 36
not available. Grayed out options are not appropriate for your Xerox DocuMate 632 scanner. If you use the One Touch application with other Xerox scanners, grayed out options become active, if appropriate. The following a Button" on page 47 for more information. DocuMate 632 Scanner User's Guide 31 - Xerox XDM6325D-WU | User Manual - Page 37
Use Configure Before Scan if you want to set the scanning mode manually before scanning. See "Configure Before Scan" on page 63. You can scan from both the Automatic Document Feeder and the Flatbed glass. Your scanner senses if pages are in the Automatic Document Feeder and automatically scans them - Xerox XDM6325D-WU | User Manual - Page 38
One Touch utility, you must first remove any pages from the Automatic Document Feeder. Otherwise, the scanner will sense those pages, and scan them instead. NOTE: When scanning from WIA or other TWAIN applications closes the window without accepting any changes. DocuMate 632 Scanner User's Guide 33 - Xerox XDM6325D-WU | User Manual - Page 39
on page 47 to display a full list of the Destination Applications that you can use with the scanner. NOTE: If you select a word processing program such as Microsoft WordPad or Microsoft Word and a page the Select Configuration list, select a scan configuration. 34 DocuMate 632 Scanner User's Guide - Xerox XDM6325D-WU | User Manual - Page 40
window first. However, you can scan at any time by pressing the Simplex or Duplex button on the scanner. When you are finished selecting new settings for a button and you press or click a scanner button, the document is scanned using the newly configured settings for that button. DocuMate 632 - Xerox XDM6325D-WU | User Manual - Page 41
Reader, and the other applications indicated by their icons in the list. The properties apply to the OCR settings for the applications. 36 DocuMate 632 Scanner User's Guide - Xerox XDM6325D-WU | User Manual - Page 42
the One Touch Properties window for that group of applications. 6. Click the Add button. 7. Click OK or Apply on the Link Properties window. DocuMate 632 Scanner User's Guide 37 - Xerox XDM6325D-WU | User Manual - Page 43
window. Image Documents Properties These properties apply to OmniPage Pro that you received with your scanner, plus Microsoft Paint and other image processing applications. 1. Click in the Color document 5. Click OK or Apply on the Link Properties window. 38 DocuMate 632 Scanner User's Guide - Xerox XDM6325D-WU | User Manual - Page 44
selected so you will see a message when it's time to click the Burn to CD button. 3. Click OK on the Link Properties window. DocuMate 632 Scanner User's Guide 39 - Xerox XDM6325D-WU | User Manual - Page 45
(AOL), you need to know which folder contains the scanned documents so you can manually attach them to your email messages. 1. Click the Browse button for Folder for storing see the AOL user manual for making changes to the Internet options applicable to AOL. 40 DocuMate 632 Scanner User's Guide - Xerox XDM6325D-WU | User Manual - Page 46
. Use this option to provide that compression capability to image files. 5. Click OK. 6. Click OK or Apply on the One Touch Properties window. DocuMate 632 Scanner User's Guide 41 - Xerox XDM6325D-WU | User Manual - Page 47
types. See "Text Formats" on page 44 for details. Create Single Image Files The TIFF and PDF formats support multiple page documents. If you are scanning as a TIFF or PDF file and want one file created for each formats tend to be larger than the JPEG format. 42 DocuMate 632 Scanner User's Guide - Xerox XDM6325D-WU | User Manual - Page 48
, the JPEG format is often used for images on web pages, or if file size might be a problem when electronically sending the files. JPEG files are reduced in size by lowering their image quality, and you 4. Click OK or Apply on the One Touch Properties window. DocuMate 632 Scanner User's Guide 43 - Xerox XDM6325D-WU | User Manual - Page 49
format icon changes to match the file type of the application. In some cases, the Destination Application supports several file types, and you can right-click on the icon to choose the particular file type when the Destination Application is a Storage location. 44 DocuMate 632 Scanner User's Guide - Xerox XDM6325D-WU | User Manual - Page 50
. See "Scanning with sPDF or nPDF and Searching for Text" on page 68 for details. 4. To change the OCR settings, choose OCR Options. DocuMate 632 Scanner User's Guide 45 - Xerox XDM6325D-WU | User Manual - Page 51
Touch OmniPage Module or OmniPage Pro software installed on your computer. Refer to the One Touch OmniPage Mini-Guide on Disc 1 of the installation CD for details. Note that the OCR Options settings apply to all 4. Click OK or Apply. The button is now renamed. 46 DocuMate 632 Scanner User's Guide - Xerox XDM6325D-WU | User Manual - Page 52
the One Touch Properties window and click the Options tab. Options tab 2. Click the menu arrow and choose the button for new options. DocuMate 632 Scanner User's Guide 47 - Xerox XDM6325D-WU | User Manual - Page 53
box opens so you can select which application to use to continue scanning. See "Scanning with Event Forwarding" on page 73 for details. DocuMate 632 Scanner User's Guide - Xerox XDM6325D-WU | User Manual - Page 54
to group them by date you can choose the week and month options. 5. Click OK to save the options for the selected button. DocuMate 632 Scanner User's Guide 49 - Xerox XDM6325D-WU | User Manual - Page 55
the Copy button. If the Scan Settings tab is not selected, click it. 4. On the Scan Configuration Properties dialog box, type a name. 50 DocuMate 632 Scanner User's Guide - Xerox XDM6325D-WU | User Manual - Page 56
darkest and lightest portions of the image. The greater the contrast, the more difference between the lighter and darker shades in the image. DocuMate 632 Scanner User's Guide 51 - Xerox XDM6325D-WU | User Manual - Page 57
. • Invert Image-Only available for Black&White Mode, this option reverses the black and whites of an image. Original Image Inverted Image 52 DocuMate 632 Scanner User's Guide - Xerox XDM6325D-WU | User Manual - Page 58
. This option is only available for Duplex scanning. • Color Filter-Color filter is the ability of your scanner to automatically remove a color from a scanned item. For example, if you are scanning a letter with tab are for the Color or Grayscale scanning mode. DocuMate 632 Scanner User's Guide 53 - Xerox XDM6325D-WU | User Manual - Page 59
. It will now be listed in the list of Scan Configurations on the One Touch Properties window for the appropriate Destination Applications. 54 DocuMate 632 Scanner User's Guide - Xerox XDM6325D-WU | User Manual - Page 60
to the device. For example, if the device is your printer, the dialog box is your printer's setup settings. 2. Click OK or Apply. DocuMate 632 Scanner User's Guide 55 - Xerox XDM6325D-WU | User Manual - Page 61
on your selection for the Storage Layout. For example, if the file type is TIFF, and you select Documents are put into 56 DocuMate 632 Scanner User's Guide - Xerox XDM6325D-WU | User Manual - Page 62
to Storage as the Destination Application, and assign each scan configuration to one of the scanner buttons. Setting up multiple folders for transfer to storage: 1. Using Microsoft Windows, create , and Advanced Settings tabs, and select the settings you want. DocuMate 632 Scanner User's Guide 57 - Xerox XDM6325D-WU | User Manual - Page 63
you haven't created the folder yet, you can click the Make New Folder button and type the name for the new folder. 58 DocuMate 632 Scanner User's Guide - Xerox XDM6325D-WU | User Manual - Page 64
Transfer to Storage destination, and each configuration scans documents to separate folders. The new configurations apply to the Transfer to Storage Destination Application. DocuMate 632 Scanner User's Guide 59 - Xerox XDM6325D-WU | User Manual - Page 65
to select a scanner button for each multiple storage folders. 2. Press the Destination Selector buttons on the scanner to get to one of the buttons set up for scanning to scanning is finished, put the next set up documents into the scanner and press the Destination Selector buttons to get to the next - Xerox XDM6325D-WU | User Manual - Page 66
and want to get the factory pre-sets back again, you will need to uninstall then re-install your scanner driver. To edit or delete a scan configuration: 1. Open the One Touch Properties window. 2. Select the the configuration, as explained in the next steps. DocuMate 632 Scanner User's Guide 61 - Xerox XDM6325D-WU | User Manual - Page 67
Lock/Key icon to toggle between locked and unlocked. 5. Edit the settings and click OK. 6. Click OK to close the dialog box. 62 DocuMate 632 Scanner User's Guide - Xerox XDM6325D-WU | User Manual - Page 68
scanning. Some interface options may not be available, based on the drivers you installed for your scanner. TWAIN-The TWAIN Interface opens for you to configure the scanning. See "Scanning with the TWAIN Click OK or Apply on the One Touch Properties window. DocuMate 632 Scanner User's Guide 63 - Xerox XDM6325D-WU | User Manual - Page 69
To Scan Using Configure Before Scan 1. Put the documents in the scanner's ADF tray or on the flatbed glass. 2. Click on the Please see "Scanning with the TWAIN Interface" on page 82 for instructions on using the scanning features found in the Basic TWAIN and Advanced TWAIN interfaces. 64 DocuMate - Xerox XDM6325D-WU | User Manual - Page 70
stop the current scan, change the Picture Type from Black & White to Color, then restart the scanning without losing the pages already scanned. DocuMate 632 Scanner User's Guide 65 - Xerox XDM6325D-WU | User Manual - Page 71
and so forth. NOTE: Xerox recommends that all OCR processing use the original factory settings for OCR scanning that came with your scanner. When scanning with other features when using One Touch 4.0. The "One Touch OmniPage Mini-Guide is available on the Disc 1 installation CD. With the One - Xerox XDM6325D-WU | User Manual - Page 72
(or other spreadsheet application) with the figures and text from the original spreadsheets. NOTE: Please Refer to the One Touch OmniPage Mini-Guide, on Disc 1 that you received with your scanner, for detailed instructions on configuring and scanning with the advanced OCR Options. DocuMate 632 - Xerox XDM6325D-WU | User Manual - Page 73
the page format. 4. Right-click on the text format icon. 5. Choose the Searchable PDF or Normal PDF option for the page format. 68 DocuMate 632 Scanner User's Guide - Xerox XDM6325D-WU | User Manual - Page 74
you want to find, and click the Find button. See the Adobe Acrobat user manual for more about finding text in a PDF file, or about editing PDF text. computer, you can scan directly from your Xerox DocuMate 632 scanner onto a CD. This feature is available only on computers running Windows XP or - Xerox XDM6325D-WU | User Manual - Page 75
a CD. When scanning is finished, a bubble message on the screen tells you that files are waiting to be burned to the CD. 70 DocuMate 632 Scanner User's Guide - Xerox XDM6325D-WU | User Manual - Page 76
writing wizard. If other files are also waiting in this location, they will get written with the One Touch files on the CD. DocuMate 632 Scanner User's Guide 71 - Xerox XDM6325D-WU | User Manual - Page 77
, the Windows XP and Windows Vista CD writing wizards will not be able to find the images to burn onto the CD. 72 DocuMate 632 Scanner User's Guide - Xerox XDM6325D-WU | User Manual - Page 78
scanning at the start of the process, you can use event forwarding. The scanner will feed in the first page, but will then stop until you select the option because the actual destination application is not selected until after the scanner feeds in the first page of your document. 4. Choose a Scan - Xerox XDM6325D-WU | User Manual - Page 79
the box and click OK. Now the application you selected opens and you can continue the scanning from that application's TWAIN interface. 74 DocuMate 632 Scanner User's Guide - Xerox XDM6325D-WU | User Manual - Page 80
site without the need for any internet plug-ins or other special processing. This is, essentially, from your scanner to a web-ready format in one automatic step. To scan and create an HTML web page: 1. Document Feeder, or put a page on the Flatbed glass. DocuMate 632 Scanner User's Guide 75 - Xerox XDM6325D-WU | User Manual - Page 81
use Microsoft Internet Explorer or other application to post the document to your web page as you would any other HTML page. 76 DocuMate 632 Scanner User's Guide - Xerox XDM6325D-WU | User Manual - Page 82
save them in a folder in one step. The process is ideal for archiving documents without having to manually save or process them in any other way. If you choose a text format for the file format, window. Your scanned documents will be stored at this location. DocuMate 632 Scanner User's Guide 77 - Xerox XDM6325D-WU | User Manual - Page 83
up for archiving). When scanning is finished, the documents are saved in the text file format and in the location you specified. 78 DocuMate 632 Scanner User's Guide - Xerox XDM6325D-WU | User Manual - Page 84
and mapped drives are represented by an icon that indicates its network connection. Select a mapped drive or server as indicated by the icon. DocuMate 632 Scanner User's Guide 79 - Xerox XDM6325D-WU | User Manual - Page 85
the Lamp Power Saving 1. Right-click on the One Touch icon and choose Show Hardware from the pop-up menu. You can also click the scanner icon at the top of the One Touch Button Panel. The Hardware icon If the Hardware View of the panel is open you can also - Xerox XDM6325D-WU | User Manual - Page 86
down after 15 minutes of idle time. You can change the time before the scanner powers down, from 1 minute to a maximum of 10 hours. 3. Click the the lamp on and off manually without turning off power to the scanner, click the Lamp On or Lamp Off buttons. To return the scanner to its factory settings, - Xerox XDM6325D-WU | User Manual - Page 87
TWAIN interface is essentially the same regardless of the software you use to open it, you can still use the instructions in this User's Guide for scanning with your Xerox DocuMate 632 scanner. The steps below show the basic process to open the TWAIN interface, but to open it in specific software - Xerox XDM6325D-WU | User Manual - Page 88
Picture then choose From Scanner or Camera. Click the drop-down menu and choose Xerox DocuMate 632. Then click Custom Insert. Note that your scanner may be listed application's user guide for the appropriate steps to open the TWAIN Interface for your scanner. DocuMate 632 Scanner User's Guide 83 - Xerox XDM6325D-WU | User Manual - Page 89
or Advanced Interface button. NOTE: When scanning from a TWAIN application, the interface that opens is the one you used previously to scan. 84 DocuMate 632 Scanner User's Guide - Xerox XDM6325D-WU | User Manual - Page 90
, you click the Scan button on the Basic Interface (not on the scanner) to scan the item. Click the Advanced Interface button if you would the ADF, make sure only one page is loaded into the scanner. 3. Click the Preview button. The scanner scans the item and displays a preview image. You can now - Xerox XDM6325D-WU | User Manual - Page 91
pages, use one of the pages as a test page and load it into the scanner. Click the Preview button and adjust the scanner settings. Then replace the page on the stack at its original position and load the will appear in the TWAIN application you're using. 86 DocuMate 632 Scanner User's Guide - Xerox XDM6325D-WU | User Manual - Page 92
-Duplex-Scans two-sided documents from the Automatic Document Feeder. • Auto Document Feeder-Simplex-Scans one-sided documents from the Automatic Document Feeder. DocuMate 632 Scanner User's Guide 87 - Xerox XDM6325D-WU | User Manual - Page 93
smallest file size for scanned items. 5. Click the Preview button to preview the image before scanning. 6. Review the image to determine if adjustments are needed. 7. To adjust a setting, click the setting in , click the Cancel button on the progress window. 88 DocuMate 632 Scanner User's Guide - Xerox XDM6325D-WU | User Manual - Page 94
various settings panels are interactive. As you change the settings on the panel, the numbers in the list on the left also change. DocuMate 632 Scanner User's Guide 89 - Xerox XDM6325D-WU | User Manual - Page 95
to read small print on a typical business card. 2. To set the resolution manually, drag the Resolution slider to the left to decrease the resolution or to the right setting. The resolution settings on your DocuMate 632 scanner range from 50 dpi to 600 dpi. 3. Click Reset to return the resolution - Xerox XDM6325D-WU | User Manual - Page 96
and down arrows next to the box to increase or decrease the setting. 3. Click Reset to return the settings to their original numbers DocuMate 632 Scanner User's Guide 91 - Xerox XDM6325D-WU | User Manual - Page 97
boxes, or click the up and down arrows next to the boxes. 2. Click Reset to return the settings to their original numbers. 92 DocuMate 632 Scanner User's Guide - Xerox XDM6325D-WU | User Manual - Page 98
options. To set the image size: 1. Select the image size from the menu. The dotted outline shows the selected area in the image. DocuMate 632 Scanner User's Guide 93 - Xerox XDM6325D-WU | User Manual - Page 99
Scanning with the TWAIN Interface The following figure shows an example of a manually selected area. The Scan Info box shows the size and position of the area. The selected scan image. You can change the ruler units to suit the type of measurements you want. 94 DocuMate 632 Scanner User's Guide - Xerox XDM6325D-WU | User Manual - Page 100
as you drag it on the Preview window Size of the file of the scanned image The space on your computer's hard drive DocuMate 632 Scanner User's Guide 95 - Xerox XDM6325D-WU | User Manual - Page 101
list. 2. Make changes to the profile as needed, and then click Save. 3. If you want to delete the selected profile, click Delete. 96 DocuMate 632 Scanner User's Guide - Xerox XDM6325D-WU | User Manual - Page 102
TWAIN Interface Display the Device Configuration 1. Click the Device Configuration button. The Device configuration window opens and shows the information about your scanner. See the section "Checking the Hardware and Setting the Lamp Power Saving" on page 80 for more information about the device - Xerox XDM6325D-WU | User Manual - Page 103
own scanning interface - known as Windows Image Acquisition (WIA) for acquiring images from scanners, digital cameras, and other digital devices. This section shows how to use Microsoft , then click Paint. 2. From the File menu choose From Scanner or Camera. 98 DocuMate 632 Scanner User's Guide - Xerox XDM6325D-WU | User Manual - Page 104
Scanning with the WIA Interface 3. The Scan using Xerox DocuMate 632 window opens. Use this window to select scanning options and start the scan process. 4. From the . 8. Preview the image again. When you are satisfied with the image, click the Scan button. DocuMate 632 Scanner User's Guide 99 - Xerox XDM6325D-WU | User Manual - Page 105
Scans You can select new settings before you scan an item to fine tune exactly how you want to scan a particular item. To select the scanner settings before you scan: 100 DocuMate 632 Scanner User's Guide - Xerox XDM6325D-WU | User Manual - Page 106
button is now set to scan with the options you selected. If you want to reset the settings and start over, click Reset. DocuMate 632 Scanner User's Guide 101 - Xerox XDM6325D-WU | User Manual - Page 107
Guide for instructions on scanning the ISIS interface. The QuickScan User's Guide is available on the Disc 1 CD that you received with the scanner. of your scanner. The Scanner Selection dialog box will then appear. 2. Select Xerox DocuMate 632 from the list of scanners and click OK. Your scanner is - Xerox XDM6325D-WU | User Manual - Page 108
troubleshooting, uninstalling, scanner specifications, and spare parts. Cleaning the Scanner Regular maintenance of your scanner the ADF cover release on the top of the scanner body to open the Automatic Document Feeder cover. 3. scanner to feed pages incorrectly. You can also take the roller assembly - Xerox XDM6325D-WU | User Manual - Page 109
on either side of the pad. 5. Close the cover when you're finished. Cleaning the Flatbed Scanner Glass Scanning items that have excessive amounts of dirt or dust may dirty the glass. To ensure the best as paper is pulled through the ADF during scanning. 104 DocuMate 632 Scanner User's Guide - Xerox XDM6325D-WU | User Manual - Page 110
Automatic Document Feeder, a warning dialog box opens after a few moments. To clear a paper jam: 1. Press the ADF cover release on the top of the scanner body to open the Automatic Document Feeder cover. 2. Remove the jammed paper and close the cover. To reduce the number of paper jams, smooth and - Xerox XDM6325D-WU | User Manual - Page 111
and is designed to be a userreplaceable part. Problems with documents feeding into the ADF is an indication that the pad is wearing out. See the "Xerox DocuMate 632 Scanner Parts List" on page 118 for ordering information replace the new pad into its slots. 106 DocuMate 632 Scanner User's Guide - Xerox XDM6325D-WU | User Manual - Page 112
and will need to be replaced. It is a user-replaceable part and can be ordered. See the section "Xerox DocuMate 632 Scanner Parts List" on page 118 for the part number. A worn roller can cause documents to feed in the roller assembly by its orange lock flange. DocuMate 632 Scanner User's Guide 107 - Xerox XDM6325D-WU | User Manual - Page 113
side of the roller assembly out and away from its housing. 5. You can discard the roller. It cannot be refurbished or reused. 108 DocuMate 632 Scanner User's Guide - Xerox XDM6325D-WU | User Manual - Page 114
the left hand side remains seated in its housing. 3. Push the locking flange up to lock the roller in place. 4. Close the ADF cover. Your scanner is now ready to scan with its new roller assembly. DocuMate 632 - Xerox XDM6325D-WU | User Manual - Page 115
information that may help you diagnose problems with the scanner. If you try the troubleshooting procedures described in this section and in the Readme file, and the scanner still has problems, you may have a malfunctioning scanner. Refer to the technical support card that you received with your - Xerox XDM6325D-WU | User Manual - Page 116
cause issues feeding paper. See "Cleaning the Scanner" on page 103 for cleaning instructions. Problem: The ADF won't feed pages properly. Scanner" on page 103. If that doesn't solve the problem, the pad assembly may need to be replaced. It is user-replaceable. See "Xerox DocuMate 632 Scanner Parts - Xerox XDM6325D-WU | User Manual - Page 117
of the paper. If you are scanning small items that are smaller than the paper guides' minimum adjustment, scan these items on the flatbed glass instead. Problem: If the USB cable is disconnected during a scan, the scanner does not reconnect when the USB cable is plugged back in. Unplug the power - Xerox XDM6325D-WU | User Manual - Page 118
Troubleshooting Codes The status light indicates the current state of the scanner. A green status light indicates the normal state of the scanner to the PC and wall. Error Code 0 Problem Description The scanner is not communicating with the computer. Solution Make Scanner User's Guide 113 - Xerox XDM6325D-WU | User Manual - Page 119
base of the scanner. then turn the scanner back on. All An internal part in the Other scanner may have Codes malfunctioned. Turn off the scanner, re-boot your computer, then turn the scanner back on. If the problem persists, contact Xerox Technical Support. 114 DocuMate 632 Scanner User's Guide - Xerox XDM6325D-WU | User Manual - Page 120
Your Scanner To uninstall the Xerox DocuMate 632 scanner, remove the One Touch 4.0 driver and modules, and any other scanning software provided with the scanner. Uninstalling the Scanner and One . 6. Close all open windows and restart your computer. DocuMate 632 Scanner User's Guide 115 - Xerox XDM6325D-WU | User Manual - Page 121
Yes. The One Touch 4.0 software is removed from your computer. 2. Unplug the scanner USB cable. 3. Reboot (restart) your computer. 4. Follow the instructions in "Step 2: Install the Software" on page 7 of this User Guide and follow steps for installing one of the other driver options. NOTE: The One - Xerox XDM6325D-WU | User Manual - Page 122
Xerox DocuMate 632 Scanner Specifications Maintenance Optical resolution Bit depth Maximum item size Minimum item size Scan method ADF specifications Scanning Speed Capacity Paper Thickness Light source Interface Scanner < = 40 Watts UL, C-UL, FCC Class B DocuMate 632 Scanner User's Guide 117 - Xerox XDM6325D-WU | User Manual - Page 123
Maintenance Xerox DocuMate 632 Scanner Parts List Please use the following part names and numbers when ordering replacements for your scanner. Part Name Part Number Paper Input Tray 57-0107-000 ADF Pad 57-0109-000 Roller Assembly 57-0114-000 AC Power Cord 35-0103-000 Power Supply - Xerox XDM6325D-WU | User Manual - Page 124
any Act of Congress. 2. Adjusted Compensation Certificates for Veterans of the World Wars. 3. Obligations or Securities of any Foreign Government, Bank, or Corporation. DocuMate 632 Scanner User's Guide 119 - Xerox XDM6325D-WU | User Manual - Page 125
the following Registrant's information: Earnings or Income Dependency Status Court Record Previous military service Physical or mental condition Exception: U. S. Army and Navy discharge certificates may body or authority in Canada, or of a court of law. 120 DocuMate 632 Scanner User's Guide - Xerox XDM6325D-WU | User Manual - Page 126
comply with the limits for the class B digital device, pursuant to part 15 of the FCC Rules. These limits are designed to provide if not installed, and used in accordance with the instructions, may cause harmful interference to radio communications. However, DocuMate 632 Scanner User's Guide 121 - Xerox XDM6325D-WU | User Manual - Page 127
) Directive (2002/96/EC). Product recycling and disposal for USA Xerox operates a worldwide equipment takeback and reuse/ recycle program. Contact your Xerox sales representative (1-800ASK-XEROX) to determine whether this Xerox product is part of the program. 122 DocuMate 632 Scanner User's Guide - Xerox XDM6325D-WU | User Manual - Page 128
the Xerox program and you are managing its disposal, please note that the product may contain lead and other materials whose disposal may be regulated due to environmental considerations. For recycling and disposal information, contact your local authorities. DocuMate 632 Scanner User's Guide 123 - Xerox XDM6325D-WU | User Manual - Page 129
124 DocuMate 632 Scanner User's Guide - Xerox XDM6325D-WU | User Manual - Page 130
Configure Before Scan 63, 82 Contrast 51, 91, 101 csv file format 45 D Destination Application 21, 22, 30 OCR 34, 45 DocuMate 632 Scanner User's Guide text file format 44 Destination Selector 23 Device Settings 51, 55 Document Format 30 Document Management 48 documentation 3 dots-per-inch 90 dpi 90 - Xerox XDM6325D-WU | User Manual - Page 131
30 Scan Info box 95 scan single page 25 scan with event forwarding 73 scanner components 2 connecting 12 locking tab 6 troubleshooting 110 Searchable PDF 45, 68 Select Configuration 32, 34 Select Destination 31, 34 blank originals 53 sPDF 34, 43, 45, 68 spreadsheets DocuMate 632 Scanner User's Guide - Xerox XDM6325D-WU | User Manual - Page 132
Storage and CD-R/W 48 Storage Properties 39 system requirements 3 T Text Editors 48 text file format 44 Text Formats 44 TIFF 42 Transfer to Storage 77 troubleshooting 110 TWAIN 63, 74 TWAIN Interface 82, 84 TWAIN standard 82 U USB port 13 Use Flatbed 25 W watermark, remove 53 WIA 63 Word Document 45 - Xerox XDM6325D-WU | User Manual - Page 133
05-0677-500
-
 1
1 -
 2
2 -
 3
3 -
 4
4 -
 5
5 -
 6
6 -
 7
7 -
8
-
9
-
10
-
11
-
12
-
13
-
14
-
15
-
16
-
17
-
18
-
19
-
20
-
21
-
22
-
23
-
24
-
25
-
26
-
27
-
28
-
29
-
30
-
31
-
32
-
33
-
34
-
35
-
36
-
37
-
38
-
39
-
40
-
41
-
42
-
43
-
44
-
45
-
46
-
47
-
48
-
49
-
50
-
51
-
52
-
53
-
54
-
55
-
56
-
57
-
58
-
59
-
60
-
61
-
62
-
63
-
64
-
65
-
66
-
67
-
68
-
69
-
70
-
71
-
72
-
73
-
74
-
75
-
76
-
77
-
78
-
79
-
80
-
81
-
82
-
83
-
84
-
85
-
86
-
87
-
88
-
89
-
90
-
91
-
92
-
93
-
94
-
95
-
96
-
97
-
98
-
99
-
100
-
101
-
102
-
103
-
104
-
105
-
106
-
107
-
108
-
109
-
110
-
111
-
112
-
113
-
114
-
115
-
116
-
117
-
118
-
119
-
120
-
121
-
122
-
123
-
124
-
125
-
126
-
127
-
128
-
129
-
130
-
131
-
132
-
133
 |
 |

DocuMate 632
user’s guide
scanner