Xerox XTRAVEL-SCAN User Guide
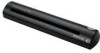
Xerox XTRAVEL-SCAN - Travel Scanner 100 Manual
 |
UPC - 785414114351
View all Xerox XTRAVEL-SCAN manuals
Add to My Manuals
Save this manual to your list of manuals |
Xerox XTRAVEL-SCAN manual content summary:
- Xerox XTRAVEL-SCAN | User Guide - Page 1
Travel Scanner 100 User Guide - Xerox XTRAVEL-SCAN | User Guide - Page 2
written permission of Visioneer. Part Number: 05-0769-100 Restricted Rights Legend Use, duplication, or disclosure is subject to restrictions as set forth in contract subdivision (c)(1)(ii) of the Rights in Technical Data and Computer Software Clause 52.227-FAR14. Material scanned by this product - Xerox XTRAVEL-SCAN | User Guide - Page 3
- Xerox XTRAVEL-SCAN | User Guide - Page 4
Welcome The Xerox Travel Scanner 100 ...What's in the Box ...What You Need ...Documentation ...1 2 3 3 Installation Before You Begin ...4 Step 1: Install the Software ...5 Step 2: Connect the Scanner ...10 Additional Applications Available with Your Scanner ...13 View the User Guides ...14 Register - Xerox XTRAVEL-SCAN | User Guide - Page 5
Method ...71 Troubleshooting ...74 Uninstalling or Reinstalling Your Scanner ...76 Uninstalling the Scanner and One Touch Software ...76 Uninstalling the PaperPort Software ...76 To Install Another Driver ...76 Xerox Travel Scanner 100 Specifications ...77 Xerox Travel Scanner 100 Spare Part List - Xerox XTRAVEL-SCAN | User Guide - Page 6
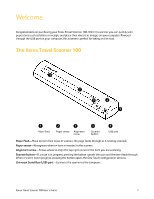
-If a scan is in progress, pressing the button cancels the scan and the item feeds through. When a scan is not in progress, pressing the button opens the One Touch configuration window. Universal Serial Bus (USB) port-Connects the scanner to the computer. Xerox Travel Scanner 100 User's Guide 1 - Xerox XTRAVEL-SCAN | User Guide - Page 7
. If any items are missing or damaged, contact the dealer where you purchased the scanner. Travel Scanner 100 Carrying Bag Calibration Page (2) USB Cable Photo Sleeves (2) Cleaning Sheet Installation Disc Quick Install Guide Technical Support Card 2 Xerox Travel Scanner 100 User's Guide - Xerox XTRAVEL-SCAN | User Guide - Page 8
information for the PaperPort software. BizCard User's Guide-On the Installation Disc; contains detailed instructions for using the software. Online Help-For the scanner configuration, TWAIN and WIA interfaces, and PaperPort software applications. Xerox Travel Scanner 100 User's Guide 3 - Xerox XTRAVEL-SCAN | User Guide - Page 9
instructions about removing the driver and software for that unit. If your computer is running Windows Vista, you may see the Vista User Account Control screen asking you to confirm system changes. Click the Continue button to allow the installation to proceed. • • • 4 Xerox Travel Scanner 100 - Xerox XTRAVEL-SCAN | User Guide - Page 10
Installation Step 1: Install the Software The Installation Disc contains the necessary driver, and additional scanning software, to use your Xerox Travel Scanner 100. To install the software: 1. Start Microsoft Windows and make sure that no other applications are running. 2. Insert the - Xerox XTRAVEL-SCAN | User Guide - Page 11
menu arrow and select the language to use. Click OK. 2. On the PaperPort Welcome window, click Next. Installing PaperPort will uninstall any existing version of PaperPort and will install the newer version. Your existing PaperPort files will not be affected. 6 Xerox Travel Scanner 100 User's Guide - Xerox XTRAVEL-SCAN | User Guide - Page 12
. 3. On the Xerox License Agreement window, read the license agreement. If you accept the terms, select I Agree then click Next. If you choose not to accept the license agreement, the installation will terminate and the scanner driver will not be installed. Xerox Travel Scanner 100 User's Guide 7 - Xerox XTRAVEL-SCAN | User Guide - Page 13
, as explained in this User Guide. TWAIN Only-The TWAIN driver is installed without the One Touch software. You can use the Xerox Travel Scanner 100 to scan from TWAIN scanning applications. You will not be able to use the AutoScan option. • 6. Click Next. A window opens with image quality samples - Xerox XTRAVEL-SCAN | User Guide - Page 14
Installation 8. STOP when you see the "Complete the installation by connecting your hardware" window. Do NOT click OK yet. Leave the window open and proceed to the next section. Xerox Travel Scanner 100 User's Guide 9 - Xerox XTRAVEL-SCAN | User Guide - Page 15
software to run the scanner. Do not proceed until you receive a message that your computer has found the new hardware, or updated the driver database. If your computer is running Windows XP or Windows Vista, you will see a message similar to the one below. 10 Xerox Travel Scanner 100 User's Guide - Xerox XTRAVEL-SCAN | User Guide - Page 16
page out of the paper feed. Remove the page when prompted by the calibration utility. When you remove the calibration page from the scanner the calibration utility will automatically close. If the utility does not close, click on OK to close the window. Xerox Travel Scanner 100 User's Guide 11 - Xerox XTRAVEL-SCAN | User Guide - Page 17
information, click OK. 9. Click OK to complete the installation process. 10. Click Close on the Installation Complete window to close and exit the software installer. You can now install the additional applications you received with your scanner. 12 Xerox Travel Scanner 100 User's Guide - Xerox XTRAVEL-SCAN | User Guide - Page 18
use its tools to print to PDF. Google Desktop is a client application providing text search over email, files, scanned documents, music, photos, chats, viewed web pages and more. OmniPage® Pro Google Desktop™ You can now view and save the User Guides. Xerox Travel Scanner 100 User's Guide 13 - Xerox XTRAVEL-SCAN | User Guide - Page 19
configurations. 3. When you're finished, click Main Menu to return to the Main Menu window and click Exit. 4. Remove the installation disc and store it in a safe place. That's it! Installation is finished and your Xerox Travel Scanner 100 is ready to scan. 14 Xerox Travel Scanner 100 User's Guide - Xerox XTRAVEL-SCAN | User Guide - Page 20
of the scanner. The Serial Number After registration is complete you will receive an email message with your RegID. 4. After receiving your RegID, write it down on a piece of paper and keep it with your scanner so you will be able to find it easily. Xerox Travel Scanner 100 User's Guide 15 - Xerox XTRAVEL-SCAN | User Guide - Page 21
Vista, you can use this option to scan with the Microsoft WIA interface. Select the WIA scan settings, put the document in the scanner, then click the Scan button on the WIA window. See "Scanning from the Windows Image Acquisition Interface" on page 65. 16 Xerox Travel Scanner 100 User's Guide - Xerox XTRAVEL-SCAN | User Guide - Page 22
of the paper and automatically begins to scan and feed the paper through the scanner. 2. A scan progress window opens and the image is sent to the selected application for PaperIn button. In this example the Destination Application is the PaperPort desktop. Xerox Travel Scanner 100 User's Guide 17 - Xerox XTRAVEL-SCAN | User Guide - Page 23
area on the right side of the screen. One Touch Icon 2. Click on the scanner icon to the right of the green buttons, in the title bar of the One Touch button panel. Hardware icon 3. Click on the Properties button in the hardware properties window. 18 Xerox Travel Scanner 100 User's Guide - Xerox XTRAVEL-SCAN | User Guide - Page 24
click on the scan button on the One Touch button panel, or on the scanning interface from the application you are using. To turn AutoLaunch back on, follow the instructions in this section and click on the option in step 4 to select to enable the feature. Xerox Travel Scanner 100 User's Guide 19 - Xerox XTRAVEL-SCAN | User Guide - Page 25
button. 5. A scan progress window opens and the image is sent to the selected application for the One Touch button. In this example the Destination Application is the PaperPort desktop. 6. You can now work with the image in the Destination Application. 20 Xerox Travel Scanner 100 User's Guide - Xerox XTRAVEL-SCAN | User Guide - Page 26
. Single-click on the detailed information to open the One Touch Properties. Left-click on the scanner icon to return to the Button view. Right-click on the scanner icon to open the scanner's hardware properties. The Button View The Hardware View Xerox Travel Scanner 100 User's Guide 21 - Xerox XTRAVEL-SCAN | User Guide - Page 27
in the scanner. 6. The scanner starts scanning and sends the image to the application, with the file format and scanning configuration you specified. NOTE: The next section contains detailed information on making changes to the One Touch Properties window. 22 Xerox Travel Scanner 100 User's Guide - Xerox XTRAVEL-SCAN | User Guide - Page 28
mode, resolution (dpi), page size, brightness (Br), and contrast (Cr). To see a selected scan configuration's settings, click its icon. Click the icon again to close the detailed information. Click the icon of a selected configuration to view its settings. Xerox Travel Scanner 100 User's Guide 23 - Xerox XTRAVEL-SCAN | User Guide - Page 29
to change or remove them. OK/Cancel/Apply buttons-OK accepts any changes and closes the window. Apply accepts any changes but leaves the window open so you can continue making additional changes. Cancel closes the window without accepting any changes. 24 Xerox Travel Scanner 100 User's Guide - Xerox XTRAVEL-SCAN | User Guide - Page 30
the application you want for the new scan configuration. 2. Click the New button. If you want to start from the settings of another configuration, select the configuration, then click the Copy button. The Scan Configuration Properties dialog box opens. Xerox Travel Scanner 100 User's Guide 25 - Xerox XTRAVEL-SCAN | User Guide - Page 31
inch (dpi) of the resolution. The higher the dpi setting, the sharper and clearer the scanned image. However, higher dpi settings take longer to scan and produce larger files for the scanned images. if you are done making changes for this configuration. 26 Xerox Travel Scanner 100 User's Guide - Xerox XTRAVEL-SCAN | User Guide - Page 32
the page is fed through at too great an angle, the image may not straighten fully. In that case, re-scan the page. Invert Image-Only available for Black&White Mode, this option reverses the black and whites of an image. Original Image Inverted Image • • Xerox Travel Scanner 100 User's Guide 27 - Xerox XTRAVEL-SCAN | User Guide - Page 33
Gamma-controls the brightness of the midtones of the color. 3. Click OK to save the new configuration. It will now be in the list of Scan Configurations on the One Touch Properties window for the appropriate Destination Applications. 28 Xerox Travel Scanner 100 User's Guide - Xerox XTRAVEL-SCAN | User Guide - Page 34
the device. 1. Click on the Device Settings tab. Fit to page, reduce image if necessary-If the scanned image is too big to be printed or faxed on a single page, the image will automatically be box is your printer's setup settings. 2. Click OK or Apply. Xerox Travel Scanner 100 User's Guide 29 - Xerox XTRAVEL-SCAN | User Guide - Page 35
. New folders are created for each month and week so you can keep track of when you scanned the documents. 3. If you want to store your archive documents in some other location, click the Browse button to specify the new location. 4. Click OK or Apply. 30 Xerox Travel Scanner 100 User's Guide - Xerox XTRAVEL-SCAN | User Guide - Page 36
re-install your scanner. To edit or delete a scan configuration: 1. Open the One Touch Properties window. 2. Select the scan configuration you want to edit or delete. Select the scan configuration to 3. Click OK to close the One Touch Properties window. Xerox Travel Scanner 100 User's Guide 31 - Xerox XTRAVEL-SCAN | User Guide - Page 37
TWAIN Interface" on page 60. WIA-The Windows Image Acquisition (WIA) Interface opens for you to make changes prior to scanning. See "Scanning from the Windows Image Acquisition Interface" on page 65. 4. Click OK or Apply on the One Touch Properties window. 32 Xerox Travel Scanner 100 User's Guide - Xerox XTRAVEL-SCAN | User Guide - Page 38
click the Done button on the TWAIN Interface. 7. All the scanned pages will be sent to the Destination Application set in the One Touch 4.0 Properties window. If the Destination Application is PaperPort, the pages will be grouped as a single stack of pages. Xerox Travel Scanner 100 User's Guide 33 - Xerox XTRAVEL-SCAN | User Guide - Page 39
document but you want to insert a color page into it. Instead of having to re-scan the entire batch, you can stop the current scan, change the picture type from Black & White to Color, then restart the scanning without losing the pages already scanned. 34 Xerox Travel Scanner 100 User's Guide - Xerox XTRAVEL-SCAN | User Guide - Page 40
for images on web pages, or if file size might be a problem when electronically sending the files. JPG files are reduced in size by lowering their image quality, and you can select the degree of quality for your scanned images from the JPG file format icon. Xerox Travel Scanner 100 User's Guide 35 - Xerox XTRAVEL-SCAN | User Guide - Page 41
PDF file size/image quality independently for each button. 4. Click OK or Apply on the One Touch Properties window. Text Formats Selecting the text format option also selects OCR processing as an automatic step for scanning. Therefore, when you scan Word. 36 Xerox Travel Scanner 100 User's Guide - Xerox XTRAVEL-SCAN | User Guide - Page 42
Scanning As you select Destination Applications that are text applications, the text format icon changes to match the file type of the application. In some cases, the Destination Application supports when the selected application is Transfer to Storage. Xerox Travel Scanner 100 User's Guide 37 - Xerox XTRAVEL-SCAN | User Guide - Page 43
Click OK or Apply on the One Touch Properties window. Detailed information about these text file formats, and instructions for setting up the OCR options, are in the One Touch OmniPage Mini-Guide located on the installation disc in the User Guides section. 38 Xerox Travel Scanner 100 User's Guide - Xerox XTRAVEL-SCAN | User Guide - Page 44
directly to your printer or fax software for faxing. Sti event forwarding is for using another application's interface for scanning. The One Touch Event Forwarding dialog box opens so you can select which application to use to continue scanning. Xerox Travel Scanner 100 User's Guide 39 - Xerox XTRAVEL-SCAN | User Guide - Page 45
the new settings. Global Options • • • Show Progress Window-Select this option to display the progress window of the document(s) during scanning. Use enhanced folder browser-Select this option if you want options are for that type of application. 40 Xerox Travel Scanner 100 User's Guide - Xerox XTRAVEL-SCAN | User Guide - Page 46
to PaperPort, and are for designating the folder to receive your scanned items. 1. Select the PaperPort folder where you want the file of the scanned image to be located. 2. apply to the Optical Character Recognition (OCR) settings for the applications. Xerox Travel Scanner 100 User's Guide 41 - Xerox XTRAVEL-SCAN | User Guide - Page 47
Click OK on the Link Properties window. 8. Click Refresh on the One Touch Properties window and the new application should now be available. Please refer to the One Touch OmniPage Mini-Guide, on the installation disc, for instructions on scanning with OCR. 42 Xerox Travel Scanner 100 User's Guide - Xerox XTRAVEL-SCAN | User Guide - Page 48
Scanning Image Documents Properties These properties apply to Microsoft Paint and other image processing applications. 1. Click in the Color document click the Add Application button. See the steps on page 42 to add an application to the list. 3. Click OK. Xerox Travel Scanner 100 User's Guide 43 - Xerox XTRAVEL-SCAN | User Guide - Page 49
attached to your computer, and your computer is running Windows XP or Windows Vista, you also use this dialog box to start the Burn to CD process. See the section "Scan and Burn to a CD" on page 47. to CD button. 4. Click OK on the Link Properties window. 44 Xerox Travel Scanner 100 User's Guide - Xerox XTRAVEL-SCAN | User Guide - Page 50
such as America Online® (AOL), you need to know which folder contains the scanned documents so you can manually attach them other internet options, click the Internet Options button. The Windows Internet Options Control Panel opens. Click the Programs tab and Xerox Travel Scanner 100 User's Guide 45 - Xerox XTRAVEL-SCAN | User Guide - Page 51
Touch software and your Xerox Travel Scanner 100. The One Touch OmniPage Module was automatically installed when you installed your driver from the installation disc. The One Touch OmniPage Mini-Guide is available on the installation disc. Please refer to that mini-guide for detailed instructions - Xerox XTRAVEL-SCAN | User Guide - Page 52
. 7. Make sure a blank CD is in the CD burner. 8. Click the Burn to CD button. The CD burner begins and your scanned documents are written to the CD. If other files are also waiting in this location, they will get written with the One Touch files on the CD. Xerox Travel Scanner 100 User's Guide 47 - Xerox XTRAVEL-SCAN | User Guide - Page 53
to start scanning. A dialog box opens for you to select the application to use for scanning. 6. Select the application you want in the box and click OK. Now the application you selected opens and you can continue scanning using the application's interface. 48 Xerox Travel Scanner 100 User's Guide - Xerox XTRAVEL-SCAN | User Guide - Page 54
scan and create an HTML web page: 1. Open the One Touch Properties window. 2. Select Microsoft Explorer as the Destination Application. 3. Choose HTML as the Format. Choose HTML 4. Choose a Scan Configuration web page as you would any other HTML page. Xerox Travel Scanner 100 User's Guide 49 - Xerox XTRAVEL-SCAN | User Guide - Page 55
scanning. 6. Scanning begins and your scanned pages are stored in the location that you specified on the One Touch 4.0 Link Properties window. Your scanned documents will be stored at the location you specified on the One Touch 4.0 Link Properties window. 50 Xerox Travel Scanner 100 User's Guide - Xerox XTRAVEL-SCAN | User Guide - Page 56
Using Microsoft Windows, create the folders that you want to use for storing scanned items. 2. Open the One Touch Properties window. 3. Receipts." 6. Click the Scan Settings, Page Settings, and Advanced Settings tabs, and select the settings you want. Xerox Travel Scanner 100 User's Guide 51 - Xerox XTRAVEL-SCAN | User Guide - Page 57
Options tab. 8. Click the Browse button. 9. Select the folder you created for storing the scanned documents. 10. Click OK. The selected folder will now be set as the Storage Location additional new configurations, such as one named "Personal Receipts." 52 Xerox Travel Scanner 100 User's Guide - Xerox XTRAVEL-SCAN | User Guide - Page 58
other configuration you created for storage. 6. Click OK. The One Touch panel will show the name of the other configuration. 7. Now scan the next set of documents. When scanning is finished, the two sets of documents are stored in the two separate folders. Xerox Travel Scanner 100 User's Guide 53 - Xerox XTRAVEL-SCAN | User Guide - Page 59
for your scanner model. To open the device settings window: 1. Right-click on the One Touch icon and choose Show Hardware from the pop-up menu. 2. The Hardware Properties dialog box opens and shows information about your Xerox Travel Scanner 100. 54 Xerox Travel Scanner 100 User's Guide - Xerox XTRAVEL-SCAN | User Guide - Page 60
3. The scanner will grab the page and move it back and forth as the utility completes the progress. 4. When prompted, remove the page from the scanner. 5. If you completed a calibration, the last calibrated field will update with the current date and time. Xerox Travel Scanner 100 User's Guide 55 - Xerox XTRAVEL-SCAN | User Guide - Page 61
the options from the list. Moderate (500 ms) is the default selection for this option. 3. Click on OK to save the changes and close the window. Click on Reset Device to return the option in this Control section back to the original factory setting. 56 Xerox Travel Scanner 100 User's Guide - Xerox XTRAVEL-SCAN | User Guide - Page 62
box opens and shows information about your Xerox Travel Scanner 100. 3. Click the Properties button. 4. Click on Enable the detection of excessive document skew. Back out the document if this occurs. 5. Click on OK to save the changes and close the window. Xerox Travel Scanner 100 User's Guide 57 - Xerox XTRAVEL-SCAN | User Guide - Page 63
open it, you can still use the instructions in this User's Guide for scanning with your Xerox Travel Scanner 100. To access the TWAIN interface from other software, please refer to their user's guides, then return to this User's Guide for the steps to scan. NOTE: You can access the TWAIN interface - Xerox XTRAVEL-SCAN | User Guide - Page 64
and then click on the Scan button in the scanning pane. Many Microsoft Office applications can access the TWAIN interface from the Insert menu, by choosing Picture then From Scanner or Camera. 3. The TWAIN interface opens and you're ready to start scanning. Xerox Travel Scanner 100 User's Guide 59 - Xerox XTRAVEL-SCAN | User Guide - Page 65
again. Continue doing this until all pages are scanned. 4. When scanning is complete, click Done to close the TWAIN interface. The scanned image appears in the TWAIN software. This example shows a thumbnail image of a scanned page on the PaperPort desktop. 60 Xerox Travel Scanner 100 User's Guide - Xerox XTRAVEL-SCAN | User Guide - Page 66
or illustrations, particularly newspaper and magazine illustrations. Selecting Reduce Moiré Patterns will limit or eliminate moiré patterns in the scanned image. This option is only available for the Grayscale or Color Mode low resolutions. • • • • • Xerox Travel Scanner 100 User's Guide 61 - Xerox XTRAVEL-SCAN | User Guide - Page 67
item with the red filtered out. • AutoScan on document insertion-AutoLaunch technology senses when an item is inserted into the paper feed and starts scanning immediately. If this option is not selected, the scanner waits for you to click the Scan button. 62 Xerox Travel Scanner 100 User's Guide - Xerox XTRAVEL-SCAN | User Guide - Page 68
Scanning from the TWAIN Interface Calibrating or Cleaning the Scanner from TWAIN You can access the calibration and cleaning utilities from the TWAIN interface. If you are using Windows 2000 or Windows Vista 64-bit, and did not install One Touch with your scanner, use these instructions for - Xerox XTRAVEL-SCAN | User Guide - Page 69
feed slot. The scanner grabs the sheet and passes it back and forth during the cleaning process. 5. When the calibration or cleaning process is finished, the scanner will exit the page from the scanner. Remove the page after the scanner has released it. 64 Xerox Travel Scanner 100 User's Guide - Xerox XTRAVEL-SCAN | User Guide - Page 70
choose From Scanner or Camera. 3. The scan window opens. Use this window to select scanning options and start the scan process. 4. Click on the color mode appropriate for the item you are scanning. 5. Place a document in the scanner's paper feed slot. Xerox Travel Scanner 100 User's Guide 65 - Xerox XTRAVEL-SCAN | User Guide - Page 71
WIA interface. Scanning from Microsoft's Paint application uses the interface described in this section. Other applications may access the advanced WIA interface available with Windows Vista. Please refer to the Windows help for instructions on using WIA. 66 Xerox Travel Scanner 100 User's Guide - Xerox XTRAVEL-SCAN | User Guide - Page 72
longer to scan and produce larger files for the scanned images. Picture type-Click the menu arrow and choose the most appropriate type for the item you're scanning. 3. Click OK. The Custom Settings button is now set to scan with the options you selected. Xerox Travel Scanner 100 User's Guide 67 - Xerox XTRAVEL-SCAN | User Guide - Page 73
pages ready. To calibrate the scanner: 1. Right-click on the One Touch icon in the Windows notification area (at the lower right corner of the screen) and choose Show Hardware from the pop-up menu. 2. The Hardware Properties for your scanner opens. 68 Xerox Travel Scanner 100 User's Guide - Xerox XTRAVEL-SCAN | User Guide - Page 74
follow these steps to open the scanner's hardware properties. 1. Open the Windows Control Panel. 2. Double-click on Scanners and Cameras. If you do not see Scanners and Cameras, open Printers and Other Hardware then you should see this option. 3. Your Xerox Travel Scanner 100 should be listed as one - Xerox XTRAVEL-SCAN | User Guide - Page 75
of the screen) and choose Show Hardware from the pop-up menu. 2. The Hardware Properties for your scanner opens. 3. Click on the Properties button to open the Device Settings for your scanner. 4. Click on the Clean button to start the cleaning utility. 70 Xerox Travel Scanner 100 User's Guide - Xerox XTRAVEL-SCAN | User Guide - Page 76
follow these steps to open the scanner's hardware properties. 1. Open the Windows Control Panel. 2. Double-click on Scanners and Cameras. If you do not see Scanners and Cameras, open Printers and Other Hardware then you should see this option. 3. Your Xerox Travel Scanner 100 should be listed as one - Xerox XTRAVEL-SCAN | User Guide - Page 77
the problem exists in the image. For example, if the line or smudge in the image appears in the center of the scan, dampen cleaning sheet in the center. Only dampen one side of the cleaning sheet. 5. Click on the Clean button to start the cleaning utility. 72 Xerox Travel Scanner 100 User's Guide - Xerox XTRAVEL-SCAN | User Guide - Page 78
the scanner will clear the cleaning sheet out of the scanner. Remove the cleaning sheet when the utility prompts you to. Do not forcefully pull the page out of the scanner, the scanner will release the page when it has fully exited out of the scanner. Xerox Travel Scanner 100 User's Guide 73 - Xerox XTRAVEL-SCAN | User Guide - Page 79
source for images. • • • Problem: During installation I got the error message: PaperPort Installation is not complete. The installation procedure was not successful. You need to reboot your computer and then restart the PaperPort software installation. 74 Xerox Travel Scanner 100 User's Guide - Xerox XTRAVEL-SCAN | User Guide - Page 80
meets the minimum requirements for using the scanner as shown on page 3. Problem: The scanned images are of poor quality even after I recalibrated and cleaned the scanner. Try reinstalling the scanner driver. The driver software may have been corrupted. Xerox Travel Scanner 100 User's Guide 75 - Xerox XTRAVEL-SCAN | User Guide - Page 81
your computer. Click Yes. 5. Close all open windows and restart your computer. To Install Another Driver Follow the instructions in "Step 1: Install the Software" on page 5 of this User Guide and follow steps for installing one of the other driver options. 76 Xerox Travel Scanner 100 User's Guide - Xerox XTRAVEL-SCAN | User Guide - Page 82
Maintenance Xerox Travel Scanner 100 Specifications Optical resolution Output bit depth Scan method Maximum item size Light source Interface Drivers Supported Operating Systems 600 dpi 24-bit color, 8-bit grayscale, 1-bit bitonal (black & white) Fast sheetfed 8.5 x 14 inches (21.6 x 35.56 cm) Three - Xerox XTRAVEL-SCAN | User Guide - Page 83
part name and number when ordering a replacement USB cable for your scanner. Part Name Part Number Calibration page and Cleaning sheet 05-0679-000 35-0065-000 High Speed USB 2.0 Certified Cable Carrying bag 88-0415-000 Photo sleeves 05-0527-000 78 Xerox Travel Scanner 100 User's Guide - Xerox XTRAVEL-SCAN | User Guide - Page 84
external radiation from ISM equipment may have to be limited or special mitigation measures taken. Changes and modifications to this equipment not specifically approved by Xerox may void the user's authority to operate this equipment. Xerox Travel Scanner 100 User's Guide 79 - Xerox XTRAVEL-SCAN | User Guide - Page 85
There are no parts behind these covers that you can maintain or service. 6. Do not perform any maintenance procedures unless you have been trained to do them by an authorized local dealer or unless a procedure is specifically described in the user manuals. 80 Xerox Travel Scanner 100 User's Guide - Xerox XTRAVEL-SCAN | User Guide - Page 86
USA/Canada) to electromagnetic compatibility. December Xerox sales representative (1-800-ASK-XEROX) to determine whether this Xerox product is part of the program. For more information about Xerox environmental programs, visit: www.xerox.com/environment.html. Xerox Travel Scanner 100 User's Guide - Xerox XTRAVEL-SCAN | User Guide - Page 87
If you are managing the disposal of your Xerox product, please note that the product contains lamp(s) with mercury, and may contain lead, Perchlorate of life electrical and electronic equipment subject to disposal must be managed within agreed procedures. 82 Xerox Travel Scanner 100 User's Guide - Xerox XTRAVEL-SCAN | User Guide - Page 88
provided the reproduction is in black and white and is less than 75% or more than 150% of the linear dimensions of the original.) Postal Money Orders. Bills, Checks, or Passports may be photographed.) 6. Immigration Papers. 7. Draft Registration Cards. Xerox Travel Scanner 100 User's Guide 83 - Xerox XTRAVEL-SCAN | User Guide - Page 89
Automobile Licenses - Drivers' Licenses - service Canada designs used by or on behalf of the Government of Canada or of a province, the government of a state other than Canada or a department, board, Commission or agency established by the Government of Canada Xerox Travel Scanner 100 User's Guide - Xerox XTRAVEL-SCAN | User Guide - Page 90
Information Contact Information For more information on Environment, Health, and Safety in relation to this Xerox product and supplies, please contact the following customer help lines: USA: Canada: Europe: 1-800-828-6571 1-800-828-6571 +44 1707 353 434 Xerox Travel Scanner 100 User's Guide 85 - Xerox XTRAVEL-SCAN | User Guide - Page 91
86 Xerox Travel Scanner 100 User's Guide - Xerox XTRAVEL-SCAN | User Guide - Page 92
tab 28 America Online® (AOL) 45 Apply button 24 Aspect dpi) 26, 32, 61, 67 DVD-ROM drive 3 C Cable 24, 32, 35, 38, 46, 47 file storage location 50 Fit to page 29 Folder Copy Options 40 Full install 8 G Gamma 28 Google Desktop™ 13 GrayScale mode 26, 28, 61 Xerox Travel Scanner 100 User's Guide - Xerox XTRAVEL-SCAN | User Guide - Page 93
Paint 39, 43, 65 Microsoft Word 23, 36, 38, 39, 41, 46 Mini-Guides 14 Minimize Size 36 Moire Patterns 27, 61 Monitor 3 N New button 24 NewSoft Presto! BizCard® 13 Normal 36 Normal PDF (nPDF) 38 88 R RAM 3 Reduce Moire Patterns 27, 61 Refresh button 24 Xerox Travel Scanner 100 User's Guide - Xerox XTRAVEL-SCAN | User Guide - Page 94
USB port 1, 10 Use enhanced folder browser 40 User Guides 14 V Vertical lines 68 VRS Settings Tab One Touch Mini-Guide 14 W Warranty 17 Watermark 28, 62 WIA Advanced settings 67 WIA interface 16, 32, 65 Windows Image Acquisition 65 Word Document 38 X XLS file format 38 Xerox Travel Scanner 100 - Xerox XTRAVEL-SCAN | User Guide - Page 95
Index 90 Xerox Travel Scanner 100 User's Guide - Xerox XTRAVEL-SCAN | User Guide - Page 96
P/N 05-0769-100
-
 1
1 -
 2
2 -
 3
3 -
 4
4 -
 5
5 -
 6
6 -
 7
7 -
8
-
9
-
10
-
11
-
12
-
13
-
14
-
15
-
16
-
17
-
18
-
19
-
20
-
21
-
22
-
23
-
24
-
25
-
26
-
27
-
28
-
29
-
30
-
31
-
32
-
33
-
34
-
35
-
36
-
37
-
38
-
39
-
40
-
41
-
42
-
43
-
44
-
45
-
46
-
47
-
48
-
49
-
50
-
51
-
52
-
53
-
54
-
55
-
56
-
57
-
58
-
59
-
60
-
61
-
62
-
63
-
64
-
65
-
66
-
67
-
68
-
69
-
70
-
71
-
72
-
73
-
74
-
75
-
76
-
77
-
78
-
79
-
80
-
81
-
82
-
83
-
84
-
85
-
86
-
87
-
88
-
89
-
90
-
91
-
92
-
93
-
94
-
95
-
96
 |
 |

Travel Scanner 100
User Guide