Yamaha AW2816 Tutorial - Page 11
Step 2. Setting up a rough mix, Adding the acoustic bass
 |
View all Yamaha AW2816 manuals
Add to My Manuals
Save this manual to your list of manuals |
Page 11 highlights
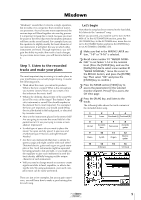
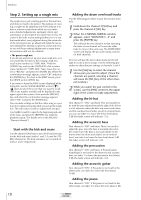
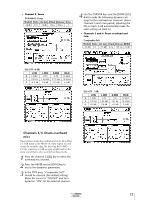
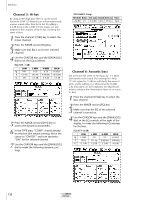
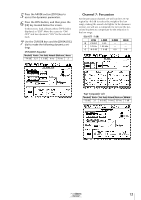
Mixdown Step 2. Setting up a rough mix The rough mix is just a starting point for the final mix, and does not need to be perfect. The purpose of creating a rough mix by adjusting only level and pan is to have a reference point from which you can make more detailed adjustments, and apply effects and automation, so don't spend too much time on this. Of course if the fader or pan settings bother you in a way that would affect your judgment during the remainder of the mixing process, go ahead and make the necessary adjustments. Mixing is a process of trial and error, so you will keep making adjustments as many times as necessary until you are satisfied. • The preset rough mix If you do not want to set up your own rough mix, or if you would like to listen to the existing rough mix, recall scene number 02 "STEP2 MIX." Press the [SCENE] key, and use the [DATA/JOG] dial to select scene number 02 "STEP2 MIX." Next, move the cursor to "RECALL" and press the [ENTER] key. When the confirmation message appears, select "OK" and press the [ENTER] key. To return to the VIEW screen, press the MIXER section [VIEW] key. If you want to leave the VIEW screen displayed while doing this, use the SCENE MEMORY section [ ]/ [ ] keys to select the scene that you want to recall. (The scene number and title will be displayed in the upper right of the screen.) Next press the [RECALL] key, and when the confirmation message appears, select "OK" and press the [ENTER] key. You can make settings so that the entire song or a portion of it continues looping while you set up the rough mix. This will make it easier to adjust level and pan. Use MARK A and B to specify the beginning and end of the loop, and press the [REPEAT] key make the playback repeat. (For details refer to the AW2816 "Owner's Manual.") s Start with the kick and snare Use the channel [ON] keys to turn off all tracks except for the kick and snare (tracks 1 and 2). Leave the STEREO channel on. The kick and snare are recorded on tracks 1 and 2 respectively. s Adding the drum overhead tracks Use the following procedure to pair the monitor channels. 1 Hold down the channel 3 [SEL] key and press the channel 4 [SEL] key. 2 When the CHANNEL PAIRING window appears, select "MONITOR 3¡4" and press the [ENTER] key. This will pair the two channels so that operating the fader of one channel will cause the other fader to move in the same way. The MIXER VIEW screen will display the pan and routing controls for both channels. Next we will pan the stereo drum tracks to left and right to create a stereo image. Use the following procedure to adjust the pan settings of channels 3 and 4. 1 Use the [SEL] key to select the channel whose pan you want to adjust. (Since the channels are paired, selecting a channel will cause the [SEL] key of the other channel to blink.) 2 While you watch the pan control in the screen, use the [PAN] control in the upper right of the screen to make adjustments. s Adding the hi-hat Turn channel 5 "ON," and listen. This will sound better with the pan adjusted toward the right. If the hi-hat is a bit obtrusive when the kick and snare track faders and the overhead track faders are all at nominal level, you can use fader 5 to lower the hi-hat level about 5 dB (the fader screen will indicate -5.0). s Adding the acoustic bass Turn channel 6 "ON" and listen. There's no need to adjust the pan, since the bass is normally placed in the center, but if the bass is too loud relative to the drums when the drum track faders are at nominal level, use fader 6 to lower the bass level about 5 dB (the fader screen will indicate -5.0). s Adding the percussion Turn channel 7 "ON" and listen. If the percussion (handclaps) is too loud for the drum set and acoustic bass, use fader 7 to lower the percussion level about 5 dB (the fader screen will indicate -5.0). s Adding the acoustic guitar Turn channel 8 "ON". If the guitar is too loud for the other tracks, use fader 8 to lower the level about 10 dB. s Adding the piano Turn channel 9 "ON". If the piano is too loud for the other tracks, use fader 9 to lower the level about 5 dB. 10 Tutorial
-
 1
1 -
2
-
3
-
4
-
5
-
 6
6 -
 7
7 -
 8
8 -
 9
9 -
 10
10 -
 11
11 -
 12
12 -
 13
13 -
 14
14 -
 15
15 -
 16
16 -
17
-
18
-
19
-
20
-
21
-
22
-
23
-
24
-
25
-
26
-
27
-
28
-
29
-
30
-
31
 |
 |