Yamaha AW2816 Tutorial - Page 12
Adding the chorus, Listening to the rough mix
 |
View all Yamaha AW2816 manuals
Add to My Manuals
Save this manual to your list of manuals |
Page 12 highlights
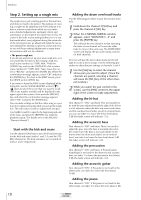
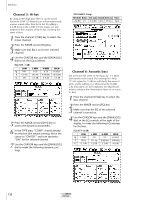
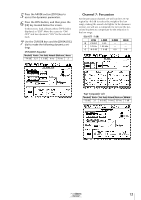
s Adding the synthesizer Turn channel 10 "ON". If the synthesizer is too loud for the other tracks, use fader 10 to lower the level about 5 dB. s Adding the organ Turn channel 11 "ON". Make fine adjustments to the fader so that the sound does not stand out in comparison with the other tracks. s Adding the electric guitar Turn channel 11 "ON". Compared to the other tracks, the electric guitar track will have a more intense sense of volume, so you might use fader 12 to lower the level about 10 dB. s Adding the lead vocal Some of you probably expected to add the chorus (tracks 13/14/15) before adding the lead vocal, but in order to set appropriate levels for the chorus, it is important to hear it in relation to the lead vocal level. Turn channel 16 on, and with the pan left in the center (the usual position for the lead vocal), set the fader at approximately nominal level (0 dB). s Adding the chorus In the intro, the chorus enters before the lead vocal, and in the final mix a certain amount of automation will be necessary. But for now, listen to a section of the song where the lead vocal is heard together with the chorus, and adjust the level of the chorus section. Turn on channels 13/14/15, and raise the fader levels to a point where they will not interfere with the lead vocal on track 16. s Listening to the rough mix Although you have already listened to the song numerous times while creating the rough mix, now you will listen to the entire song, rather than to an individual part. Make adjustments as desired. s Saving the song To save the song, press the WORK NAVIGATE section [SONG] key to access the SONG screen. As necessary, press the [F1] key to display the Song List page. Move the cursor in the screen to "SAVE," and press the [ENTER] key. When the confirmation window appears, move the cursor to "OK" and press the [ENTER] key. The song has now been saved. s Saving the scene Let's save the completed rough mix. Press the SCENE key, and use the [DATA/JOG] dial to select a vacant scene that is displayed as "No Data!" Then move the cursor to "STORE" and press the [ENTER] key. The TITLE EDIT popup window will appear, so assign a name (or leave it unassigned), select "OK" and press the [ENTER] key. You can alternately select this scene and another scene to compare the pre-made rough mix with your own. Tutorial 11
-
 1
1 -
2
-
3
-
4
-
5
-
6
-
 7
7 -
 8
8 -
 9
9 -
 10
10 -
 11
11 -
 12
12 -
 13
13 -
 14
14 -
 15
15 -
 16
16 -
 17
17 -
18
-
19
-
20
-
21
-
22
-
23
-
24
-
25
-
26
-
27
-
28
-
29
-
30
-
31
 |
 |
