Yamaha AW2816 Tutorial - Page 13
Step 3. Assembling the mix for each part, Channels 1/2: Bass drum and, snare drum
 |
View all Yamaha AW2816 manuals
Add to My Manuals
Save this manual to your list of manuals |
Page 13 highlights
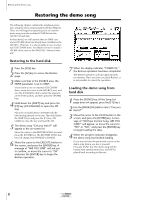
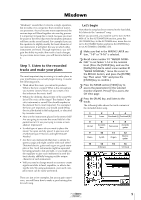
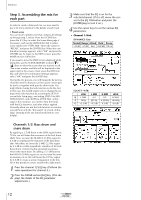
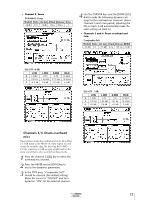
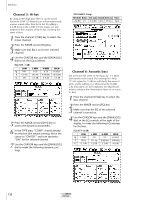
Mixdown Step 3. Assembling the mix for each part In order to create a balanced mix, we now need to pay a bit more attention to the details of each track. • Preset scene You can recall a preset scene that contains all settings up through step 3, below. Press the [SCENE] key (press the [F1] key to select the Scene Mem page if necessary), and use the [DATA/JOG] dial to select scene number 03 "STEP3 MIX." Move the cursor to "RECALL" and press the [ENTER] key. When the confirmation message appears, select "OK" and press the [ENTER] key. To return to the VIEW screen, press the MIXER section [VIEW] key. If you want to leave the VIEW screen displayed while doing this, use the SCENE MEMORY section [ ]/ [ ] keys to select the scene that you want to recall. (The scene number and title will be displayed in the upper right of the screen.) Next, press the [RECALL] key, and when the confirmation message appears, select "OK" and press the [ENTER] key. During the mix process, you will frequently be turning channels on/off so that you can hear just a certain part by itself, or together with specific other tracks. You might think of using the Solo function to do this, but in this case, this would require you to change the settings of the Solo function by accessing the SET UP screen/Solo Setup page, and setting STATUS to MIXDOWN SOLO, and LISTEN to AFTER PAN. At this stage of the mixdown, you need to hear the tracks with the EQ, dynamics, and other effects applied. Normally when you use the Solo function to monitor, you will hear only the "dry sound" of a track. At this stage, listening to the dry sound would not be very helpful. 3 Make sure that the EQ is on for the selected channel. (If it is off, move the cursor to the EQ ON button and press the [ENTER] key to turn it on.) 4 Use the cursor keys to set the various EQ parameters. • Channel 1: Kick DYNAMICS Gate Threshold Range Attack Hold Decay -23 dB -57 dB 0ms 34.8 dB 110 ms EQ (ATT -4 dB) LOW L-MID Q L.SHLF 6.3 F 70 Hz 223 Hz G +3.5 dB -4.5 dB H-MID 0.9 4.23 kHz 4.5 dB HIGH H.SHLF 10.0 kHz 0.0 dB s Channels 1/2: Bass drum and snare drum By applying a 3.5 dB boost to the LOW region below 70 Hz, we will fatten the resonance of the kick drum shell. Next, we raise the HI-MID 4.23 kHz region by 4.5 dB to emphasize the character of the kick drum skin. After than, we lower the L-MID 223 Hz region by 4.5 dB to cut the sympathetic vibration of the kick (bass drum), minimizing the unwanted resonance. Next is the snare drum. By adding a 5.5 dB boost to the HIGH 10.0 kHz region we can increase the sense of sensation of air. We will lower the 187 Hz region by 4.0 dB to create a sense of separation in the mix. All of this produces a snare sound with a light touch. 1 Press the channel 1 [SEL] key. (Perform the same operations for channel 2.) 2 Press the MIXER section [EQ] key. (This displays the details of the EQ parameter adjustments.) 12 Tutorial
-
 1
1 -
2
-
3
-
4
-
5
-
6
-
7
-
 8
8 -
 9
9 -
 10
10 -
 11
11 -
 12
12 -
 13
13 -
 14
14 -
 15
15 -
 16
16 -
 17
17 -
 18
18 -
19
-
20
-
21
-
22
-
23
-
24
-
25
-
26
-
27
-
28
-
29
-
30
-
31
 |
 |