Yamaha AW2816 Tutorial - Page 22
Channel 8: Acoustic guitar, Channel 16: Lead vocal
 |
View all Yamaha AW2816 manuals
Add to My Manuals
Save this manual to your list of manuals |
Page 22 highlights
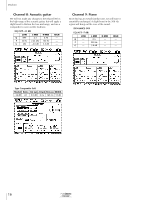
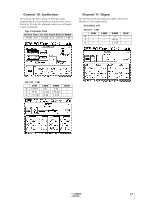
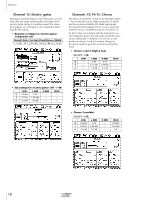
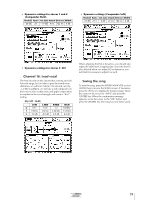
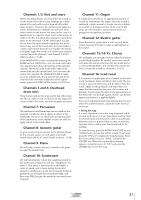
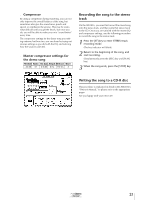
s Channels 1/2: Kick and snare When recording drums, you record the dry sound as on the tracks of the demo song. Adding just a slight amount of reverb will create a dramatically wider sense of space. However, be careful not to apply too much. Sometimes for a ballade you will year fairly heavy reverb on the drums, but even in this case it is applied only to a specific drum (such as the snare). In order to do this, it is obviously necessary to record the snare on its own track. On the other hand, it is just fine to leave the drum sound completely dry. In the demo song, we set the reverb time to 0.8 seconds to create a light reverb that will not "muddy" the drums, and lightly apply the reverb only to the snare and percussion. Raise the channel 2 and channel 7 AUX5 faders to about -25 dB. In the MIXER VIEW screen (accessed by pressing the MIXER section [VIEW] key), you can view and make fine adjustments to the fader settings of the selected channel. The AUX5 fader in the lower right of the screen indicates the current level. You can move the cursor here and turn the [DATA/JOG] dial to make accurate adjustments. If you want to go back to the channel fader and make additional reverb adjustments, press the FADER MODE section [AUX5] key. s Channels 3 and 4: Overhead drum mics These tracks combine the toms and hi-hat of the drum set. This is a stereo track. So that we do not impair the clarity of the hi-hat work, we will not apply any effect. s Channel 7: Percussion The tambourine and handclaps are recorded on this channel. It might be nice to apply an effect to the handclaps, but since we don't want to blur the place of the tambourine in the rhythm section, we will not apply effects to this track either. s Channel 8: Acoustic guitar To give a sense of spaciousness to the phrases played by the acoustic guitar, we will apply some light reverb. Raise the AUX5 track 8 fader to about -25 dB. s Channel 9: Piano We will add a certain amount of reverb to the piano to make the sound richer. s Channel 10: Synthesizer We will intentionally refrain from applying reverb to the synthesizer. Instead we will use "Symphonic" for effect 2. This effect is used mainly to add depth, a sense of speed, and a stereo feeling (horizontal spread) to synthesizer sounds. By increasing the EQ.G parameter we will give the sound more edge, and then raise FREQ to give the sound an increased sense of speed. s Channel 11: Organ It is difficult to decide on an appropriate amount of reverb for instruments like organ. Since the sound is sustained, a large amount of reverb can occur before you realize it, ruining your mix. In the case of this song, we will simulate a narrow space (such as a garage) by not applying an effect. s Channel 12: Electric guitar Since the electric guitar takes a solo, we will add a certain amount of reverb in order to add richness to the sound. s Channels 13/14/15: Chorus We will apply just enough reverb to make the backing vocals blend together. Be careful, since more reverb will make the sound richer but will also make the lyrics less understandable, and will blur the overall mix. Don't overdo the reverb for channels 13/14/15. s Channel 16: Lead vocal It is common to apply quite a bit of reverb on the lead vocal, but please listen carefully to the result. The less reverb is used, the better you will be able to hear the result. Apply reverb gradually, and stop when you sense that the sound has become a bit warmer and plumper. In particular, the detail and expressiveness of the AW2816's "24 bit high-quality reverb" can be best appreciated when it is applied lightly. Since each adjustment performed during the mix will affect the audible balance, adjust the fader levels as necessary. • Saving the song It is very important to save the song frequently while you are working on it. If you have been working hard for several hours and the power cable is accidentally disconnected or a power failure occurs, or someone operates a key or fader, your hard work will be for nothing. To save the song, press the WORK NAVIGATE section [SONG] key to access the SONG screen. If necessary press the [F1] key to display the Song List page. Move the cursor in the screen to "SAVE," and press the [ENTER] key. When the confirmation message appears, move the cursor to "OK" and press the [ENTER] key to save the song. Tutorial 21
-
 1
1 -
2
-
3
-
4
-
5
-
6
-
7
-
8
-
9
-
10
-
11
-
12
-
13
-
14
-
15
-
16
-
 17
17 -
 18
18 -
 19
19 -
 20
20 -
 21
21 -
 22
22 -
 23
23 -
 24
24 -
 25
25 -
 26
26 -
 27
27 -
28
-
29
-
30
-
31
 |
 |
