Yamaha AW2816 Tutorial - Page 23
Step 5. Completing the mix and making automation settings, • Automix, Listen to the recorded automix
 |
View all Yamaha AW2816 manuals
Add to My Manuals
Save this manual to your list of manuals |
Page 23 highlights
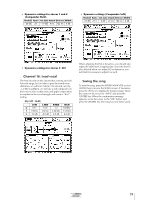
Mixdown Step 5. Completing the mix and making automation settings The basic mix is now nearly complete. Effects have been added, and now it's time to listen carefully to the entire song and make final adjustments. As you listen to the mix, you may decide that you are not satisfied with having a single "average" mix throughout the entire song. That's where automation comes in. In the days before automation was available, a recording engineer had to make this type of adjustment manually while the actual master recording was being made. If the changes involved multiple faders or controls, it was sometimes necessary to obtain the help of other people. Of course, timing is vital, so if the changes were not made at the right time, the mixing process had to be repeated over and over until it was perfect. On the AW2816, the faders, channel on/off, pan, and EQ can all be automated, so it's easy to create a perfect automix. The automix in the demo song uses a combination of automated fader operations, channel on/off, and pan. For details on recording and editing automation, you can refer to the Operation Guide. Here we will provide a brief explanation of the changes we made to the presets, and the reasons for the change. Turn automix on, and watch how the faders and channel [ON] keys change as the song progresses. Use the following procedure to turn automix on. 1 In the AUTOMATION section, press the [AUTOMIX] key. If necessary, press the [F1] key to display the Main page. 2 Move the cursor to AUTOMIX, and press the [ENTER] key to select ENABLE. 3 As explained earlier in this tutorial, return to the VIEW screen or another desired screen. • Automix We will be explaining the progress of automix according to the absolute time counter. Please be aware that the times are approximate. Listen to the recorded automix This automix is stored with a title of "Can you feel it," so press the "AUTOMIX" button to access the "AUTOMIX" screen. Then press the "AUTOMIX" key several times to access the "MEMORY" screen, and recall "Can you feel it." Next, turn the "AUTOMIX" setting to "ENABLE" so the automix will be reflected in the playback. About the contents of the "Can you feel it?" automix At each point in the demo song, the automix pushes forward "the sound that is most important at that point" by adjusting the level of each part (the faders will move). During the electric guitar solo, automix will also adjust the depth of the effect (Reverb PLATE). The automix is recorded according to the following time-line. Listen to the actual sound as you read through this, and use it as a source of ideas for your own automixes. 22 Tutorial
-
 1
1 -
2
-
3
-
4
-
5
-
6
-
7
-
8
-
9
-
10
-
11
-
12
-
13
-
14
-
15
-
16
-
17
-
 18
18 -
 19
19 -
 20
20 -
 21
21 -
 22
22 -
 23
23 -
 24
24 -
 25
25 -
 26
26 -
 27
27 -
 28
28 -
29
-
30
-
31
 |
 |