Yamaha AW2816 Tutorial - Page 4
Recording on the AW2816, Creating a new song, Recording the rhythm - owners manual
 |
View all Yamaha AW2816 manuals
Add to My Manuals
Save this manual to your list of manuals |
Page 4 highlights
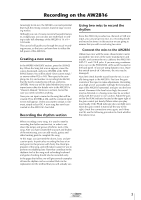
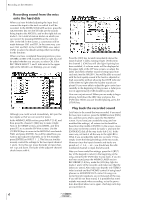
Recording on the AW2816 Amazingly for its size, the AW2816 conceals potential that rivals the mixing consoles found in large recording studios. Although you can of course record a live performance in a single pass, you can also use multi-track recording to take full advantage of the AW2816's 16 x 8 = 128 tracks. This tutorial will guide you through the actual recording process, so that you can learn how to utilize the full power of the AW2816. Creating a new song In the WORK NAVIGATE section, press the [SONG] key. When the Song List screen appears, move the cursor downward, and press [ENTER] at the NEW SONG button. You will be asked "Save current song?," so answer either YES or NO. Then specify the sampling rate (Fs) and number of recording bits (Recbit) that the newly created song will use, and press [ENTER]. Next you will be asked whether you want to import mixer data (for details refer to the AW2816's "Owner's Manual," Reference section), but in this case you need not select anything. Now you can input a name for the song that will be created. Press [ENTER] at OK, and the comment input screen will appear. Unless you want to assign a comment, simply select OK. A new song has now been created on the AW2816's hard disk. Recording the rhythm section When recording a new song, it is usual to start by recording the rhythm section first, in order to set down the tempo and groove (rhythmic feel) of the song. After you have created the structure and rhythm of the entire song, you can add vocals, guitar, and other backing parts to complete the song. At this stage, you just need the drums, bass, and percussion parts. In particular, recording the bass at an early point in the process will clarify the chord progression of the song, and will make it easier for you to perform overdubbing later. Parts that contribute to the rhythmic feel of the song such as backing keyboard and guitar chording should also be recorded early. In the pages that follow, we will give several examples of how the rhythm can be recorded. Refer to the explanation for the method that you will actually use. Using two mics to record the rhythm Since the AW2816 provides two channels of XLR mic input, you can put up two mics in a recording booth and record in stereo. In this section we are going to assume that you will record using two mics. s Connect the mics to the AW2816 Obtain two mics with the same characteristics (as far as possible, two mics of the same manufacturer and model), and connect the mic cables to the AW2816's INPUT 1 and 2 XLR jacks. If you are using condenser mics, turn on the PHANTOM +48V switch located on the back panel. (If you are using dynamic mics, leave this switch turned off. Otherwise, the mic may be damaged.) Now let's check that the sound from the mic is actually being input to the AW2816. First turn the gain controls of the input to make adjustments. Recording at as high a level as possible will take the best advantage of the AW2816's potential, and give you the best sound. However if the level is too high, the sound may be distorted or a hissing noise may be recorded along with the sound, so use caution. Adjust the gain so that the PEAK indicator located at the upper right of the gain control just barely flickers when you play most loudly. If the PEAK indicator does not light even when the gain control is turned all the way to the right, check the connections once again, and if they are OK, use the following procedure to check whether the meters move. Tutorial 3
-
 1
1 -
 2
2 -
 3
3 -
 4
4 -
 5
5 -
 6
6 -
 7
7 -
 8
8 -
 9
9 -
 10
10 -
11
-
12
-
13
-
14
-
15
-
16
-
17
-
18
-
19
-
20
-
21
-
22
-
23
-
24
-
25
-
26
-
27
-
28
-
29
-
30
-
31
 |
 |