Yamaha CLP-950 Owner's Manual
Yamaha CLP-950 Manual
 |
View all Yamaha CLP-950 manuals
Add to My Manuals
Save this manual to your list of manuals |
Yamaha CLP-950 manual content summary:
- Yamaha CLP-950 | Owner's Manual - Page 1
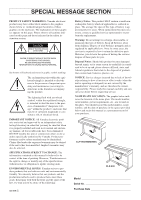
IMPORTANT Check your power supply Make sure that your local AC mains voltage matches the voltage specified on the name plate on the bottom panel. In some areas a voltage selector may be provided on the bottom panel of the main keyboard unit near the power cord. Make sure that the voltage selector is - Yamaha CLP-950 | Owner's Manual - Page 2
maintenance (servicing) instructions in the so unless specifically authorized by Yamaha. Product performance and/or safety model number, serial number, and the date of purchase in the spaces provided below and retain this manual as a permanent record of your purchase. CLP-950/950M/950C CLP-930 Model - Yamaha CLP-950 | Owner's Manual - Page 3
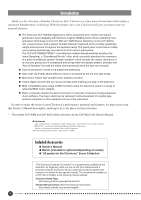
have the instrument inspected by qualified Yamaha service personnel. • Do not place Yamaha cannot be held responsible for damage caused by improper use or modifications to the instrument, or data that is lost or destroyed. Always turn the power off when the instrument is not in use. (1)B-6 CLP-950 - Yamaha CLP-950 | Owner's Manual - Page 4
make the most of your Clavinova's performance potential and features, we urge you to read this Owner's Manual thoroughly, and keep it in a safe place for later reference. * The models CLP-950M and CLP-950C will be referred to as the CLP-950 in this Owner's Manual. I Trademarks • Apple and Macintosh - Yamaha CLP-950 | Owner's Manual - Page 5
Interface (such as the Yamaha UX256) .... 39 Factory Preset Recall 40 Troubleshooting 40 Options & Expander Modules 40 Voice Descriptions 41 Demo Song List 42 Factory Setting List 42 MIDI Data Format 43 MIDI Implementation Chart 47 CLP-950: Keyboard Stand Assembly 48 CLP-930: Keyboard Stand - Yamaha CLP-950 | Owner's Manual - Page 6
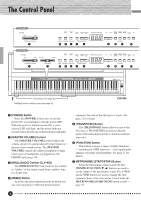
E. PIANO E. PIANO HARPSI- VIBRA- CHURCH JAZZ STRINGS CHOIR WOOD E. BASS SPLIT PIANO 1 PIANO 2 Clavinova's internal stereo sound system. The [MASTER VOLUME] control also adjusts headphone volume when a pair of headphones is plugged into the PHONES jack (page 10). 3 [BRILLIANCE] Control (CLP-950 - Yamaha CLP-950 | Owner's Manual - Page 7
response of the Clavinova to match your playing style. See page 21 for details. * Pedals The soft (left), sostenuto (center) and damper (right) pedals provide a range of expressive control capabilities similar to the pedal functions on an acoustic piano. See page 20 for details. CLP-950/930 7 - Yamaha CLP-950 | Owner's Manual - Page 8
not controlled by the Clavinova's volume or brilliance (CLP-950) control. Use the volume control on the external audio equipment to adjust the level. 2 AUX IN L/L+R and R Jacks These jacks are intended for use with an external tone generator module such as the Yamaha - Yamaha CLP-950 | Owner's Manual - Page 9
MIDI data generated by the Clavinova (e.g. note and velocity data produced by playing the Clavinova keyboard). More details on MIDI are given in "MIDI Functions" on page 33. 5 PEDAL Jack (CLP-930) This terminal is when a pair of headphones is plugged into either of the PHONES jacks. CLP-950/930 9 - Yamaha CLP-950 | Owner's Manual - Page 10
Stand The Clavinova is supplied with a music stand that can be attached to the instrument by inserting it into the holes at the top of panel. NOTE • The music stand can be removed to allow placement of a laptop-type personal computer or other equipment on top of the instrument. 10 CLP-950/930 - Yamaha CLP-950 | Owner's Manual - Page 11
Turn Power On After making sure that the Clavinova's AC cord is properly plugged into the Clavinova itself and plugged into a convenient AC wall CLP-950 NOTE • See "Voice Descriptions" on page 41. GRAND GRAND E. PIANO E. PIANO HARPSI- VIBRA- CHURCH JAZZ STRINGS CHOIR WOOD E. BASS PIANO 1 PIANO - Yamaha CLP-950 | Owner's Manual - Page 12
The "50 greats for the Clavinova" score collection provided with the Clavinova includes the written scores for all voice selector button, the GRAND PIANO 1 (GRAND PIANO: CLP-930) demo tune will begin to adjust the volume and the [BRILLIANCE] control (CLP-950) to adjust the brilliance (page 19). Exit - Yamaha CLP-950 | Owner's Manual - Page 13
can play the keyboard along with the preset song playback. The voice playing on the keyboard can be changed. • You can change the Brilliance control (CLP-950) and Reverb type that is applied to the voice you play on the keyboard and for the preset song playback. You can change the Effect - Yamaha CLP-950 | Owner's Manual - Page 14
once. NOTE • The A and B points are automatically canceled when a new song is selected. • The A-B Repeat function cannot be used during "ALL" or "rnd" playback. 14 CLP-950/930 - Yamaha CLP-950 | Owner's Manual - Page 15
Start/Stop The left pedal can be assigned to start and stop preset song playback via the "Left Pedal Mode" function described on pages 31 (CLP-930) and 32 (CLP-950). CLP-950/930 15 - Yamaha CLP-950 | Owner's Manual - Page 16
GRAND GRAND E. PIANO E. PIANO HARPSI- VIBRA- CHURCH JAZZ STRINGS CHOIR WOOD E. BASS PIANO 1 PIANO 2 1 2 CHORD PHONE ORGAN ORGAN BASS VOICE CLP-950 To activate applied to the 1st Voice only. Other Dual Mode Functions The Clavinova Function mode provides access to a number of other dual-mode - Yamaha CLP-950 | Owner's Manual - Page 17
The Split Mode (CLP-950) The split mode makes it possible to play two different • "b" is indicated with a lower is indicated with an upper "~". Other Split Mode Functions The Clavinova Function mode provides access to a number of other split-mode functions, listed below. See the corresponding - Yamaha CLP-950 | Owner's Manual - Page 18
Reverb The [REVERB] button selects a number of digital reverb effects that you can use for extra depth if the REVERB effect is OFF, a "soundboard reverb" effect will be applied when the CLP-950 GRAND PIANO 1 voice is selected. Adjusting Reverb Depth Adjust the reverb depth for the selected voice - Yamaha CLP-950 | Owner's Manual - Page 19
while holding the [EFFECT] button to recall the default setting for the current voice (the default depth settings are different for each voice). Brilliance (CLP-950) This control can be used to change the tonality or "timbre" of the sound output. The control range is from MELLOW to BRIGHT. For - Yamaha CLP-950 | Owner's Manual - Page 20
"Sustain Samples" to accurately recreate the unique resonance of an acoustic grand piano's soundboard and strings. NOTE • On the CLP-950 the depth of the effect produced by the "Sustain Samples" can be via the "Left Pedal Mode" described on pages 31 (CLP-930) and 32 (CLP950). 20 CLP-950/930 - Yamaha CLP-950 | Owner's Manual - Page 21
(i.e. a maximum of one octave up or down). "Transposing" the pitch of the Clavinova keyboard facilitates playing in difficult key signatures, and you can easily match the pitch of below and above the A-1 ... C7 range of the Clavinova sound one octave higher and lower, respectively. CLP-950/930 21 - Yamaha CLP-950 | Owner's Manual - Page 22
to the A3 note's Hz) range in approximately 0.2 Hertz intervals. Pitch control is useful for tuning the Clavinova to match other instruments or recorded music. A-1 B-1 C3 B3 -/NO +/YES Tuning Up ...Z To An alternative tuning method is available in the Function mode - page 28. 22 CLP-950/930 - Yamaha CLP-950 | Owner's Manual - Page 23
The Metronome & Tempo Control The Clavinova built-in metronome is a convenient feature for practice, and it can also provide a solid rhythmic guide when recording using the User Song Recorder feature, lit) can be recalled by simultaneously pressing the [t] and [s] buttons. CLP-950/930 23 - Yamaha CLP-950 | Owner's Manual - Page 24
to record and play back what you've played on the Clavinova keyboard can be an effective practice aid. You can, F3) G Split balance (F4: CLP-950) G Split octave shift (F4: CLP-950) Recording CLP-950 GRAND GRAND E. PIANO E. PIANO HARPSI- VIBRA- CHURCH JAZ PIANO 1 PIANO 2 1 2 CHORD PHONE ORGAN - Yamaha CLP-950 | Owner's Manual - Page 25
in step 1 of the recording procedure are actually recorded by the Clavinova. These initial settings can be changed after the recording is finished by F3)", "Dual octave shift (F3)", "Split balance (F4:CLP950)" or "Split octave shift (F4:CLP-950)". Erasing a Single Track All data can be erased from - Yamaha CLP-950 | Owner's Manual - Page 26
is also possible to store it to an external MIDI storage device such as the Yamaha MIDI Data Filer MDF3 by using the Bulk Data Dump function described on page Pedal Mode" function described on pages 31 (CLP-930) and 32 (CLP-950). This is convenient for starting playback of the recorded part anytime after - Yamaha CLP-950 | Owner's Manual - Page 27
The Function Mode The [FUNCTION] button provides access to a range of functions that give the Clavinova extraordinary versatility. The functions are categorized in groups as follows: CLP-930 CLP-950 F1 F1 Tuning 28 F2 F2 Scale 28 F3 F3 Dual Mode Functions 29 - F4 Split Mode Functions 30 F4 - - Yamaha CLP-950 | Owner's Manual - Page 28
function, as listed below. F2.1: Scale ...In addition to the standard Equal Temperament tuning, the Clavinova includes 6 classic tunings that you can select and use to play music of the corresponding period, setting is effective for tunings other than the Equal Temperament tuning. 28 CLP-950/930 - Yamaha CLP-950 | Owner's Manual - Page 29
, and "1" to shift the pitch up one octave. Press the [-/NO] and [+/YES] buttons simultaneously to recall the default setting (different for each voice combination). CLP-950/930 29 - Yamaha CLP-950 | Owner's Manual - Page 30
default values. Press the [+/YES] button to reset the values. "End" will appear on the display when all functions have been reset. F4 CLP-950 Split Mode Functions After selecting "F4.Y", press the [+/YES] button to engage the split-mode function submode, then use the [TEMPO/FUNCTION t, s] buttons - Yamaha CLP-950 | Owner's Manual - Page 31
to reset the values. "End" will appear on the display when all functions have been reset. F4 CLP-930 Left Pedal Mode This function sets the left pedal for normal soft-pedal operation or for song start/ [-/NO] and [+/YES] buttons simultaneously to recall the default setting "1". CLP-950/930 31 - Yamaha CLP-950 | Owner's Manual - Page 32
Sample Depth ... The CLP-950 GRAND PIANO 1 voice features special "Sustain Samples" which recreate the unique resonance of an acoustic grand piano's soundboard and strings when to use the "canceled" part as a guide to play along with. Set to "0" if you don't want to hear the part. 32 CLP-950/930 - Yamaha CLP-950 | Owner's Manual - Page 33
Mode F7 CLP-930 MIDI Functions F8 CLP-950 MIDI Functions G A Brief Introduction to MIDI MIDI, the Musical Instrument Digital Interface, is ent channels. Multiple channels have (Set to receive on MIDI channel 2) Clavinova (Set to receive on MIDI channel 1) been implemented to allow selective - Yamaha CLP-950 | Owner's Manual - Page 34
The transmit channel parameter can also be turned "OFF" if you don't want the Clavinova to transmit any MIDI data. To select the multi-timbre receive mode, set the receive on program change numbers for each of the Clavinova's voices, refer to page 44 in the MIDI Data Format section. 34 CLP-950/930 - Yamaha CLP-950 | Owner's Manual - Page 35
of the same model type. • The reload operation cannot be executed when the demo/preset song mode or user song recorder is in operation, or when the Function mode is engaged. • No MIDI note/panel data transmission or data reception occurs during a bulk data dump transmit operation. CLP-950/930 35 - Yamaha CLP-950 | Owner's Manual - Page 36
• Dual (ON/OFF, Voice, and Dual Functions for each voice combination) • Split (ON/OFF, Voice, and Split Functions for each voice combination : CLP-950) • Reverb (ON/OFF, Type, and Depth for each voice) • Effect (ON/OFF, Type, and Depth for each voice) • Touch Sensitivity (including the FIXED volume - Yamaha CLP-950 | Owner's Manual - Page 37
(the manual is not written for any specific models). The document is available as a PDF file (in English) at the following Internet address: Clavinova Home Page: http://www.yamaha.co.jp/english/product/cl/ Yamaha Manual Library (Electronic Musical Instruments) http://www2.yamaha.co.jp/manual/english - Yamaha CLP-950 | Owner's Manual - Page 38
using Windows, a Yamaha MIDI driver must be installed in the personal computer. The Yamaha MIDI driver can be obtained at Yamaha's home page on the World Wide Web, . G Connector Pin Numbers MINI DIN 8-PIN 6 78 34 5 12 D-SUB 9-PIN 54321 9876 38 CLP-950/930 - Yamaha CLP-950 | Owner's Manual - Page 39
HOST SELECT Standard Macintosh 8-pin system peripheral cable Mini-DIN 8-pin Computer UX256 or equivalent Clavinova G Connecting the USB Interface and Instrument via MIDI Cables USB cable MIDI OUT IN MIDI HOST SELECT MIDI cables Computer UX256 or equivalent Clavinova CLP-950/930 39 - Yamaha CLP-950 | Owner's Manual - Page 40
sets all Backup on/off settings (F8: CLP-930, F9: CLP-950) to "OFF". NOTE • The factory setting list is found on page 42. Troubleshooting If you encounter what appears to be a malfunction, please check the following points before assuming that your Clavinova is faulty. 1. No Sound When the Power - Yamaha CLP-950 | Owner's Manual - Page 41
des voix/Descripciones de las voces Voice GRAND PIANO GRAND PIANO 1 GRAND PIANO 2 E.PIANO 1 E.PIANO 2 HARPSICHORD VIBRAPHONE CHURCH ORGAN JAZZ ORGAN STRINGS CHOIR WOOD BASS E.BASS CLP- CLP- Stereo/ Touch Dynamic 950 930 Mono Response Sampling* Voice Descriptions - O Stereo O O - Stereo - Yamaha CLP-950 | Owner's Manual - Page 42
Voice Reverb Type Reverb Depth Effect Type Effect Depth Touch Sensitivity Volume in the FIXED Mode Metronome Metronome Time Signature Tempo Transpose Function CLP-950 GRAND PIANO 1 OFF OFF BASS Preset for each voice Preset for each voice Preset for each voice Preset for each voice MEDIUM 64 OFF - Yamaha CLP-950 | Owner's Manual - Page 43
vous seront utiles et vous aideront à commander le Clavinova. SI usted está ya familiarizado con MIDI, o number: 00H ~ 7FH = C-2 ~ G8 vv = Velocity * If received value exceeds the supported range for the selected voice, the note is adjusted by the necessary number of octaves. 2. CLP-950/930 43 - Yamaha CLP-950 | Owner's Manual - Page 44
(n = channel number) ppH = Program change number P.C.#=Program Change number GRAND PIANO 1* GRAND PIANO 2 E.PIANO 1 E.PIANO 2 HARPSICHORD VIBRAPHONE CHURCH ORGAN JAZZ ORGAN STRINGS CHOIR WOOD BASS E.BASS CLP-950 MSB LSB P.C.# 0 112 0 0 112 1 0 112 5 0 112 4 0 112 6 0 112 11 0 112 - Yamaha CLP-950 | Owner's Manual - Page 45
ddH | | ccH F7H Exclusive status YAMAHA ID When received, n=0~F. When transmitted, n=0. Model ID of XG ByteCount ByteCount Address High Address F7H] F0H = Exclusive status 43H = Yamaha ID 73H = Clavinova ID 67H = CLP-950/930 common ID 11H = Clavinova special control 0nH = Control MIDI change - Yamaha CLP-950 | Owner's Manual - Page 46
Default value (H) 7F G Effect MIDI Map REVERB ROOM HALL 1 HALL 2 STAGE Sound board MSB 02H 01H 01H 03H 03H LSB 10H 10H 11H 10H 12H (CLP-950) EFFECT MSB LSB CHORUS 42H 10H PHASER 48H 10H TREMOLO 42H 12H DELAY 05H 10H 46 - Yamaha CLP-950 | Owner's Manual - Page 47
YAMAHA [Clavinova] Model: CLP-950/930 Function MIDI Implementation Chart Transmitted Recognized Basic Default Channel Changed 1 1~16 Mode Default Messages Altered 3 X Note OMNI ON, POLY Mode 3: OMNI OFF, POLY Mode 2: OMNI ON, MONO Mode 4: OMNI OFF, MONO O: Yes X: No CLP-950/930 47 - Yamaha CLP-950 | Owner's Manual - Page 48
de la caja. No se olvide de sacarlo de la caja. CLP-950: Keyboard Stand Assembly CLP-950: Zusammenbau und Aufstellung CAUTION • Be careful not to confuse parts the "Assembly Parts" illustration will be used. Follow the assembly instructions and select the parts as needed. Z Attach (C). the side - Yamaha CLP-950 | Owner's Manual - Page 49
de cabeza redonda de 4 x 12 mm 2 CLP-950: Assemblage du support de clavier CLP-950: Conjunto del soporte del teclado PRECAUTION • Veiller ment. • Pour démonter le Clavinova, inverser l'ordre des indications utilisés. Veuillez vous conformer aux instructions d'assemblage et sélectionner les élé - Yamaha CLP-950 | Owner's Manual - Page 50
Unterseite der Tastatureinheit angeschlossen. Bringen Sie nach dem Anschluß die Kabelhalter an der Seitenwand an, um das Kabel dann in diese Halter zu klemmen. 50 CLP-950/930 - Yamaha CLP-950 | Owner's Manual - Page 51
la unidad principal. Una vez se ha conectado, coloque los soportes de cable del panel lateral como se muestra, y sujete el cable en los soportes. CLP-950/930 51 - Yamaha CLP-950 | Owner's Manual - Page 52
CAUTION • An improper voltage setting can cause serious damage to the Clavinova or result in improper operation. M Attach the rear panel (E). With only and the string will never have to be reattached again. For instructions on its removal, refer to the paper titled "REQUEST" that can be CLP-950/930 - Yamaha CLP-950 | Owner's Manual - Page 53
Puis fixez le haut du panneau arrière sur les supports des panneaux latéraux à l'aide de deux vis corde à nouveau. En ce qui concerne les instructions pour retirer cette corde, veuillez vous référer tensión puede causar daños serios a la Clavinova o ser motivo de mal funcionamiento. M CLP-950/930 53 - Yamaha CLP-950 | Owner's Manual - Page 54
ready. The parts shown in the "Assembly Parts" illustration will be used. Follow the assembly instructions and select the parts as needed. Z Attach (C). the side panels (D) to the pedal box die Pedale in dieselbe Richtung weisen wie die vorspringenden Teile der Füße. 54 CLP-950/930 - Yamaha CLP-950 | Owner's Manual - Page 55
de cabeza redonda de 6 x 25 mm 1 CLP-930: Assemblage du support de clavier CLP-930: Conjunto del soporte del teclado PRECAUTION • Veiller • Pour démonter le Clavinova, inverser l'ordre des indications utilisés. Veuillez vous conformer aux instructions d'assemblage et sélectionner les CLP-950/930 55 - Yamaha CLP-950 | Owner's Manual - Page 56
darauf, daß Sie Ihre Finger nicht zwischen Tastatur- einheit und den Seitenwänden bzw. der Rückwand einklemmen - die Tastatureinheit könnte dadurch zu Fall kommen! 56 CLP-950/930 - Yamaha CLP-950 | Owner's Manual - Page 57
en éliminant les espaces entre les panneaux arrière et latéraux, fixez le haut du panneau arrière sur les supports des panneaux latéraux à l'aide de deux vis à tête ronde 4 x 12 mm 2. Et finalement, fixez le por lo que deberá tener mucho cuidado que no se caiga la unidad principal. CLP-950/930 57 - Yamaha CLP-950 | Owner's Manual - Page 58
CAUTION • An improper voltage setting can cause serious damage to the Clavinova or result in improper operation. N Set the adjuster. For stability only and the string will never have to be reattached again. For instructions on its removal, refer to the paper titled "REQUEST" that can CLP-950/930 - Yamaha CLP-950 | Owner's Manual - Page 59
appuyez sur les pédales? ➔ Tourner le stabilisateur de sorte que le Clavinova repose fermement sur le sol. • Les cordons des pédales et d' nécessaire de fixer la corde à nouveau. En ce qui concerne les instructions pour retirer cette corde, veuillez vous référer à la page intitulée CLP-950/930 59 - Yamaha CLP-950 | Owner's Manual - Page 60
stand WEIGHT CLP-950/950M/950C CLP-930 88 CLP-950 no puede accederse desde fuera de la caja del instrumento (se conecta internamente a la unidad de pedales durante el procedimiento de montaje). • Specifications and descriptions in this owner's manual are for information purposes only. Yamaha - Yamaha CLP-950 | Owner's Manual - Page 61
○ ○ ○ ○ ○ ○ ○ ○ ○ ○ ○ ○ ○ ○ ○ ○ ○ ○ ○ ○ ○ ○ ○ ○ ○ ○ ○ ○ ○ ○ ○ ○ ○ ○ ○ ○ ○ ○ ○ ○ ○ ○ ○ ○ ○ ○ ○ ○ ○ ○ ○ ○ ○ ○ ○ ○ ○ ○ ○ ○ ○ ○ ○ ○ ○ ○ ○ ○ ○ ○ ○ ○ ○ ○ ○ ○ ○ ○ ○ ○ ○ ○ ○ ○ ○ ○ ○ ○ ○ ○ ○ CLP-950/930 ○ ○ ○ 61 - Yamaha CLP-950 | Owner's Manual - Page 62
MEMO NOTIZEN NOTES MEMORANDUM ... ○ ○ ○ ○ ○ ○ ○ ○ ○ ○ ○ ○ ○ ○ ○ ○ ○ ○ ○ ○ ○ ○ ○ ○ ○ ○ ○ ○ ○ ○ ○ ○ ○ ○ ○ ○ ○ ○ ○ ○ ○ ○ ○ ○ ○ ○ ○ ○ ○ ○ ○ ○ ○ ○ ○ ○ ○ ○ ○ ○ ○ ○ ○ ○ ○ ○ ○ ○ ○ ○ ○ ○ ○ ○ ○ ○ ○ ○ ○ ○ ○ ○ ○ ○ ○ ○ ○ ○ ○ - Yamaha CLP-950 | Owner's Manual - Page 63
Instructions found in this manual BEFORE marking any connections, including connection to the main supply. 2. Main Power Supply Verification: Yamaha that may exist. 12. Electrical/electronic products should be serviced by a qualified service person when: a. The power supply cord has been damaged - Yamaha CLP-950 | Owner's Manual - Page 64
instructions contained in this manual, meets FCC requirements. Modifications not expressly approved by Yamaha OFF" and "ON", please try to eliminate the problem by using one of the following measures: Relocate either please contact Yamaha Corporation of America, Electronic Service Division, 6600 - Yamaha CLP-950 | Owner's Manual - Page 65
Yamaha Yamaha Yamaha Yamaha SWEDEN Yamaha Scandinavia av Yamaha Scandinavia Yamaha Europa GmbH. Siemensstraße 22-34, 25462 Rellingen, F.R. of Germany Tel: 04101-3030 OTHER COUNTRIES Yamaha Yamaha Music Indonesia (Distributor) PT. Nusantik Gedung Yamaha Yamaha Yamaha Yamaha Corporation, Asia Yamaha Yamaha - Yamaha CLP-950 | Owner's Manual - Page 66
Clavinova Web site (English only) http://www.yamaha.co.jp/english/product/cl/ Yamaha Manual Library (English versions only) http://www2.yamaha.co.jp/manual/english/ M.D.G., Pro Audio & Digital Musical Instrument Division, Yamaha Corporation © 2000 Yamaha Corporation V495600 0??POZC??.?-??B0 Printed
-
 1
1 -
 2
2 -
 3
3 -
 4
4 -
 5
5 -
 6
6 -
 7
7 -
8
-
9
-
10
-
11
-
12
-
13
-
14
-
15
-
16
-
17
-
18
-
19
-
20
-
21
-
22
-
23
-
24
-
25
-
26
-
27
-
28
-
29
-
30
-
31
-
32
-
33
-
34
-
35
-
36
-
37
-
38
-
39
-
40
-
41
-
42
-
43
-
44
-
45
-
46
-
47
-
48
-
49
-
50
-
51
-
52
-
53
-
54
-
55
-
56
-
57
-
58
-
59
-
60
-
61
-
62
-
63
-
64
-
65
-
66
 |
 |

IMPORTANT
Check your power supply
Make sure that your local AC
mains voltage matches the volt-
age specified on the name plate
on the bottom panel. In some ar-
eas a voltage selector may be
provided on the bottom panel of
the main keyboard unit near the
power cord. Make sure that the
voltage selector is set for the volt-
age in your area. The voltage se-
lector is set at 240V when the unit
is initially shipped. To change the
setting use a “minus” screwdriver
to rotate the selector dial so that
the correct voltage appears next
to the pointer on the panel.
WICHTIG
Überprüfung der Stromversorgung
Vergewissern Sie sich vor dem An-
schließen an das Stromnetz, daß die
örtliche Netzspannung den
Betriebsspannungswerten auf dem
Typenschild an der Unterseite des In-
struments entspricht. In bestimmten
Verkaufsgebieten ist das Instrument
mit einem Spannungswähler an der
Unterseite neben der Netzkabel-
durchführung ausgestattet. Falls vor-
handen, muß der Spannungswähler
auf die örtliche Netzspannung einge-
stellt werden. Der Spannungswähler
wurde werkseitig auf 240 V voreinge-
stellt. Zum Verstellen drehen Sie den
Spannungsregler mit einem Schlitz-
schraubendreher, bis der Zeiger auf
den korrekten Spannungswert weist.
IMPORTANT
Contrôler la source d’alimentation
Vérifiez que la tension spécifiée sur
le panneau inférieur correspond à
la tension du secteur.
Dans certai-
nes régions, l’instrument peut être
équipé d’un sélecteur de tension si-
tué sur le panneau inférieur du cla-
vier à proximité du cordon d’alimen-
tation.
Vérifiez que ce sélecteur est
bien réglé en fonction de la tension
secteur de votre région. Le sélec-
teur de tension est réglé sur 240 V
au départ d’usine.
Pour modifier ce
réglage, utilisez un tournevis à lame
plate pour tourner le sélecteur afin
de mettre l’indication correspondant
à la tension de votre région vis à vis
du repère triangulaire situé sur le
panneau.
IMPORTANTE
Verifique la alimentación de
corriente
Asegúrese de que tensión de ali-
mentación de CA de su área corres-
ponde con la tensión especificada en
la placa de características del panel
inferior. En algunas zonas puede
haberse incorporado un selector de
tensión en el panel inferior de la
unidad del teclado principal, cerca del
cable de alimentación.
Asegúrese de
que el selector de tensión esté
ajustado a la tensión de su área.
El
selector de tensión se ajusta a 240V
cuando la unidad sale de fábrica.
Para
cambiar el ajuste, emplee un destorni-
llador de cabeza “recta” para girar el
selector de modo que aparezca la
tensión correcta al lado del indicador
del panel.
ENGLISH
DEUTSCH
FRANÇAIS
ESPAÑOL