Yamaha DGX-500 Owner's Manual - Page 82
Utility – Formatting a Previously Formatted Disk, Filename, Format?, Sure?, Complete
 |
View all Yamaha DGX-500 manuals
Add to My Manuals
Save this manual to your list of manuals |
Page 82 highlights
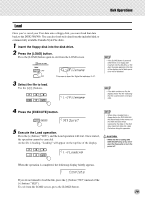
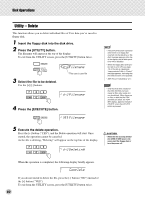
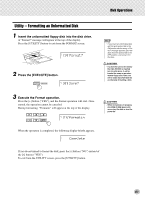
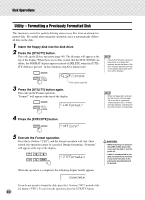
Disk Operations Utility - Formatting a Previously Formatted Disk This function is useful for quickly deleting unnecessary files from an already formatted disk. Be careful when using this operation, since it automatically deletes all data on the disk. 1 Insert the floppy disk into the disk drive. 2 Press the [UTILITY] button. This calls up the Delete operation (page 80). The filename will appear at the top of the display. When there are no files on disk that the DGX-500/300 can delete, the FORMAT display appears instead of DELETE, when the [UTILITY] button is pressed. In this situation, step #2 is unnecessary. L-U Filename This case is user file 3 Press the [UTILITY] button again. This calls up the Format operation. "Format?" will appear at the top of the display. CUE Format? • If the [UTILITY] button is pressed when there is no floppy disk inserted into the disk drive, a "No disk" message appears at the top of the display, and all disk operations will be disabled. • When the floppy disk's write-protect tab is set to ON (see page 74) or the disk is a purposely "copy-protected" disk, a "Protect" message appears, indicating that the Utility function is not possible. 4 Press the [EXECUTE] button. YES Sure? 5 Execute the Format operation. Press the [+] button ("YES"), and the Format operation will start. Once started, the operation cannot be canceled. During formatting, "Formatin" will appear at the top of the display. 072 Formatin When the operation is completed, the following display briefly appears. Complete If you do not intend to format the disk, press the [-] button ("NO") instead of the [+] button ("YES"). To exit from the operation, press the UTILITY button. 82 • While formatting is in progress (the DISK IN USE lamp is lit) , never eject the disk or turn the power off. • If data is already saved on the disk, be careful not to format it. If you format the disk, all the previously recorded data will be deleted.
-
 1
1 -
2
-
3
-
4
-
5
-
6
-
7
-
8
-
9
-
10
-
11
-
12
-
13
-
14
-
15
-
16
-
17
-
18
-
19
-
20
-
21
-
22
-
23
-
24
-
25
-
26
-
27
-
28
-
29
-
30
-
31
-
32
-
33
-
34
-
35
-
36
-
37
-
38
-
39
-
40
-
41
-
42
-
43
-
44
-
45
-
46
-
47
-
48
-
49
-
50
-
51
-
52
-
53
-
54
-
55
-
56
-
57
-
58
-
59
-
60
-
61
-
62
-
63
-
64
-
65
-
66
-
67
-
68
-
69
-
70
-
71
-
72
-
73
-
74
-
75
-
76
-
 77
77 -
 78
78 -
 79
79 -
 80
80 -
 81
81 -
 82
82 -
 83
83 -
 84
84 -
 85
85 -
 86
86 -
 87
87 -
88
-
89
-
90
-
91
-
92
-
93
-
94
-
95
-
96
-
97
-
98
-
99
-
100
-
101
-
102
-
103
-
104
-
105
-
106
-
107
-
108
-
109
-
110
-
111
-
112
 |
 |