Yamaha DGX-500 Owner's Manual - Page 88
External Clock, Press the [TEMPO] button. - 88 key
 |
View all Yamaha DGX-500 manuals
Add to My Manuals
Save this manual to your list of manuals |
Page 88 highlights
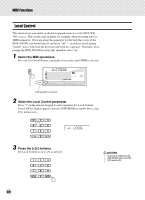
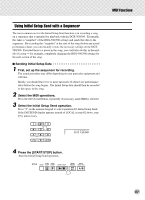
MIDI Functions 5 Start recording on the sequencer, then send the Initial Setup data. Start recording on the sequencer in the normal way, then - with as little delay as possible - press the [+] button to actually start transmitting the data. An "End" message briefly appears in the display when the operation is complete. End 6 Stop recording on the sequencer. Stop recording on the sequencer in the normal way. Make sure that any sub- sequently recorded performance data is recorded at least one measure fol- lowing the Initial Setup data. • When the Initial Setup Send operation is completed, the DGX500/300 automatically returns to the previous panel condition. External Clock This determines whether the style and song playback functions are controlled by the DGX-500/300's internal clock (off) or by MIDI clock data from an external sequencer or computer (on). This should be set to on when you want to have style or song playback follow the external device (such as a rhythm machine or a sequencer). The default setting is off. 1 Press the [TEMPO] button. 2 Set the instrument to External Clock. Press and hold the [+] button until the value "280" is indicated, then press the [+] button once more to select "ECL" (External Clock) in the display. To return to the Internal Clock setting, simply select a Tempo value from 32 to 280. • If External Clock is set to ON, style or song playback will not start unless external clock are received. MIDI LSB receive cancel. Set to receive or not receive the LSB data of BANK SELECT. Press and hold the lowest key and turning on the power. DGX-500 DGX-300 Turning on the power again normally, "MIDI LSB receive cancel" return to normal. 88
-
 1
1 -
2
-
3
-
4
-
5
-
6
-
7
-
8
-
9
-
10
-
11
-
12
-
13
-
14
-
15
-
16
-
17
-
18
-
19
-
20
-
21
-
22
-
23
-
24
-
25
-
26
-
27
-
28
-
29
-
30
-
31
-
32
-
33
-
34
-
35
-
36
-
37
-
38
-
39
-
40
-
41
-
42
-
43
-
44
-
45
-
46
-
47
-
48
-
49
-
50
-
51
-
52
-
53
-
54
-
55
-
56
-
57
-
58
-
59
-
60
-
61
-
62
-
63
-
64
-
65
-
66
-
67
-
68
-
69
-
70
-
71
-
72
-
73
-
74
-
75
-
76
-
77
-
78
-
79
-
80
-
81
-
82
-
 83
83 -
 84
84 -
 85
85 -
 86
86 -
 87
87 -
 88
88 -
 89
89 -
 90
90 -
 91
91 -
 92
92 -
 93
93 -
94
-
95
-
96
-
97
-
98
-
99
-
100
-
101
-
102
-
103
-
104
-
105
-
106
-
107
-
108
-
109
-
110
-
111
-
112
 |
 |