Yamaha DGX-530 Owner's Manual - Page 111
Installing the Musicsoft, Downloader and Digital, Music Notebook Applications
 |
UPC - 086792880303
View all Yamaha DGX-530 manuals
Add to My Manuals
Save this manual to your list of manuals |
Page 111 highlights
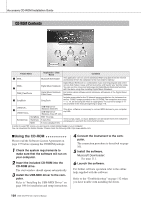
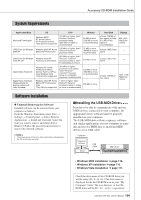
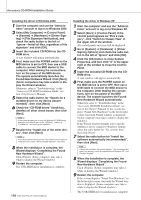
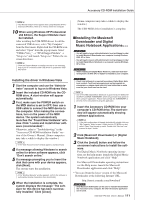
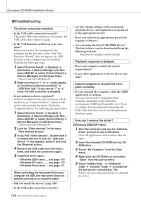
Accessory CD-ROM Installation Guide NOTE • This Wizard window will not appear when using Windows XP Pro- fessional x64 Edition. There is no need to restart the computer. 10 When using Windows XP Professional x64 Edition, the Support Module must be installed. After installing the USB-MIDI drivers for all the connected USB devices, select "My Computer" from the Start menu. Right-click the CD-ROM icon and select "Open" from the pop-up menu. Select "USBdrvVista_" → "XPx64SupportModule" → "Setup.exe" and launch "Setup.exe." Follow the onscreen directions. NOTE • Once the Support Module is installed, this step is not necessary, even if you've connected a new USB device or updated the USBMIDI driver. Installing the driver in Windows Vista 1 Start the computer and use the "Administrator" account to log on to Windows Vista. 2 Insert the included CD-ROM into the CDROM drive. A start window will appear automatically. 3 First, make sure the POWER switch on the MIDI device is set to OFF, then use a USB cable to connect the MIDI device to the computer. After making the connections, turn on the power of the MIDI device. The system automatically launches the "Found New Hardware" window. Click "Locate and install driver software (recommended)". Otherwise, refer to "Troubleshooting" in the "Accessory CD-ROM Installation Guide" section of the Owner's Manual. (Some computers may take a while to display the window.). NOTE • If the "User Account Control" window appears, click [Continue]. 4 If a message allowing Windows to search online for driver software appears, click "Don't search online." 5 If a message prompting you to insert the disk that came with your device appears, click [Next]. The system starts the installation. NOTE • If the "Windows Security" window appears, confirm this software is authored by Yamaha Corporation then click [Install]. 6 When the installation is complete, the system displays the message "The software for this device has been successfully installed." Click [Close]. (Some computers may take a while to display the window.) The USB-MIDI driver installation is complete. ■Installing the Musicsoft Downloader and Digital Music Notebook Applications● ● ● IMPORTANT • You will need to log on with administrator (root) privileges in order to install Musicsoft Downloader on a computer running Windows 2000, XP or Vista. • You will need to log on with administrator (root) privileges in order to install Digital Music Notebook on a computer running Windows, XP or Vista. IMPORTANT • When installing the Digital Music Notebook, make sure that Inter- net Explorer 6.0 (with SP1) or higher is installed to your computer. IMPORTANT • Credit card settlement is required to purchase Digital Music Note- book content. Credit card processing may not be possible for some areas, so please check with your local authorities to make sure that your credit card can be used. NOTE • Use of the DMN (Digital Music Notebook) is governed by the SIBELIUS SCORCH LICENSE AGREEMENT, which the purchaser fully agrees to when using the application. Please read carefully the AGREEMENT at the end of this manual before using the application. 1 Insert the Accessory CD-ROM into your computer's CD-ROM drive. The start window will appear automatically showing software applications. NOTE • If the start window does not appear automatically, double click your "My Computer" folder to open it. Right-click the CD-ROM icon and select "Open" from the pop-up menu. Double click "Start.exe" and proceed to step 2, below. 2 Click [Musicsoft Downloader] or [Digital Music Notebook]. 3 Click the [install] button and follow the on-screen instructions to install the software. For Digital Music Notebook operating instructions see the help menu: launch the Digital Music Notebook application and click "Help". For Musicsoft Downloader operating instructions see the Help menu: launch the Musicsoft Downloader application and click "Help". * You can obtain the latest version of the Musicsoft Downloader at the following Internet URL. http://music.yamaha.com/download/ IMPORTANT • Only Musicsoft Downloader can be used to transfer files between this instrument and a computer. No other file transfer application can be used. DGX-530/YPG-535 Owner's Manual 111
-
 1
1 -
2
-
3
-
4
-
5
-
6
-
7
-
8
-
9
-
10
-
11
-
12
-
13
-
14
-
15
-
16
-
17
-
18
-
19
-
20
-
21
-
22
-
23
-
24
-
25
-
26
-
27
-
28
-
29
-
30
-
31
-
32
-
33
-
34
-
35
-
36
-
37
-
38
-
39
-
40
-
41
-
42
-
43
-
44
-
45
-
46
-
47
-
48
-
49
-
50
-
51
-
52
-
53
-
54
-
55
-
56
-
57
-
58
-
59
-
60
-
61
-
62
-
63
-
64
-
65
-
66
-
67
-
68
-
69
-
70
-
71
-
72
-
73
-
74
-
75
-
76
-
77
-
78
-
79
-
80
-
81
-
82
-
83
-
84
-
85
-
86
-
87
-
88
-
89
-
90
-
91
-
92
-
93
-
94
-
95
-
96
-
97
-
98
-
99
-
100
-
101
-
102
-
103
-
104
-
105
-
 106
106 -
 107
107 -
 108
108 -
 109
109 -
 110
110 -
 111
111 -
 112
112 -
 113
113 -
 114
114 -
 115
115 -
 116
116 -
117
-
118
-
119
-
120
-
121
-
122
-
123
-
124
-
125
-
126
-
127
-
128
-
129
-
130
-
131
-
132
-
133
-
134
-
135
-
136
-
137
-
138
-
139
-
140
-
141
-
142
-
143
-
144
 |
 |