Yamaha DGX-530 Owner's Manual - Page 13
Connecting to a Computer (USB Terminal), Turning the Power On, Music Rest - driver
 |
UPC - 086792880303
View all Yamaha DGX-530 manuals
Add to My Manuals
Save this manual to your list of manuals |
Page 13 highlights
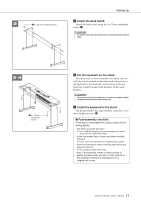
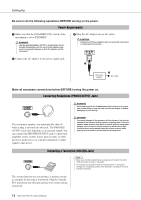
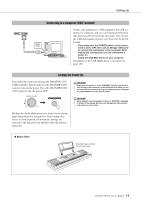
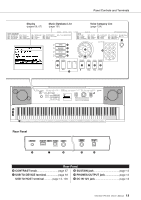
Setting Up Connecting to a Computer (USB Terminal) Connect the instrument's USB terminal to the USB terminal of a computer, and you can transfer performance data and song files between the two (page 101). To use the USB data-transfer features you'll need to do the following: • First, make sure the POWER switch on the instrument is set to OFF, then use an AB type USB cable to connect the instrument to the computer. After making the connections, turn the instrument's power on. • Install the USB-MIDI driver on your computer. Installation of the USB-MIDI driver is described on page 109. Turning the Power On Turn down the volume by turning the [MASTER VOLUME] control to the left and press the [STANDBY/ON] switch to turn on the power. Press the [STANDBY/ON] switch again to turn the power OFF. CAUTION • Even when the switch is in the "STANDBY" position, electricity is still flowing to the instrument at the minimum level. When you are not using the instrument for a long time, make sure you unplug the AC power adaptor from the wall AC outlet. CAUTION • Never attempt to turn the power off when a "WRITING!" message is shown in the display. Doing so can damage the flash memory and result in a loss of data. Backup data in the flash memory is loaded to the instrument when the power is turned on. If no backup data exists on flash memory, all instrument settings are restored to the initial factory defaults when the power is turned on. ● Music Rest Insert the music rest into the slots as shown. DGX-530/YPG-535 Owner's Manual 13
-
 1
1 -
2
-
3
-
4
-
5
-
6
-
7
-
 8
8 -
 9
9 -
 10
10 -
 11
11 -
 12
12 -
 13
13 -
 14
14 -
 15
15 -
 16
16 -
 17
17 -
 18
18 -
19
-
20
-
21
-
22
-
23
-
24
-
25
-
26
-
27
-
28
-
29
-
30
-
31
-
32
-
33
-
34
-
35
-
36
-
37
-
38
-
39
-
40
-
41
-
42
-
43
-
44
-
45
-
46
-
47
-
48
-
49
-
50
-
51
-
52
-
53
-
54
-
55
-
56
-
57
-
58
-
59
-
60
-
61
-
62
-
63
-
64
-
65
-
66
-
67
-
68
-
69
-
70
-
71
-
72
-
73
-
74
-
75
-
76
-
77
-
78
-
79
-
80
-
81
-
82
-
83
-
84
-
85
-
86
-
87
-
88
-
89
-
90
-
91
-
92
-
93
-
94
-
95
-
96
-
97
-
98
-
99
-
100
-
101
-
102
-
103
-
104
-
105
-
106
-
107
-
108
-
109
-
110
-
111
-
112
-
113
-
114
-
115
-
116
-
117
-
118
-
119
-
120
-
121
-
122
-
123
-
124
-
125
-
126
-
127
-
128
-
129
-
130
-
131
-
132
-
133
-
134
-
135
-
136
-
137
-
138
-
139
-
140
-
141
-
142
-
143
-
144
 |
 |