Yamaha EMX5000-20 Owner's Manual - Page 8
EMX5000-20/ EMX5000-12 Quick Guide, Connection - used
 |
View all Yamaha EMX5000-20 manuals
Add to My Manuals
Save this manual to your list of manuals |
Page 8 highlights
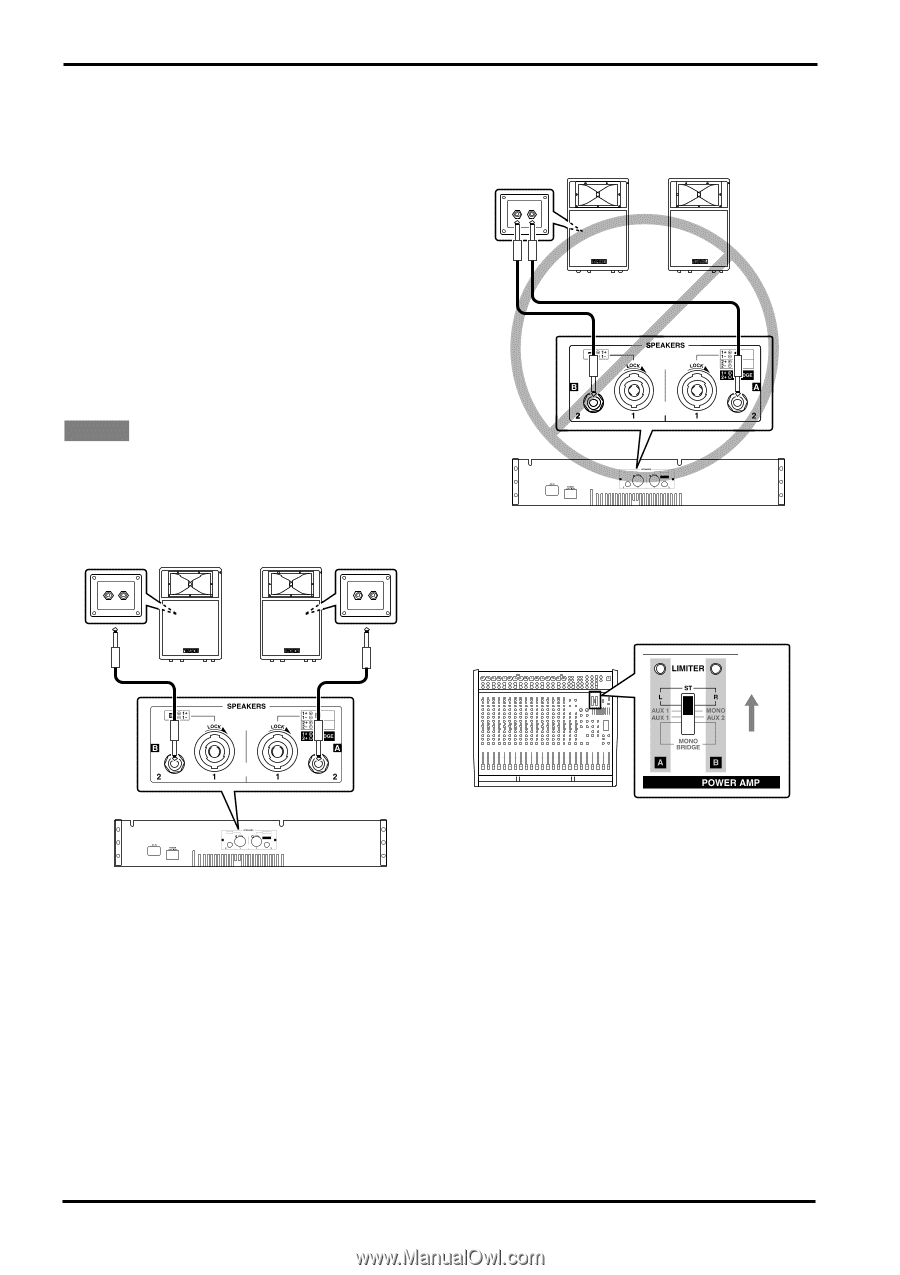
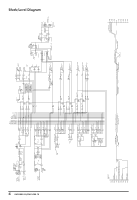
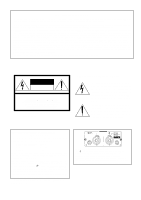
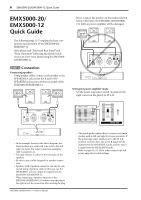
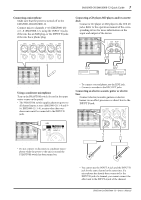
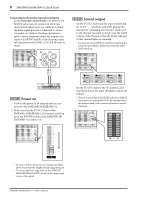
6 EMX5000-20/EMX5000-12 Quick Guide EMX5000-20/ EMX5000-12 Quick Guide The following steps (1-5) explain the basic connection and operation of the EMX5000-20/ EMX5000-12. Also, please read "Front and Rear Panel" and "Basic Operation" following this Quick Guide section to learn more about using the EMX500020/EMX5000-12. STEP 1 Connection Connecting speakers Using speaker cables, connect each speaker to the SPEAKERS A jack and to the B jack in the SPEAKERS jack section on the rear panel of the EMX5000-20/EMX5000-12. Never connect the speakers in the manner shown below. Otherwise, the EMX5000-20/EMX500012's built-in power amplifier will be damaged. EMX5000-20 (EMX5000-12) Setting the power amplifier mode Set the power amp select switch (located on the right corner on the panel) to ST L-R. EMX5000-20 (EMX5000-12) • In the example shown by the above diagram, two main speakers are connected (one each to left and right) in stereo. For other connection examples, refer to pages 20-21. • You may connect to either of the two jacks on the speakers. • Be sure to use a cable designed for speaker connection. • Speakers with a Speakon connector can also be connected using a Speakon cable. In this case, use the SPEAKERS 1 jacks to output the signal from the EMX5000-20/EMX5000-12. • When connecting a Speakon connector to the EMX5000-20/EMX5000-12, be sure to turn the plug to the right to lock the connection after inserting the plug. EMX5000-20/EMX5000-12-Owner's Manual EMX5000-20 (EMX5000-12) Power amp select switch • This quick guide explains how to connect one main speaker each to left and right for stereo operation. If the power amp select switch is set to the ST L-R position as shown here, the stereo R signal will be output from the SPEAKERS A jacks, and the stereo L signal from the SPEAKERS B jacks. Refer to pages 14, 19, 20 for other connections and power amp select switch settings.
-
 1
1 -
2
-
 3
3 -
 4
4 -
 5
5 -
 6
6 -
 7
7 -
 8
8 -
 9
9 -
 10
10 -
 11
11 -
 12
12 -
 13
13 -
14
-
15
-
16
-
17
-
18
-
19
-
20
-
21
-
22
-
23
-
24
-
25
-
26
-
27
-
28
-
29
-
30
-
31
-
32
-
33
-
34
-
35
-
36
-
37
-
38
 |
 |