Yamaha EZ-EG Owner's Manual
Yamaha EZ-EG Manual
 |
View all Yamaha EZ-EG manuals
Add to My Manuals
Save this manual to your list of manuals |
Yamaha EZ-EG manual content summary:
- Yamaha EZ-EG | Owner's Manual - Page 1
E Playing the Songs The EZ-EG features a range of internal songs that you can play along with. Song numbers 1 through 18 are pre-programmed into the EZ-EG. Additional songs can be downloaded from the internet using a computer and loaded into the EZ-EG for playback. Refer to the "Connecting to MIDI - Yamaha EZ-EG | Owner's Manual - Page 2
"Int". Problem: The EZ-EG is picking up noise. Check: Are you using the EZ-EG near a mobile phone? Try turning the mo- bile phone off or moving it further away from the EZ-EG. Specifications Strings Frets Displays Voices Play Modes Controls Songs 6 12 Numeric LED display, 6 x 12 fret LEDs 9 guitar
-
 1
1 -
 2
2
 |
 |
q
Frets
The EZ-EG frets glow red when pressed. When the PLAY MODE is set
to CHORD or BOTH, the appropriate frets will glow to indicate the frets
you should press.
• When the CAPO function is used an entire column of frets will glow at the
capo position.
w
Control Section
This section includes the controls for the EZ-EG’s many features and
functions (details in “
Control Section
”, below).
e
Strings
The strings can be played either with a pick or finger style. Strings that are
sounding can be muted by lightly touching the strings with the right hand
while touching the metal section on the back of the neck with the left hand.
r
Tremolo Arm
The tremolo arm can be used to raise or lower the pitch of strings that
are sounding. Lift the arm away from the body to raise the pitch, or lower
it toward the body to lower the pitch.
t
[VOLUME] Control
Adjusts the overall volume level. Rotate clockwise to increase the vol-
ume, or counterclockwise to decrease the volume.
y
[STANDBY/ON] Control
This is the EZ-EG power switch. Rotate to the ON position to turn the
power on, or to the STANDBY position to turn the power off.
q
VALUE [+]/[-] Buttons
These buttons are used to select sounds and songs as well as adjust
tempo, balance, and other parameters. Press the [+] button once to
increment the value by one, or press the [-] button once to decrement
the value by one. Holding either button causes continuous incrementing
or decrementing in the corresponding direction. Press both the [+] and
[-] buttons simultaneously to reset the initial default value for the
selected parameter.
w
Display
Displays the value of the parameter being edited, as well as the cur-
rently selected tempo.
e
[BALANCE] Button
Allows adjustment of the volume balance between the played sound and
the accompaniment song sound.
r
[TUNING] Button
Allows overall tuning of the EZ-EG in semitone increments, as well as
selection of one of the EZ-EG’s alternative tunings: in addition to stan-
dard guitar tuning the EZ-EG provides drop-D, open-D, open-G, and
open-E tunings.
t
[TEMPO] Button
Allows the song tempo to be set from
q
=32 through
q
=280.
y
[CAPO] Button
Allows the position of the EZ-EG’s “virtual capo” to be specified.
u
[SONG] Button
Allows any of the 18 internal songs to be selected for playback. In addi-
tion to the songs initially provided, songs downloaded from the internet
to a computer can be read into and stored in the EZ-EG.
i
[SOUND] Button
Allows selection of any of the EZ-EG’s 20 instrument sounds.
o
[DEMO] Button
Starts and stops song playback.
!
0
[STRUM], [CHORD], [BOTH] Buttons
Starts playback of the selected song using the corresponding playback
method.
q
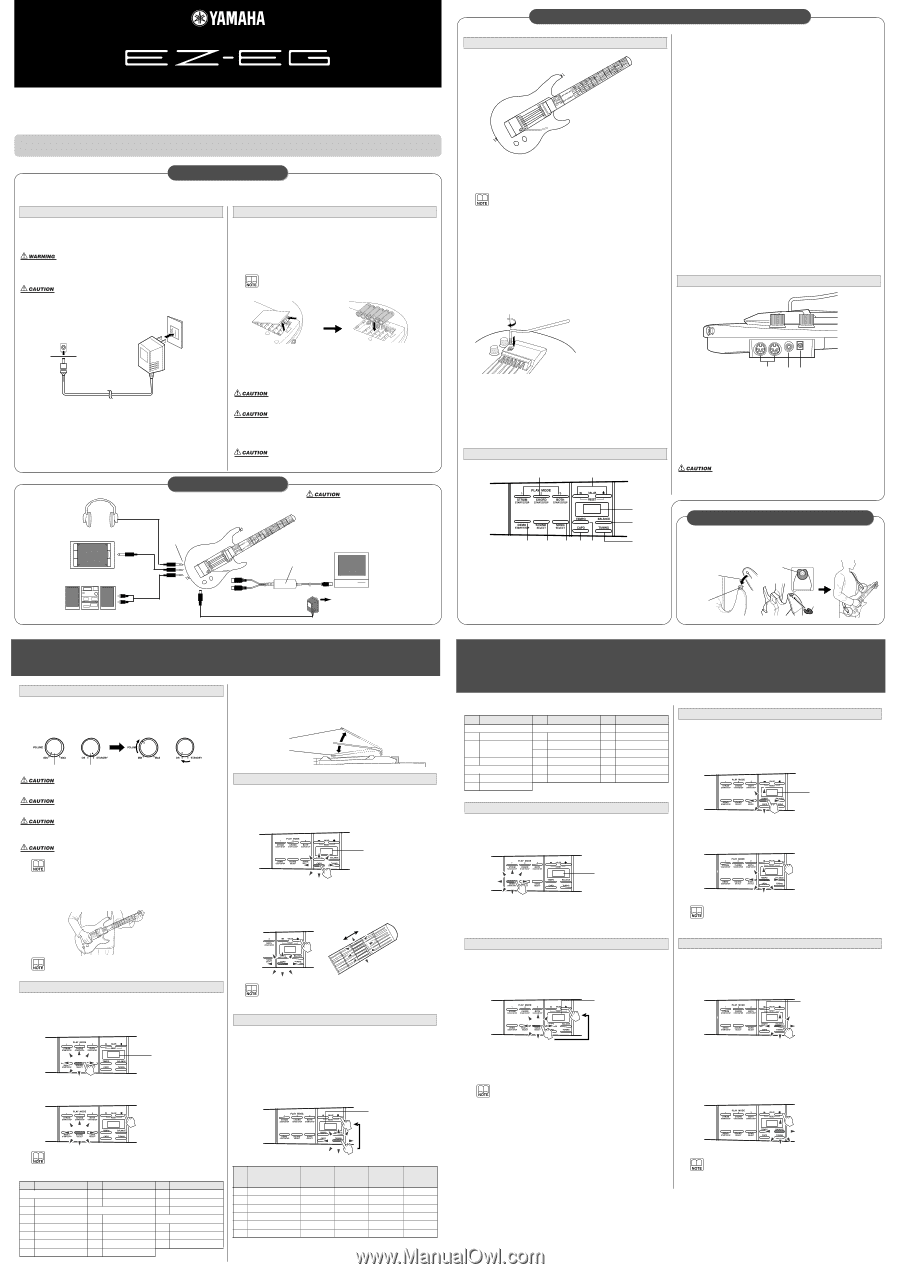
MIDI IN/MIDI OUT Connectors
These connectors can be used to connect the EZ-EG to other MIDI gear
or a computer using standard MIDI cables.
w
PHONES/OUTPUT Jack
This jack can be used to connect a pair of stereo headphones for private
practice or listening, or to connect the EZ-EG to an audio system, televi-
sion, or instrument amplifier.
e
DC IN 9V Jack
The supplied AC Power Adaptor (PA-D09) can be connected here.
• Make sure that power to all external devices is OFF when connect-
ing the EZ-EG to avoid possible electric shock and damage to the
equipment. Also, start with all volume controls turned down to mini-
mum to prevent possible damage to speakers and other playback
equipment.
After slipping the ends of the supplied strap over the strap pins on the
EZ-EG body, secure the strap by sliding a C-clip under the head of each
strap pin – between the strap and the head of the strap pin – as shown
in the illustration.
Body
Control Section
y
t
r
e
w
q
0
.
0
.
0
.
Attaching the Tremolo Arm
Screw the threaded end of the
tremolo arm clockwise into the
arm hole on the EZ-EG bridge.
Screw the arm in until it stops,
then rotate it back (counter-
clockwise) to a comfortable play-
ing position.
0
.
0
.
0
.
q
w
e
r
t
y
u
i
o
!
0
Connectors
e
w
q
Strap Pin
Attach securely
to ensure that
the strap does
not slip off.
C-clip
attached.
C-clip
EZ-EG
Headphones
Powered Speaker
Audio System,
Television, etc.
RCA Pin Plugs
PHONES/OUTPUT
Connector
Standard
Phone Plug
Stereo
Mini Plug
DC IN 9V
Connector
AC Power
Adaptor
To AC wall socket
MIDI OUT Connector
MIDI IN Connector
USB-MIDI Interface
USB
Connector
Computer
• Make sure that power to all external
devices is OFF when connecting the
EZ-EG to avoid possible electric
shock and damage to the equip-
ment. Also, start with all volume con-
trols turned down to minimum to
prevent possible damage to speak-
ers and other playback equipment.
Refer to
“
Connecting To a
Computer
”
on the other
side for connection
details.
Song List
1
Press the [DEMO] button.
Playback of the currently selected song will begin, then the remaining
songs will play back in sequence.
2
Press the [DEMO] button to stop playback.
1
Press [SONG] and select a song.
After pressing the
[SONG]
button, use the
[+]
and
[-]
buttons to select
the number of the song you want to play.
2
Press the [DEMO] button to start and stop playback.
• After pressing the [DEMO] button to start playback, the [+] and [-] buttons
can be used to select a specific song. All remaining songs will play back
in sequence following the selected song.
• If a play mode is selected – i.e. the [STRUM], [CHORD] or [BOTH] button
is pressed – the selected song will play repeatedly.
Songs loaded from a computer will be stored in memory numbers “F-1,
F-2, etc.”
following the pre-programmed song data (1 – 18), and can be
selected using the [+] and [-] buttons in the same way as the pre-pro-
grammed songs.
Playback tempo of the songs can be adjusted from
q
=32 through
q
=280
(quarter notes per minute). This can be handy to slow a song down for prac-
tice.
1
Press the [TEMPO] button.
2
Use the [+] and [-] buttons to set the tempo.
• Press the [+] and [-] buttons simultaneously to reset the default tempo of
the song.
By changing the volume of song playback, you can set the optimum balance
between the song and played sounds.
1
Press the [BALANCE] button
2
Use the [+] and [-] buttons to set the balance.
Adjust the song volume from 0 (minimum) through 127 (maximum) to
achieve the ideal balance with the played sound.
The initial default song volume setting is 64.
• Press the [+] and [-] buttons simultaneously to reset the default song vol-
ume.
No.
Title
No.
Title
No.
Title
FULL CHORUS
PATTERN
12
8 Beat Stroke-4
1
Day Tripper
6
West Coast
13
16 Beat Stroke
2
Take Me Home
Country Roads
7
Hillbilly
14
3 Finger-1
8
Mersey Beat
15
3 Finger-2
3
Stand By Me
9
8 Beat Stroke-1
16
Rock
’
n Roll Riff
INTRO
10
8 Beat Stroke-2
17
Bossa Nova
4
A Hard Days Night
11
8 Beat Stroke-3
18
Jazz
5
Michelle
Listen To the Songs and Play Along
Listen To a Specified Song and Play Along
.
1
The current song
number is shown on
the display.
7
The number of the
currently selected
song will appear on
the display.
Change the Song Tempo
Change the Balance
64
The current tempo
will appear on the
display.
130
80
The current balance
value appears on the
display.
96
1
Turn on the power & adjust the volume.
Rotate the
[STANDBY/ON]
switch to the ON position.
While playing the EZ-EG strings rotate the
[VOLUME]
control to set an
appropriate volume.
• Make sure that the [VOLUME] control is set to the MIN (minimum)
position when turning on the power. Also make sure that external
amplification gear is off when turning the EZ-EG power on.
• Avoid touching the tremolo arm while turning the power on. If the
tremolo arm is not in its neutral position while the power is turned on
the EZ-EG may not play at the correct pitch.
• A very small amount of power is used by the EZ-EG when the
[STANDBY/ON] switch is in the STANDBY position. Be sure to
remove the batteries or unplug the AC Power Adaptor if you will not
be using the EZ-EG for an extended period of time.
• Don’t force the STANDBY switch or VOLUME control past their
maximum “stop” positions.
• The “YAMAHA” name will scroll across the EZ-EG frets when the
power is turned on. You can stop this by simply pressing any fret.
2
Play chords.
Form a chord with your left hand (the frets you press will glow red), then
play the strings with your right hand.
• Strings that are sounding can be muted by lightly touching the strings
with the right hand while touching the metal section on the back of the
neck with the left hand.
The EZ-EG includes 20 different guitar, bass, and other instrument sounds.
Choose the sound that best suits the song you
’
re playing and your playing style.
1
Press the [SOUND] button.
2
Select a sound number.
Use the
[+]
and
[-]
buttons to select the sound you want to play.
• Press the [+] and [-] buttons simultaneously to instantly recall sound
number 1.
Sound List
●
Using the Tremolo Arm
By raising and lowering the tremolo arm you can raise and lower the pitch of
notes played. Pressing the arm toward the body lowers the pitch, while lifting
the arm away from the body raises the pitch. Use the tremolo arm to add
expressive bends to your playing.
The EZ-EG
’
s virtual capo functions in the same way as a normal guitar
capo,
“
stopping
”
the strings at the speci
fi
ed fret. Some guitar songbooks
include capo indications that can make setting this function easy.
1
Press the [CAPO] button.
2
Select the capo position (fret).
Use the
[+]
and
[-]
buttons to select the fret at which you want to posi-
tion the capo. You can select frets 1 through 10. All fret buttons at the
selected fret position will glow.
• The CAPO setting only applies to the played sound (not to the song play-
back sound).
• Some songs, however, do have a preset CAPO setting.
After pressing the
[TUNING]
button you can use the
[+]
and
[-]
buttons to
raise or lower the overall pitch of the EZ-EG in semitone steps up to one
octave. For example, a setting of
“
-1
”
lowers the pitch by one semitone; a
setting of
“
+4
”
raises the pitch by four semitones (an interval of a third); or a
setting of
“
-12
”
lowers the pitch by a full octave. This makes it easy to play
the EZ-EG in any key
–
to match the range of a singer, for example.
The EZ-EG also provides four alternative tunings which can be selected by
pressing the
[+]
button beyond the
“
+12
”
setting:
Drop D
,
Open D
,
Open G
,
and
Open E
.
Power On & Play
Selecting Different Sounds
No.
Sound
No.
Sound
No.
Sound
GUITAR
8
Overdrive Guitar
15
Synth Bass
1
Folk Guitar
9
Distortion Guitar
16
Hi-Q Bass
2
Classic Guitar
BASS
17
Dance Bass
3
12-string Guitar
10
Acoustic Bass
OTHERS
4
Jazz Guitar
11
Finger Bass
18
Banjo
5
Octave Guitar
12
Pick Bass
19
Shamisen
6
Clean Guitar
13
Fretless Bass
20
Piano
7
Mute Guitar
14
Slap Bass
[STANDBY/ON] Switch
[VOLUME] Control
1
The number of the cur-
rently selected sound
will appear on the dis-
play.
7
Using the CAPO Function
Tuning
Tuning
Display
Key Control
-12
-
0
-
12
Drop D
drd
Open D
oPd
Open G
oPG
Open E
oPE
1st
E
E
D
D
E
2nd
B
B
A
B
B
3rd
G
G
F
#
G
G
#
4th
D
D
D
D
E
5th
A
A
A
G
B
6th
E
D
D
D
E
Raise Pitch
Lower Pitch
C0
The current CAPO
position will appear
on the display.
C3
drd
The number of semi-
tones tuned or the type
of alternative tuning
selected will appear on
the display.
Owner’s Manual
q
Make sure that the EZ-EG power switch is set to the STANDBY position.
w
Plug the DC plug of the AC Adaptor into the DC IN 9V jack on the EZ-EG.
e
Plug the AC Adaptor into a convenient AC wall outlet.
• When powering the EZ-EG from the AC mains use only the supplied
PA-D09 AC Power Adaptor! The use of other adaptors can result in
overheating and damage, and can pose a fire hazard. Damage
caused by using an AC adaptor other than the one supplied with the
EZ-EG is not covered by the warranty.
• When you’re not using the EZ-EG, or when there is danger of a
lightning strike, be sure to unplug the AC adaptor from the AC
mains.
q
Place the EZ-EG face-down (string-side down) on a soft surface, and
remove the battery compartment cover.
w
Install six 1.5-volt
“
AA
”
size, R6P or equivalent batteries in the battery
compartment, making sure the polarities (i.e. the
“
+
”
and
“
-
”
ends of the
batteries) are arranged as shown in the diagram.
e
Close the battery compartment cover.
•
If batteries are installed and the AC power adapter is connected to the EZ-EG,
the AC power adaptor supplies power to the EZ-EG rather than the batteries.
•
Alkali type batteries are recommended for maximum battery life and performance.
It is a good idea to change the batteries before they run too low to
maintain proper operation. When the batteries run low the output vol-
ume of the EZ-EG will be reduced, the sound may become distorted,
and the displays may not light properly.
Please keep the following points in mind when changing batteries:
• Be sure to observe the +/- polarity markings, and install the batter-
ies with the proper orientation. Improper battery orientation can
result in overheating, fluid leakage, and possibly fire.
• Always replace all six batteries at the same time. Don’t mix old bat-
teries with new. All batteries must also be of the same type – never
mix alkaline and manganese batteries, batteries from different man-
ufacturers, or different types of batteries even if they are from the
same manufacturer. Doing so can result in overheating, fluid leak-
age, and possibly fire.
• Remove the batteries from the instrument if you won’t be using it for an
extended period of time. If the batteries are left installed they will gradually
run down, and may possibly leak fluid that can damage the instrument.
Using the AC Power Adaptor
AC Adaptor
PA-D09
(DC IN 9V )
Using Batteries
Thank you for choosing a Yamaha Easy Guitar (EZ-EG)! For maximum performance and enjoyment,
please read this owner
’
s manual carefully before using your EZ-EG. When you
’
re done reading the
manual, please store it in a safe place
–
along with the warranty card
–
for future reference.
Playing the EZ-EG
When you
’
re set up and ready, turn on the power and play!
Playing the Songs
The EZ-EG features a range of internal songs that you can play along with. Song numbers 1 through 18 are pre-programmed into
the EZ-EG. Additional songs can be downloaded from the internet using a computer and loaded into the EZ-EG for playback.
Refer to the
“
Connecting to MIDI Devices
”
section for details.
Easy Guitar
Power Supply
You can use either the supplied AC power adaptor or batteries to power your EZ-EG, but we recommend that you use the
AC adaptor whenever possible.
Connections
Attaching the Strap and C-Clip
●
Supplied Accessories
—
Please check to make sure that you have the following accessories:
•
Tremolo Arm
•
Strap
•
C-Clip x 2
•
Pick
•
AC Power Adaptor
•
USB-MIDI Interface UX16
•
Safety Precautions Document
•
EZ-EG Song Chord Chart, Warranty Card
Names Of the Parts, Controls, and Connectors