Yamaha HTR-4065 Owners Manual - Page 20
Connection Method 2 HDMI Control-compatible TV, devices and power cable of the unit, turn on the unit - connections
 |
View all Yamaha HTR-4065 manuals
Add to My Manuals
Save this manual to your list of manuals |
Page 20 highlights
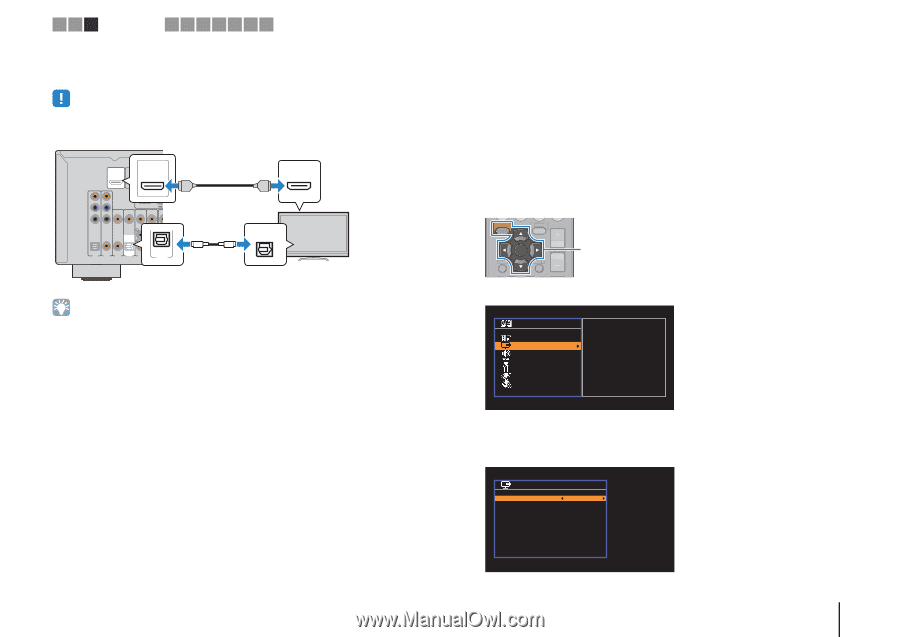
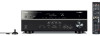
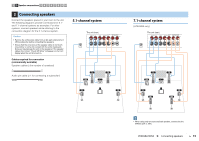
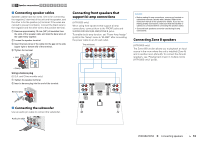
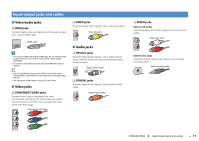
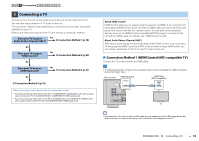
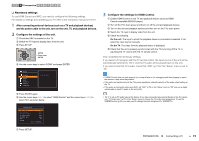
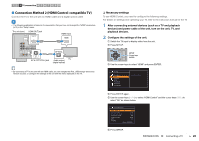
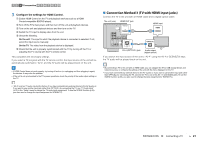
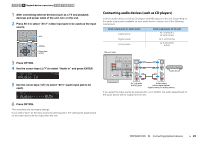
1 2 3 TV connection 4 5 6 7 8 9 10 ■ Connection Method 2 (HDMI Control-compatible TV) Connect the TV to the unit with an HDMI cable and a digital optical cable. • The following explanation is based on the assumption that you have not changed the "HDMI" parameters (p.72) in the "Setup" menu. The unit (rear) HDMI OUT jack HDMI OUT ARC HDMI 1 (BD/DVD) HDMI OUT HDMI 2 ARC ANTENNA AM FM PR HDMI HDMI input HDMI HDMI PB Y COMPONENT VIDEO VIDEO OPTICAL AV 1 COAXIAL AV 2 COAXIAL AV 3 OPTICAL ( TV ) AV 4 AV 5 OPTICAL AV 6 (TOVA) AV 4 OPTICAL O O AV 4 (OPTICAL) jack Audio output (digital optical) TV • By connecting a TV to the unit with an HDMI cable, you can navigate the iPod, USB storage device and network sources, or configure the settings of the unit with the menu displayed on the TV. ❑ Necessary settings To use HDMI Control, you need to configure the following settings. For details on settings and operating your TV, refer to the instruction manual for the TV. 1 After connecting external devices (such as a TV and playback devices) and power cable of the unit, turn on the unit, TV, and playback devices. 2 Configure the settings of the unit. a Switch the TV input to display video from the unit. b Press SETUP. SETUP OPTION ENTER VOLUME RETURN DISPLAY SETUP Cursor keys ENTER TOP POP UP c Use the cursor keys to select "HDMI" and press ENTER. Setup Speaker HDMI Sound ECO Function Network Language Configuration d Press ENTER again. e Use the cursor keys (q/w) to select "HDMI Control" and the cursor keys (e/r) to select "On" as shown below. Configuration HDMI Control On Audio Output Auto Standby Through Auto TV Audio Input AV4 Standby Sync Auto ARC On SCENE Back: RETURN f Press SETUP. PREPARATIONS ➤ Connecting a TV En 20
-
 1
1 -
2
-
3
-
4
-
5
-
6
-
7
-
8
-
9
-
10
-
11
-
12
-
13
-
14
-
 15
15 -
 16
16 -
 17
17 -
 18
18 -
 19
19 -
 20
20 -
 21
21 -
 22
22 -
 23
23 -
 24
24 -
 25
25 -
26
-
27
-
28
-
29
-
30
-
31
-
32
-
33
-
34
-
35
-
36
-
37
-
38
-
39
-
40
-
41
-
42
-
43
-
44
-
45
-
46
-
47
-
48
-
49
-
50
-
51
-
52
-
53
-
54
-
55
-
56
-
57
-
58
-
59
-
60
-
61
-
62
-
63
-
64
-
65
-
66
-
67
-
68
-
69
-
70
-
71
-
72
-
73
-
74
-
75
-
76
-
77
-
78
-
79
-
80
-
81
-
82
-
83
-
84
-
85
-
86
-
87
-
88
-
89
-
90
-
91
-
92
-
93
-
94
-
95
-
96
-
97
-
98
-
99
-
100
-
101
-
102
-
103
-
104
-
105
-
106
-
107
-
108
-
109
-
110
-
111
-
112
-
113
-
114
-
115
-
116
-
117
-
118
-
119
-
120
-
121
-
122
-
123
-
124
 |
 |