Yamaha HTR-4065 Owners Manual - Page 31
select Start and press SETUP., Disconnect the YPAO microphone from the unit. - problems
 |
View all Yamaha HTR-4065 manuals
Add to My Manuals
Save this manual to your list of manuals |
Page 31 highlights
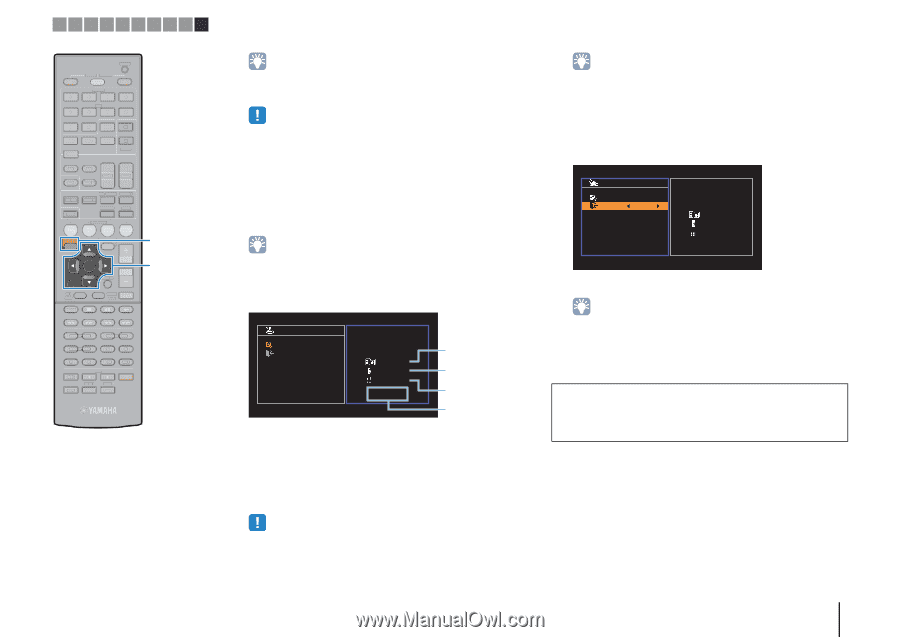
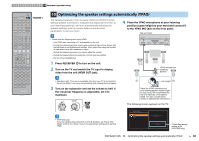
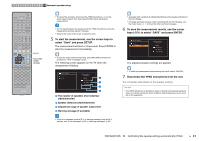
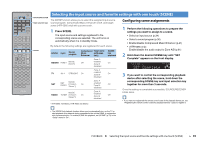
1 2 3 4 5 6 7 8 9 10 Automatic speaker setup CODE SET SOURCE RECEIVER HDMI 1 2 3 4 AV 1 2 3 4 5 6 AUDIO A V-AUX USB TUNER NET B ZONE FM AM PRESET TUNING INFO MEMORY MOVIE SLEEP BD DVD SUR. DECODE STRAIGHT MUSIC ENHANCER DIRECT SCENE TV NET RADIO SETUP OPTION SETUP ENTER VOLUME RETURN DISPLAY TOP MENU MODE POP-UP MUTE MENU Cursor keys ENTER RETURN 1 2 3 4 5 6 7 8 9 INPUT MUTE 0 10 TV TV VOL TV CH ENT • To cancel the operation, disconnect the YPAO microphone, or use the cursor keys to select "Exit" and press ENTER, before starting the measurement. • Do not stand between the speakers and the YPAO microphone during the measurement process (about 3 minutes). • Move to the corner of the room or leave the room. 5 To start the measurement, use the cursor keys to select "Start" and press SETUP. The measurement will start in 10 seconds. Press ENTER to start the measurement immediately. • To stop the measurement temporarily, press RETURN and follow the procedure in "Error messages" (p.32). The following screen appears on the TV when the measurement finishes. Auto Setup Start Exit Measurement Finished Result 3 / 2 / 0.1 ch 3.0 / 10.5 m -3.0 / +10.0 dB 1 2 3 4 1 The number of speakers (front side/rear side/subwoofer) 2 Speaker distance (nearest/farthest) 3 Adjustment range of speaker output level 4 Warning message (if available) • A speaker with a problem is indicated by blinking of the speaker indicators in the front display. • If multiple warnings are given (when operating with the front display), use the cursor keys (q/w) to check the other warning messages. 6 To save the measurement results, use the cursor keys (e/r) to select "SAVE" and press ENTER. Auto Setup Start Exit SAVE Measurement Finished Result 3 / 2 / 0.1 ch 3.0 / 10.5 m -3.0 / +10.0 dB The adjusted speaker settings are applied. • To finish the measurement without saving the result, select "CANCEL". 7 Disconnect the YPAO microphone from the unit. This completes optimization of the speaker settings. Caution • The YPAO microphone is sensitive to heat, so should not be placed anywhere where it could be exposed to direct sunlight or high temperatures (such as on top of AV equipment). • If any error message (such as E-1) or warning message (such as W-1) appears, see "Error messages" (p.32) or "Warning messages" (p.33). PREPARATIONS ➤ Optimizing the speaker settings automatically (YPAO) En 31
-
 1
1 -
2
-
3
-
4
-
5
-
6
-
7
-
8
-
9
-
10
-
11
-
12
-
13
-
14
-
15
-
16
-
17
-
18
-
19
-
20
-
21
-
22
-
23
-
24
-
25
-
 26
26 -
 27
27 -
 28
28 -
 29
29 -
 30
30 -
 31
31 -
 32
32 -
 33
33 -
 34
34 -
 35
35 -
 36
36 -
37
-
38
-
39
-
40
-
41
-
42
-
43
-
44
-
45
-
46
-
47
-
48
-
49
-
50
-
51
-
52
-
53
-
54
-
55
-
56
-
57
-
58
-
59
-
60
-
61
-
62
-
63
-
64
-
65
-
66
-
67
-
68
-
69
-
70
-
71
-
72
-
73
-
74
-
75
-
76
-
77
-
78
-
79
-
80
-
81
-
82
-
83
-
84
-
85
-
86
-
87
-
88
-
89
-
90
-
91
-
92
-
93
-
94
-
95
-
96
-
97
-
98
-
99
-
100
-
101
-
102
-
103
-
104
-
105
-
106
-
107
-
108
-
109
-
110
-
111
-
112
-
113
-
114
-
115
-
116
-
117
-
118
-
119
-
120
-
121
-
122
-
123
-
124
 |
 |