Yamaha HTR-5280 Owner's Manual - Page 44
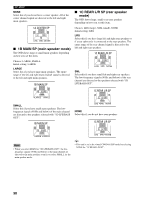
L/R BALANCE balance of the, left and right main speakers, HP TONE CTRL headphone tone, control
 |
UPC - 072874307073
View all Yamaha HTR-5280 manuals
Add to My Manuals
Save this manual to your list of manuals |
Page 44 highlights
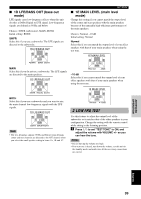
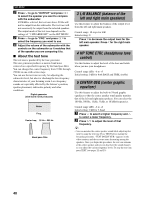
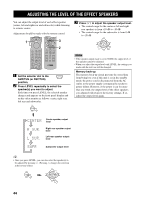
SET MENU 2 Press d to go to "OUTPUT" and press j / i to select the speaker you want to compare with the subwoofer. If SWFR is selected, the test tone above 90 Hz will not be output from the subwoofer. The test tone will not necessarily be output from the selected speakers. The output mode of the test tone depends on the settings of "1 SPEAKER SET" on the SET MENU. 3 Press d to go to "FRQ" and press j / i to select the frequency you want to use. 4 Adjust the volume of the subwoofer with the controls on the subwoofer so it matches that of the speaker you are comparing it to. I About the test tone The test tone is produced by the tone generator. The tone generator produces a narrow-band noise centered on a specified frequency by the band pass filter. You can change this center frequency from 35 Hz through 250 Hz in one-sixth octave steps. You can use the test tone not only for adjusting the subwoofer level, but also for checking the low-frequency characteristics of your listening room. Low-frequency sounds are especially affected by the listener's position, speaker placement, subwoofer polarity and other conditions. Digital generator (wide band noise produced) Noise Freq. Center freq. 35 Hz - 250 Hz Band pass filter 3 L/R BALANCE (balance of the left and right main speakers) Use this feature to adjust the balance of the output level from the left and right main speakers. Control range: 10 steps for L/R Initial setting: 0 Press i to decrease the output level for the left main speaker. Press j for the right main speaker. 4 HP TONE CTRL (headphone tone control) Use this feature to adjust the level of the bass and treble when you use your headphones. Control range (dB): -6 to +3 Initial setting: 0 dB for both BASS and TRBL (treble) 5 CENTER GEQ (center graphic equalizer) Use this feature to adjust the built-in 5-band graphic equalizer so that the center speaker tonal quality matches that of the left and right main speakers. You can select the 100 Hz, 300 Hz, 1 kHz, 3 kHz, or 10 kHz frequencies. Control range (dB): -6 to +6 Initial setting: 0 dB for 5-band 1 Press d to select a higher frequency and u to select a lower frequency. 2 Press j / i to adjust the level of that frequency. y • You can monitor the center speaker sound while adjusting this item by using the test tone. Press TEST before starting the foregoing procedure. "TEST DOLBY SUR." appears on the video monitor, and the test tone starts alternating among the speakers. Once you begin this procedure, the test tone remains at the center speaker and you can hear how the sound changes as you adjust the various frequency levels. To stop the test tone, press TEST (see pages 22 and 23). 40
-
 1
1 -
2
-
3
-
4
-
5
-
6
-
7
-
8
-
9
-
10
-
11
-
12
-
13
-
14
-
15
-
16
-
17
-
18
-
19
-
20
-
21
-
22
-
23
-
24
-
25
-
26
-
27
-
28
-
29
-
30
-
31
-
32
-
33
-
34
-
35
-
36
-
37
-
38
-
 39
39 -
 40
40 -
 41
41 -
 42
42 -
 43
43 -
 44
44 -
 45
45 -
 46
46 -
 47
47 -
 48
48 -
 49
49 -
50
-
51
-
52
-
53
-
54
-
55
-
56
-
57
-
58
-
59
-
60
-
61
-
62
-
63
-
64
-
65
-
66
-
67
-
68
-
69
-
70
-
71
-
72
-
73
-
74
-
75
-
76
-
77
-
78
 |
 |